

Vault is a secrets management platform that provides encrypted storage for long lived secrets, identity brokerage using ephemeral credentials, and encryption as a service. Unless you’re using HashiCorp Cloud Platform to host Vault (which is always recommended if you can support it), deploying and running Vault clusters will likely be a manual process. Any time a server needs to be restarted, an engineer would need to login and restart the service.
This is what orchestrators like HashiCorp Nomad and Kubernetes were built to automate. While Kubernetes has a wide array of components to manage additional use cases, Nomad is mainly focused on scheduling and cluster management. It’s simple to run, lightweight, and supports running VMs, containers, raw executables, JAR files, Qemu workloads, and more with custom task driver plugins. By running Vault as a Nomad job (Nomad’s term for workloads), operators can manage and schedule Vault servers with a low-complexity architecture.
This post shows how to deploy and configure Vault servers on Nomad using HCP Terraform. The secrets consumption will be done using the Nomad and Vault CLI’s, respectively, to show the underlying workflows. The Terraform code will be split in two, with separate configuration for the infrastructure and the Vault deployment. This is done to manage the states for these workspaces separately and share dependency outputs between them.
Full list of the series:
- Running Vault on Nomad, Part 1
- Running Vault on Nomad, Part 2
- Running Vault on Nomad, Part 3
»Deployment architecture
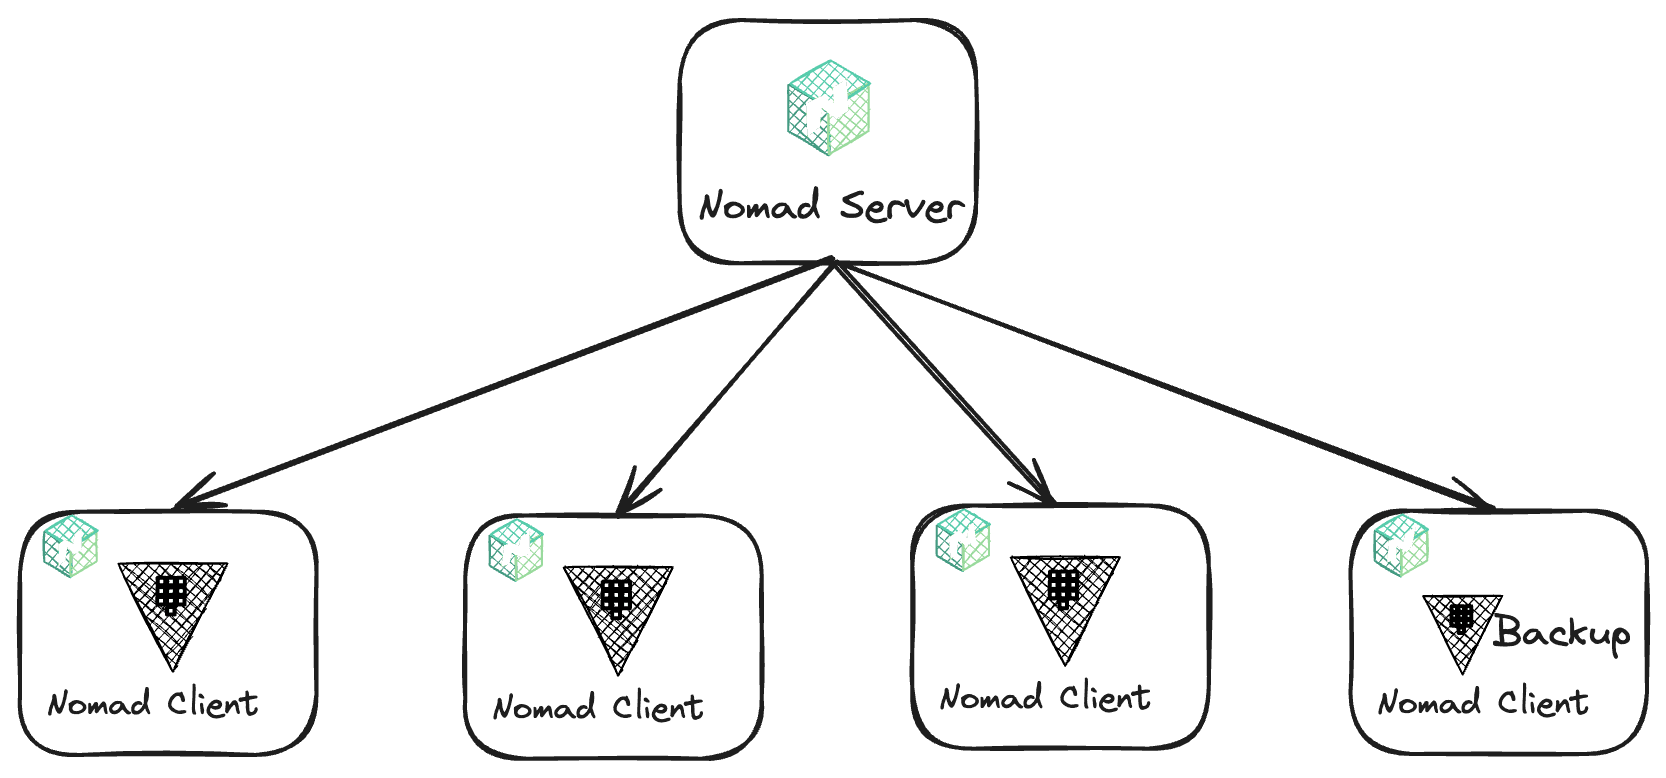
This deployment architecture requires five virtual machines (VMs) — one is the Nomad server, and the other four are the Nomad clients that run the Vault servers, including a backup server for Vault. These VMs will be deployed to Amazon EC2 instances. The VMs will all live in the same virtual private cloud (VPC) subnet.
»HCP Terraform and directory setup
Because this approach splits the architecture into multiple workspaces, you need to configure remote backends for each HCP Terraform workspace so that output dependencies can be shared between them. To create these workspaces, create a directory structure that contains a folder for each workspace. The directory structure should look like this:
├── 1-nomad-infrastructure
├── 2-nomad-configuration
├── 3-nomad-example-job-deployment

3 directories
The remote backend is HCP Terraform. To create the remote backends, create a file called backend.tf in each of the directories. Here is a shell script that will create the directory structure and write the relevant backend.tf files in all of the directories.
»Networking for the Nomad cluster
To create the infrastructure for Nomad, navigate to the 1-nomad-infrastructure directory. First, set up your AWS Terraform provider. Here is the provider.tf code.
Once the provider is configured, you’re ready to deploy a VPC and a subnet. To do this, there is another file in the same directory, called network.tf, which contains the code below:
network.tf
module "vpc" {
  source = "terraform-aws-modules/vpc/aws"

  name = "my-vpc"
  cidr = "10.0.0.0/16"

  azs             = ["eu-west-1a"]
  private_subnets = ["10.0.1.0/24", "10.0.2.0/24", "10.0.3.0/24"]
  public_subnets  = ["10.0.101.0/24", "10.0.102.0/24", "10.0.103.0/24"]

  enable_nat_gateway = true
  enable_vpn_gateway = false
  enable_dns_support = true
  enable_dns_hostnames = true

  tags = {
    Terraform = "true"
    Environment = "dev"
  }
}
This code deploys all the resources required for a fully functional network, including resources for a working AWS VPC, associated subnets, and NAT gateways. It uses the community Terraform module called the AWS VPC Terraform module, available on the Terraform Registry.
»Configuration of Nomad servers
Before you can write the Terraform code to deploy the five VMs, you need to write some shell scripts to configure the servers during their deployment as a prerequisite. The first is for the Nomad server called nomad-server.sh:
#! /bin/bash -e

# Install Nomad
sudo apt-get update && \
  sudo apt-get install wget gpg coreutils -y

wget -O- https://apt.releases.hashicorp.com/gpg | sudo gpg --dearmor -o /usr/share/keyrings/hashicorp-archive-keyring.gpg
echo "deb [signed-by=/usr/share/keyrings/hashicorp-archive-keyring.gpg] https://apt.releases.hashicorp.com $(lsb_release -cs) main" | sudo tee /etc/apt/sources.list.d/hashicorp.list
sudo apt-get update && sudo apt-get install nomad -y

# Create Nomad directory.
mkdir -p /etc/nomad.d


# Nomad configuration files
cat <<EOF > /etc/nomad.d/nomad.hcl
log_level = "DEBUG"
data_dir = "/etc/nomad.d/data"

server {
  enabled = true
  bootstrap_expect = ${NOMAD_SERVER_COUNT}
  server_join {
    retry_join = ["provider=aws tag_value=${NOMAD_SERVER_TAG} tag_key=${NOMAD_SERVER_TAG_KEY}"]
  }
}


autopilot {
    cleanup_dead_servers      = true
    last_contact_threshold    = "200ms"
    max_trailing_logs         = 250
    server_stabilization_time = "10s"
    enable_redundancy_zones   = false
    disable_upgrade_migration = false
    enable_custom_upgrades    = false
}


EOF

 cat <<EOF > /etc/nomad.d/acl.hcl
 acl = {
   enabled = true
 }
EOF

systemctl enable nomad
systemctl restart nomad
This script does a number of things to configure the Nomad server:
- Installs the Nomad binary.
- Creates the Nomad directory that contains everything it needs to function.
- Creates a Nomad configuration file for the server and places it in the Nomad directory created in step 2.
- This configuration uses a feature called cloud auto-join that looks for pre-specified tags on the VM and automatically joins any VMs with these tags to a Nomad cluster.
- Enables access control lists (ACLs) for Nomad.
- Starts the Nomad service.
This script runs on the Nomad server VM when deployed using cloud-init. Notice the script contains three variables for cloud auto-join: ${NOMAD_SERVER_COUNT}, ${NOMAD_SERVER_TAG_KEY}, and ${NOMAD_SERVER_TAG}. The values of these variables will be rendered by Terraform.
To deploy this VM and run this script, use the file named compute.tf, which is in the directory mentioned above:
compute.tf
data "aws_ami" "ubuntu" {
  most_recent = true

  filter {
    name   = "name"
    values = ["ubuntu/images/hvm-ssd/ubuntu-focal-20.04-amd64-server-*"]
  }

  filter {
    name   = "virtualization-type"
    values = ["hvm"]
  }

  owners = ["099720109477"] # Canonical
}
The code above uses a data source to locate the Amazon Machine Image (AMI) used to deploy the VM instance.
The code below creates a security group attached to the VM, allowing SSH access to it on port 22:
compute.tf
resource "aws_security_group" "ssh" {
  vpc_id = module.vpc.vpc_id
  name   = "allow_ssh"

  ingress {
    from_port = 22
    protocol  = "tcp"
    to_port   = 22

    cidr_blocks = [
      "0.0.0.0/0"
    ]
  }

  tags = {
    Name = "allow_ssh"
  }
}
The following code creates another security group that allows access to Nomad’s default port, which is port 4646. This is attached to the Nomad server VM:
compute.tf
resource "aws_security_group" "nomad" {
  vpc_id = module.vpc.vpc_id
  name   = "nomad_port"

  ingress {
    from_port = 4646
    protocol  = "tcp"
    to_port   = 4648

    cidr_blocks = [
      "0.0.0.0/0"
    ]
  }

  tags = {
    Name = "nomad"
  }
}
The next piece of code creates a security group to allow egress connections outside of the network:
compute.tf
resource "aws_security_group" "egress" {
  vpc_id = module.vpc.vpc_id
  name   = "egress"

  egress {
    from_port = 0
    protocol  = "-1"
    to_port   = 0

    cidr_blocks = [
      "0.0.0.0/0"
    ]
  }

  tags = {
    Name = "egress"
  }
}
The code below creates the final security group of this walkthrough that allows access to Vault on its default port of 8200. This will be attached to the Nomad clients that will run Vault:
compute.tf
resource "aws_security_group" "vault" {
  vpc_id = module.vpc.vpc_id
  name   = "vault"

  ingress {
    from_port = 8200
    protocol  = "tcp"
    to_port   = 8201

    cidr_blocks = [
      "0.0.0.0/0"
    ]
  }

  tags = {
    Name = "vault"
  }
}
The code below creates an IP address for the Nomad server in the first resource and associates it with the Nomad server VM in the second. Terraform will not perform the association until the Nomad server VM has been deployed. The IP address is deployed first because it is used in the Nomad config file that is deployed as part of the VM provisioning to enable the OIDC discovery URL on the Nomad server.
compute.tf
resource "aws_eip" "nomad_server" {
  tags = {
    Name = "Nomad Server"
  }
}

resource "aws_eip_association" "nomad_server" {
  instance_id   = aws_instance.nomad_servers.id
  allocation_id = aws_eip.nomad_server.id
}
The other prerequisite for deploying the VM for the Nomad server is an SSH key pair, which enables authentication to the VM when connecting via SSH:
compute.tf
resource "aws_key_pair" "deployer" {
  key_name   = "deployer-key"
  public_key = file(var.ssh_key)
}
The code below deploys the VM for the Nomad server:
compute.tf
resource "aws_instance" "nomad_servers" {
  ami           = data.aws_ami.ubuntu.id
  instance_type = "t3.micro"
  subnet_id     = module.vpc.public_subnets.0
  key_name      = aws_key_pair.deployer.key_name


  user_data = templatefile("./servers.sh", {
    NOMAD_SERVER_TAG     = "true"
    NOMAD_SERVER_TAG_KEY = "nomad_server"
    NOMAD_SERVER_COUNT   = 1
    NOMAD_ADDR           = aws_eip.nomad_server.public_ip
  })

  vpc_security_group_ids = [
    aws_security_group.ssh.id,
    aws_security_group.egress.id,
    aws_security_group.nomad.id
  ]

  lifecycle {
    ignore_changes = [
      user_data,
      ami
    ]
  }

  tags = {
    Name         = "Nomad Server"
    nomad_server = true
  }
}
Some points to note about this code:
- This resource uses
cloud-initto deploy the script to the VM that installs the dependent packages and configure the server for Nomad.- The script is rendered using the
templatefilefunction and populates the variable values in the script template with the values specified in the above resource:-
NOMAD_SERVER_TAG: for cloud auto-join -
NOMAD_SERVER_TAG_KEY: for cloud auto-join -
NOMAD_SERVER_COUNT: to specify how many servers Nomad expects to join the cluster -
NOMAD_ADDR: to configure Nomad’s OIDC discovery URL
-
- The script is rendered using the
- The data source used to obtain the AMI will always fetch the latest version. This means the VM could be deployed more if desired. The lifecycle block ignores changes specifically related to the AMI ID.
- It associates the security groups created above to the VM.
- It also adds the SSH key pair to the VM to aid in SSH authentication. This is useful for troubleshooting.
»Configuring Nomad clients for the Vault servers
To deploy the Nomad clients for Vault, you take a similar approach to deploying the server. The main difference is the cloud-init script and the number of servers deployed. The script below (client.sh) is used to configure each Nomad client:
#! /bin/bash -e

# Install the CNI Plugins
curl -L https://github.com/containernetworking/plugins/releases/download/v0.9.1/cni-plugins-linux-amd64-v0.9.1.tgz -o /tmp/cni.tgz
mkdir -p /opt/cni/bin
tar -C /opt/cni/bin -xzf /tmp/cni.tgz

# Install Nomad
sudo apt-get update && \
  sudo apt-get install wget gpg coreutils -y

wget -O- https://apt.releases.hashicorp.com/gpg | sudo gpg --dearmor -o /usr/share/keyrings/hashicorp-archive-keyring.gpg
echo "deb [signed-by=/usr/share/keyrings/hashicorp-archive-keyring.gpg] https://apt.releases.hashicorp.com $(lsb_release -cs) main" | sudo tee /etc/apt/sources.list.d/hashicorp.list
sudo apt-get update && sudo apt-get install nomad -y

# Create Nomad directory.
mkdir -p /etc/nomad.d

# Create Vault directory.
mkdir -p /etc/vault.d


# Add Docker's official GPG key:
sudo apt-get update
sudo apt-get install ca-certificates curl -y
sudo install -m 0755 -d /etc/apt/keyrings
sudo curl -fsSL https://download.docker.com/linux/ubuntu/gpg -o /etc/apt/keyrings/docker.asc
sudo chmod a+r /etc/apt/keyrings/docker.asc

# Add the repository to Apt sources:
echo \
  "deb [arch=$(dpkg --print-architecture) signed-by=/etc/apt/keyrings/docker.asc] https://download.docker.com/linux/ubuntu \
  $(. /etc/os-release && echo "$VERSION_CODENAME") stable" | \
  sudo tee /etc/apt/sources.list.d/docker.list > /dev/null
sudo apt-get update

# Install Docker
sudo apt-get install docker-ce docker-ce-cli containerd.io docker-buildx-plugin docker-compose-plugin -y

# Install Java
sudo apt install default-jre -y

# Nomad configuration files
cat <<EOF > /etc/nomad.d/nomad.hcl
log_level = "DEBUG"
data_dir = "/etc/nomad.d/data"

client {
  enabled    = true
  node_pool  = "vault-servers"
  node_class = "vault-servers"

  server_join {
    retry_join = ["${NOMAD_SERVERS_ADDR}"]
  }

  host_volume "/etc/vault.d" {
    path      = "/etc/vault.d"
    read_only = false
  }

}

plugin "docker" {
  config {
    allow_privileged = true
  }
}

autopilot {
    cleanup_dead_servers      = true
    last_contact_threshold    = "200ms"
    max_trailing_logs         = 250
    server_stabilization_time = "10s"
    enable_redundancy_zones   = false
    disable_upgrade_migration = false
    enable_custom_upgrades    = false
}


EOF

 cat <<EOF > /etc/nomad.d/acl.hcl
 acl = {
   enabled = true
 }
EOF

systemctl enable nomad
systemctl restart nomad
The script above is similar to that of the Nomad server. One key difference is the Nomad client configuration file, which includes the following configuration items:
- Node pool: This Nomad feature can group pieces of compute infrastructure together. In this case, you want dedicated servers to run your Vault cluster to reduce the security blast radius. Grouping these servers lets you specify what node pool the Vault servers should run on and create policies around this to prevent other Nomad jobs from being deployed to these client nodes.
- Host volume: Vault can store encrypted secrets that other authorized Nomad jobs can retrieve. This means that Vault is a stateful workload that requires persistent storage. Host volumes expose a volume on the VM to Nomad and lets you mount the volume to a Nomad job. This means that if a job is restarted, it can still access its data.
- Docker plugin: The Docker plugin is enabled because Vault will be run in a container as a Nomad job. This has the potential to ease the upgrade paths by simply changing the tag on the image used.
Before deploying the Nomad clients, you need to perform a quick health check on the Nomad server to ensure it is available for clients to join it. To check this, use TerraCurl to make an API call to the Nomad server to check its status:
resource "terracurl_request" "nomad_status" {
  method         = "GET"
  name           = "nomad_status"
  response_codes = [200]
  url            = "http://${aws_eip.nomad_server.public_ip}:4646/v1/status/leader"
  max_retry = 4
  retry_interval = 10

  depends_on = [
    aws_instance.nomad_servers,
    aws_eip_association.nomad_server
  ]
}
This checks that Nomad has an elected leader in the cluster and expects a 200 response. If it does not get the desired response, TerraCurl will retry every 10 seconds for a maximum of 4 retries. This prevents potential race conditions between the Nomad server and the clients’ provisioning.
Now you’re ready to deploy the Nomad client VMs. This is similar to the server deployed before, with a few key differences:
- Vault requires more compute power so the instance type is bigger.
- It uses the
countfeature because you need three Vault nodes. - The script rendered by the
templatefilefunction needs only one variable value this time (the Nomad server address).
resource "aws_instance" "nomad_clients" {
  count                       = 3
  ami                         = data.aws_ami.ubuntu.id
  instance_type               = "t3.medium"
  subnet_id                   = module.vpc.public_subnets.0
  key_name                    = aws_key_pair.deployer.key_name
  associate_public_ip_address = true

  user_data = templatefile("./clients.sh", {
    NOMAD_SERVERS_ADDR = "${aws_instance.nomad_servers.private_ip}"
  })

  vpc_security_group_ids = [
    aws_security_group.ssh.id,
    aws_security_group.egress.id,
    aws_security_group.nomad.id,
    aws_security_group.vault.id
  ]

  tags = {
    Name         = "Vault on Nomad Client ${count.index + 1}"
    nomad_server = false
  }

  lifecycle {
    ignore_changes = [
      user_data,
      ami
    ]
  }

  depends_on = [
    terracurl_request.nomad_status
  ]

}
»Configuration of the Nomad client for the Vault backup server
The next piece of infrastructure to deploy is the VM used as the Vault backup server. The server makes backups of the Vault cluster. It’s best practice to store backups away from the Vault cluster, so create a separate node pool for the backup server. Run the vault-backup-server.sh script below, which is located in the same directory you’ve been working in so far:
#! /bin/bash -e

# Install the CNI Plugins
curl -L https://github.com/containernetworking/plugins/releases/download/v0.9.1/cni-plugins-linux-amd64-v0.9.1.tgz -o /tmp/cni.tgz
mkdir -p /opt/cni/bin
tar -C /opt/cni/bin -xzf /tmp/cni.tgz

# Install Nomad
sudo apt-get update && \
  sudo apt-get install wget gpg coreutils -y

wget -O- https://apt.releases.hashicorp.com/gpg | sudo gpg --dearmor -o /usr/share/keyrings/hashicorp-archive-keyring.gpg
echo "deb [signed-by=/usr/share/keyrings/hashicorp-archive-keyring.gpg] https://apt.releases.hashicorp.com $(lsb_release -cs) main" | sudo tee /etc/apt/sources.list.d/hashicorp.list
sudo apt-get update && sudo apt-get install nomad -y

# Create Nomad directory.
mkdir -p /etc/nomad.d

# Install Vault
sudo apt-get install vault -y

# Create Vault directory.
mkdir -p /etc/vault.d


# Add Docker's official GPG key:
sudo apt-get update
sudo apt-get install ca-certificates curl -y
sudo install -m 0755 -d /etc/apt/keyrings
sudo curl -fsSL https://download.docker.com/linux/ubuntu/gpg -o /etc/apt/keyrings/docker.asc
sudo chmod a+r /etc/apt/keyrings/docker.asc

# Add the repository to Apt sources:
echo \
  "deb [arch=$(dpkg --print-architecture) signed-by=/etc/apt/keyrings/docker.asc] https://download.docker.com/linux/ubuntu \
  $(. /etc/os-release && echo "$VERSION_CODENAME") stable" | \
  sudo tee /etc/apt/sources.list.d/docker.list > /dev/null
sudo apt-get update

# Install Docker
sudo apt-get install docker-ce docker-ce-cli containerd.io docker-buildx-plugin docker-compose-plugin -y

# Install Java
sudo apt install default-jre -y

# Nomad configuration files
cat <<EOF > /etc/nomad.d/nomad.hcl
log_level = "DEBUG"
data_dir = "/etc/nomad.d/data"

client {
  enabled    = true
  node_pool  = "vault-backup"
  node_class = "vault-backup"

  server_join {
    retry_join = ["${NOMAD_SERVERS_ADDR}"]
  }

  host_volume "vault_vol" {
    path      = "/etc/vault.d"
    read_only = false
  }

}

plugin "docker" {
  config {
    allow_privileged = true
  }
}

autopilot {
    cleanup_dead_servers      = true
    last_contact_threshold    = "200ms"
    max_trailing_logs         = 250
    server_stabilization_time = "10s"
    enable_redundancy_zones   = false
    disable_upgrade_migration = false
    enable_custom_upgrades    = false
}


EOF

 cat <<EOF > /etc/nomad.d/acl.hcl
 acl = {
   enabled = true
 }
EOF

systemctl restart nomad
Next, you need to actually deploy the VM using the code below, which is added to the compute.tf file:
compute.tf
resource "aws_instance" "nomad_clients_vault_backup" {
  count                       = 1
  ami                         = data.aws_ami.ubuntu.id
  instance_type               = "t3.medium"
  subnet_id                   = module.vpc.public_subnets.0
  key_name                    = aws_key_pair.deployer.key_name
  associate_public_ip_address = true

  user_data = templatefile("./vault-backup-server.sh", {
    NOMAD_SERVERS_ADDR = "${aws_instance.nomad_servers.private_ip}"
  })

  vpc_security_group_ids = [
    aws_security_group.ssh.id,
    aws_security_group.egress.id,
    aws_security_group.nomad.id,
    aws_security_group.vault.id
  ]

  tags = {
    Name         = "Vault backup server"
    nomad_server = false
  }

  lifecycle {
    ignore_changes = [
      user_data,
      ami
    ]
  }

  depends_on = [
    terracurl_request.nomad_status
  ]

}
»Nomad ACL configuration
As part of the Nomad server configuration deployed by the cloud-init script, ACLs were enabled. This means that an access token is required before any actions can be performed. As this is a new install of Nomad, a token does not exist yet.
To bootstrap Nomad’s ACL system with the initial management token, you can use Nomad’s API and TerraCurl. TerraCurl is useful in this scenario because the Nomad Terraform provider does not support this bootstrapping functionality. You can write the TerraCurl resource to bootstrap the Nomad ACL system. There is a file in the 1-nomad-infrastructure directory called nomad.tf that includes the following code:
nomad.tf
resource "terracurl_request" "bootstrap_acl" {
  method         = "POST"
  name           = "bootstrap"
  response_codes = [200, 201]
  url            = "http://${aws_instance.nomad_servers.public_ip}:4646/v1/acl/bootstrap"
}
This code makes a POST API call to the Nomad server using the public IP address that was assigned to the VM during creation. It uses Terraform’s interpolation and joins that to the Nomad API endpoint /v1/acl/bootstrap to make the call. This resource tells Terraform to expect either a 200 or 201 response code from the API call or Terraform will fail. The response body from the API call is stored in state.
»Terraform outputs
In order to provide some of the computed values to other workspaces, you need to output them. To do this, create a file called outputs.tf in the same directory as above and insert the following code:
outputs.tf
output "nomad_server_public_ip" {
  value = aws_eip.nomad_server.public_ip
}

output "nomad_server_private_ip" {
  value = aws_instance.nomad_servers.private_ip
}

output "nomad_clients_private_ips" {
  value = aws_instance.nomad_clients.*.private_ip
}

output "nomad_clients_public_ips" {
  value = aws_instance.nomad_clients.*.public_ip
}


output "terraform_management_token" {
  value     = nomad_acl_token.terraform.secret_id
  sensitive = true
}

output "nomad_ui" {
  value = "http://${aws_eip.nomad_server.public_ip}:4646"
}
The directory structure should now look like this:
├── 1-nomad-infrastrcuture
│         ├── anonymous-policy.hcl
│         ├── backend.tf
│         ├── client-policy.hcl
│         ├── clients.sh
│         ├── compute.tf
│         ├── network.tf
│         ├── nomad-client-vault-backup.sh
│         ├── nomad.tf
│         ├── outputs.tf
│         ├── providers.tf
│         ├── servers.sh
│         └── variables.tf
├── 2-nomad-configuration
│         ├── backend.tf
└── 3-nomad-job-example-deployment
          └── backend.tf

3 directories, 14 files
Now you can run terraform plan and terraform apply to create these resources.
»In the next blog
This blog post showed how to deploy the infrastructure required to run Vault on Nomad. It covered some Terraform directory structure concepts and how they relate to workspaces. It also covered deploying and configuring Nomad, as well as Nomad ACLs. Part 2 of this blog series will look at deploying Vault as a Nomad job and configuring it, while Part 3 will explore deploying some automation to assist in the day-to-day operations of Vault.


