A Field Guide to Zero Trust Security in the Public Sector
Learn the foundational concepts behind zero trust security and how to use HashiCorp Vault, Consul, and Boundary to implement a zero trust security posture in public sector environments.
»Executive summary
Recently, the White House issued an executive order on Improving the Nation’s Cyber Security, which laid the groundwork for implementing zero trust architectures in the federal government. This executive order is the seminal directive asserting zero trust security as mandatory for federal agencies. By extension, it influences cybersecurity policy across the public sector as a whole.
As organizations move from static datacenters to dynamic public and private multi-cloud environments, security becomes more challenging and complex. Securing traditional datacenters involved protecting the network perimeter with firewalls and threat detection. In the multi-cloud era, the point of control shifts from physical controls to trusted identities. This enables a zero trust paradigm in which every entity must be authenticated and authorized before gaining access to any system. This identity-based framework helps organizations operate secure, dynamic environments at scale. With HashiCorp Vault at its core, alongside HashiCorp Consul and HashiCorp Boundary, the HashiCorp portfolio of tools helps enterprises improve their security posture and reduce risk across the extended enterprise, both on-premises and in the cloud.
This white paper explains the foundational concepts behind zero trust security and details prescriptive steps public sector organizations can employ to implement a zero trust security posture across all their cloud and on-premises environments with Vault, Consul, and Boundary.
For more information, please contact:
HashiCorp Federal Sales
hashicorpfederal@hashicorp.com
HashiCorp Public Sector industry page
»Introduction
Public sector organizations no longer operate homogeneous cloud environments exclusive to a single cloud service provider (CSP). The growth of the CSP ecosystem has expanded the availability of cloud offerings, using services from multiple providers is not only advisable but often imperative. This extended cloud environment exacerbates the challenges of securing IT systems and data. These challenges are particularly acute in the public sector, where organizations are not only protecting their own data, but the data of the people they are sworn to protect and serve.
At the same time, security in the cloud is being recast from static, network-based security to dynamic and identity-based —– with no clear network perimeter. In the past, static infrastructure typically sat within a well-defined perimeter in which administrators had full visibility and control across the environment. If your datacenter was your castle, securing it essentially meant building a network-based moat and using access control lists (ACLs) to control access. Once granted access, entities had full trust within the environment.
Today’s cloud environments are far less static, much harder to control, and offer less visibility. There’s no single perimeter that a moat — or traditional firewalls and security practices — can defend. As a result, traditional approaches to security become unwieldy, less effective, and cost prohibitive in these complex cloud environments.
This new multi-cloud dynamic means teams and organizations must rethink how to secure their applications and infrastructure through a zero trust architecture. The recent executive order on Improving the Nation’s Cybersecurity, states that “The Federal Government must adopt security best practices; advance toward Zero Trust Architecture; accelerate movement to secure cloud services, including Software as a Service (SaaS), Infrastructure as a Service (IaaS), and Platform as a Service (PaaS); centralize and streamline access to cybersecurity data to drive analytics for identifying and managing cybersecurity risks; and invest in both technology and personnel to match these modernization goals.”
In accordance with this executive order, the Cybersecurity & Infrastructure Security Agency (CISA) has published the following definition of critical software that must conform to these larger zero trust security considerations and is thus subject to the further requirements of the executive order (EO).
“EO-critical software is defined as any software that has, or has direct software dependencies upon, one or more components with at least one of these attributes:
Is designed to run with elevated privilege or manage privileges;
Has direct or privileged access to networking or computing resources;
Is designed to control access to data or operational technology;
Performs a function critical to trust; or,
Operates outside of normal trust boundaries with privileged access.”
As a result, agencies that are mandated to leverage EO-critical software and systems must fully understand and embrace zero trust security, then plan and execute an implementation strategy.
A zero trust security model uses policy logic that starts by trusting nothing, yet makes authentication and authorization among dynamic systems possible and practical. Policy logic that trusts nothing eliminates a sole reliance on physical firewalls or network rules and is thus ideal for securing vast numbers of ephemeral systems. Consequently, zero trust security can help organizations speed adoption of the cloud while improving the security of mission critical systems and data.
»What is Zero Trust Security?
At HashiCorp, we understand that adoption of a cloud operating model means teams and organizations must rethink how to secure their applications and infrastructure. As more and more governing bodies across institute guidelines and requirements for implementing zero trust architectures, modernization of cybersecurity practices becomes imperative. Organizations must shift to a framework built upon the principles of zero trust:
Identity driven
Mutually authenticated
Least-privileged
Time and usage bound
Encrypted in transit and at rest
Audited and logged

HashiCorp’s approach to zero trust is to secure everything based on trusted identities. We’ve embraced and pioneered this approach because:
Enterprise-level identity platforms already use this model and therefore can be easily integrated into multi-cloud zero trust security.
Identity provides security based on logical entities, not addressing or location, allowing security to scale with the infrastructure without overwhelming operations teams.
Identity empowers organizations to manage who and what have access to which resources, and for how long.
IT administrators can create logical mapping between identities and policies that can be created, managed, and deleted at scale.
Zero trust security also allows public sector organizations to manage the transition to the cloud while maintaining the highest level of security, no matter the cloud, no matter the scale. The end result is a security posture that protects both remote cloud systems and the distributed workforces that manage them. This is especially important today as more people work from home, widening the attack surface and risking users ignoring or circumventing VPNs and other traditional security measures. This paper presents a practical guide to leveraging the HashiCorp stack to help with the zero trust security journey in the public sector.
»Zero Trust at HashiCorp: It Starts with Identity
Identity is core to zero trust security. The system of record for any action taken within the IT infrastructure is based on identity. This approach is embodied in HashiCorp’s flagship security products:
HashiCorp Vault, our centralized secrets management and encryption solution, leverages trusted identity platforms (such as Active Directory/LDAP, AWS IAM, and Kubernetes JWT) to perform secure access. Vault also serves as an identity broker for applications and machines, enabling authentication in traditional and automated workflows.
HashiCorp Consul abstracts networking services with identities, which are used to authenticate and authorize communication between services. The service identity replaces IP addressing and manual methods for authentication and authorization. Service identities are more scalable and reduce management overhead in modern, dynamic cloud environments where IP addresses are ephemeral.
HashiCorp Boundary leverages existing identity tools like Vault to act as a system of record for issuing and revoking just-in-time credentials for remote human access to systems across clouds and datacenters.
»Implementing a Zero Trust Security Framework
»Overview: Roadmap and Stages
Adopting zero trust involves four distinct stages (and HashiCorp tools can help at every step):
Stage 1: Centrally store, access, and distribute static and dynamic secrets like tokens, passwords, certificates, and encryption keys to applications across any public or private cloud environment (Vault).
Stage 2: Protect and encrypt sensitive data and network traffic for all your applications and services across any public and private cloud environment (Consul).
Stage 3: Secure remote access for your entire workforce without having to manage VPNs, share credentials, or expose your network (Boundary).
Stage 4: Secure data at rest by encrypting data with symmetric keys or tokenization (Vault).
»Using HashiCorp Vault, Consul and Boundary to Achieve Zero Trust Security
Learn more about each stage by reading through our tutorials for the relevant product:
HashiCorp Vault: Get started
HashiCorp Consul: Get started
HashiCorp Boundary: Get started
Prerequisites:
Download the products
General awareness of Vault, Consul, and Boundary
Admin access to deploy to your target infrastructure (i.e. AWS, Microsoft Azure, or VMware vSphere)
A simple application for testing (e.g., an NGINX server)
»Create a Vault Cluster
As outlined above, once you download and install Vault and set up your Vault server, you are ready to deploy your first Vault cluster and create an instance in the cloud, in the zone you choose, with a private address by default. You can optionally enable a public address if you’re in development or need access to debug an issue. It is a best practice to disable public access in production environments and use network peering with your public clouds to establish a high level of security while allowing full control of your systems.
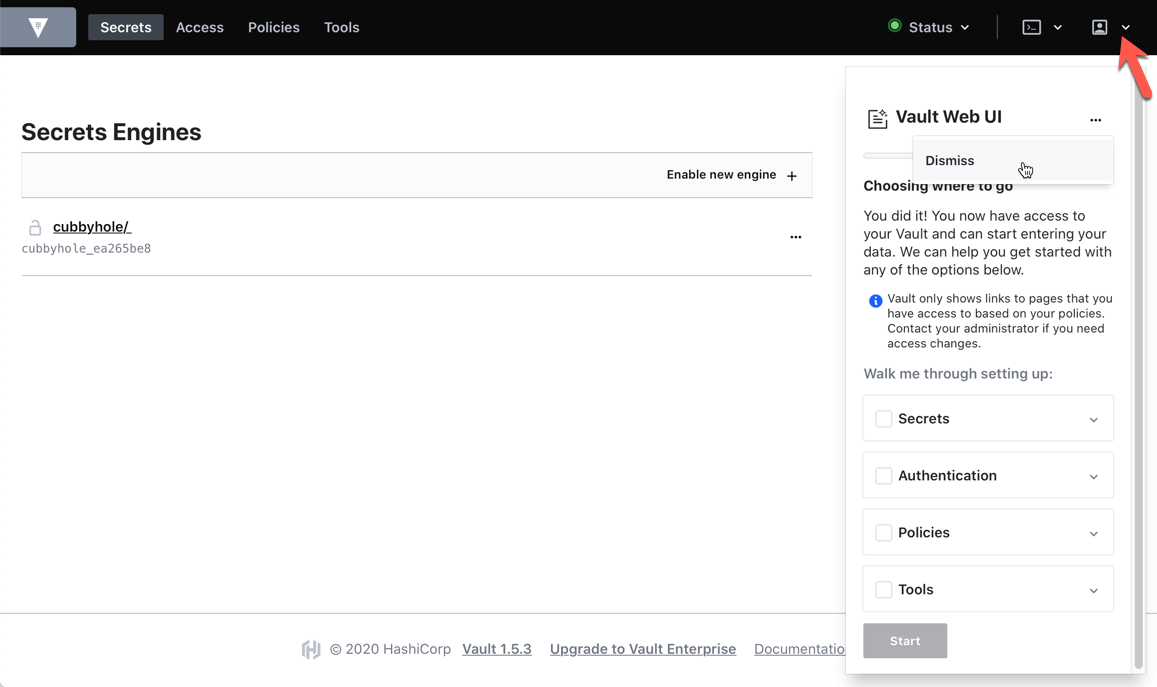
When your cluster is up and running, you can access the Vault web UI by following these steps outlined. Once set up, Vault UI has a built-in tutorial to walk you through the common steps to operate various Vault features.

Vault also offers a command line interface if that is your preference

You can use either interface to create, edit, and delete secrets; manage roles and policies; and manage all Vault tasks. Experienced users may be more comfortable using the CLI. Beginners often prefer the UI.
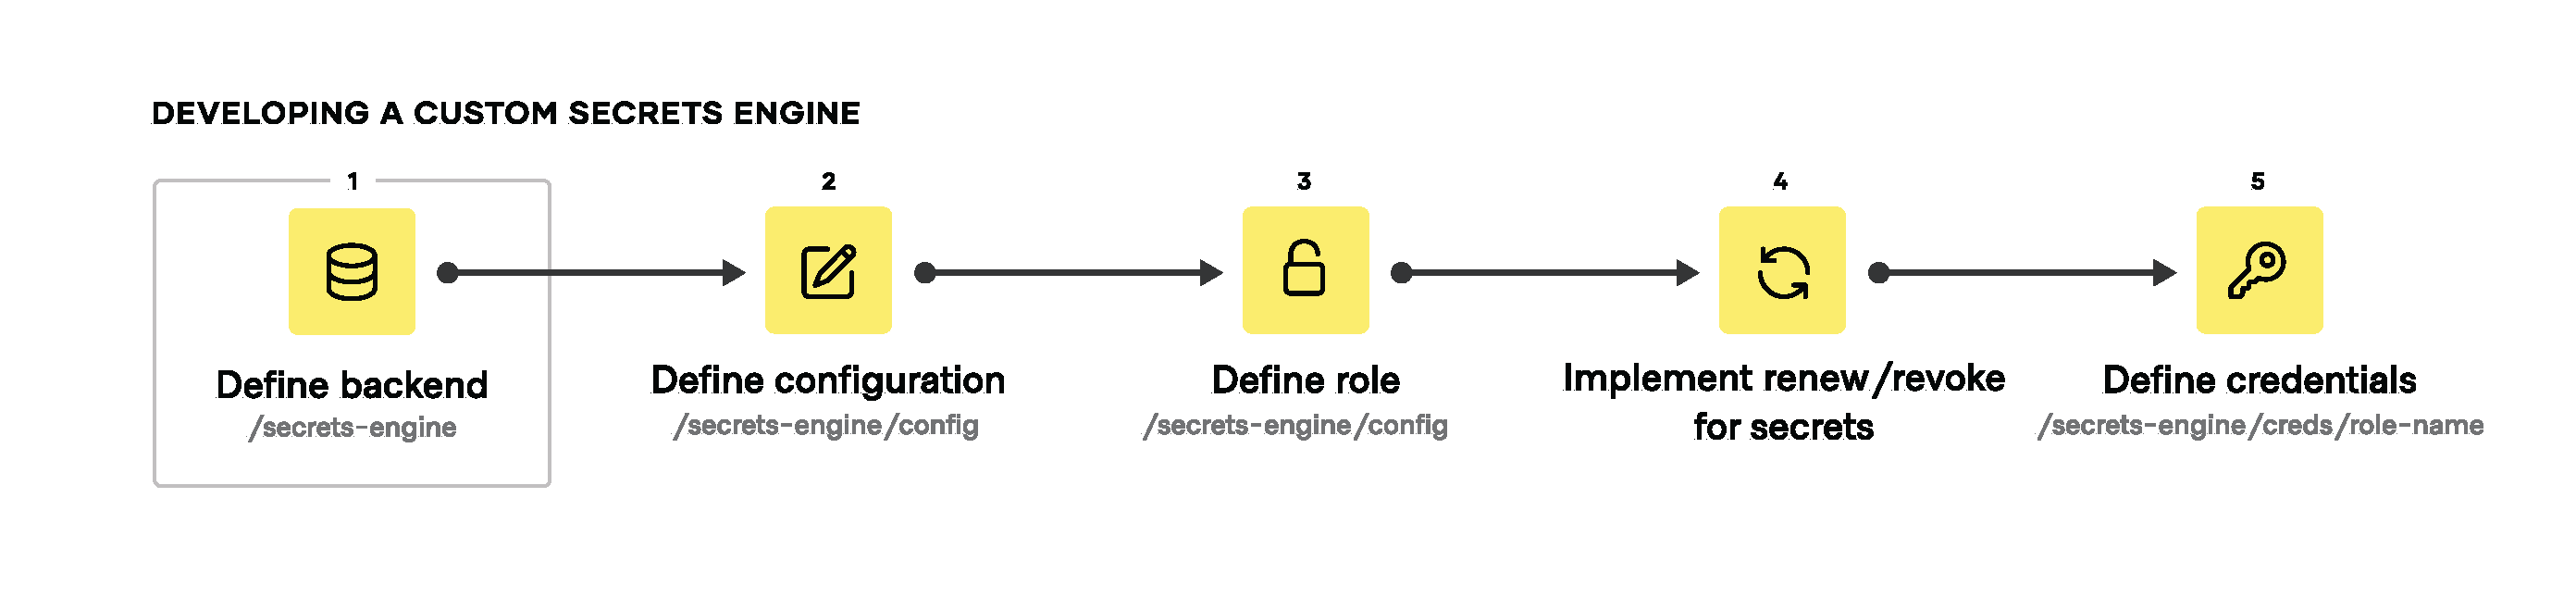
»Get Applications to Retrieve Secrets from Vault Programmatically
When using secrets engines in Vault, you define the backend, configure it with policies, define roles with permissions to use those policies, assign the policies to the roles, and get access based on each use case. These steps look like this:

»Create a Secret
You can create secrets from the Vault dashboard or via the CLI, with each secret given a path, and then its key-value.

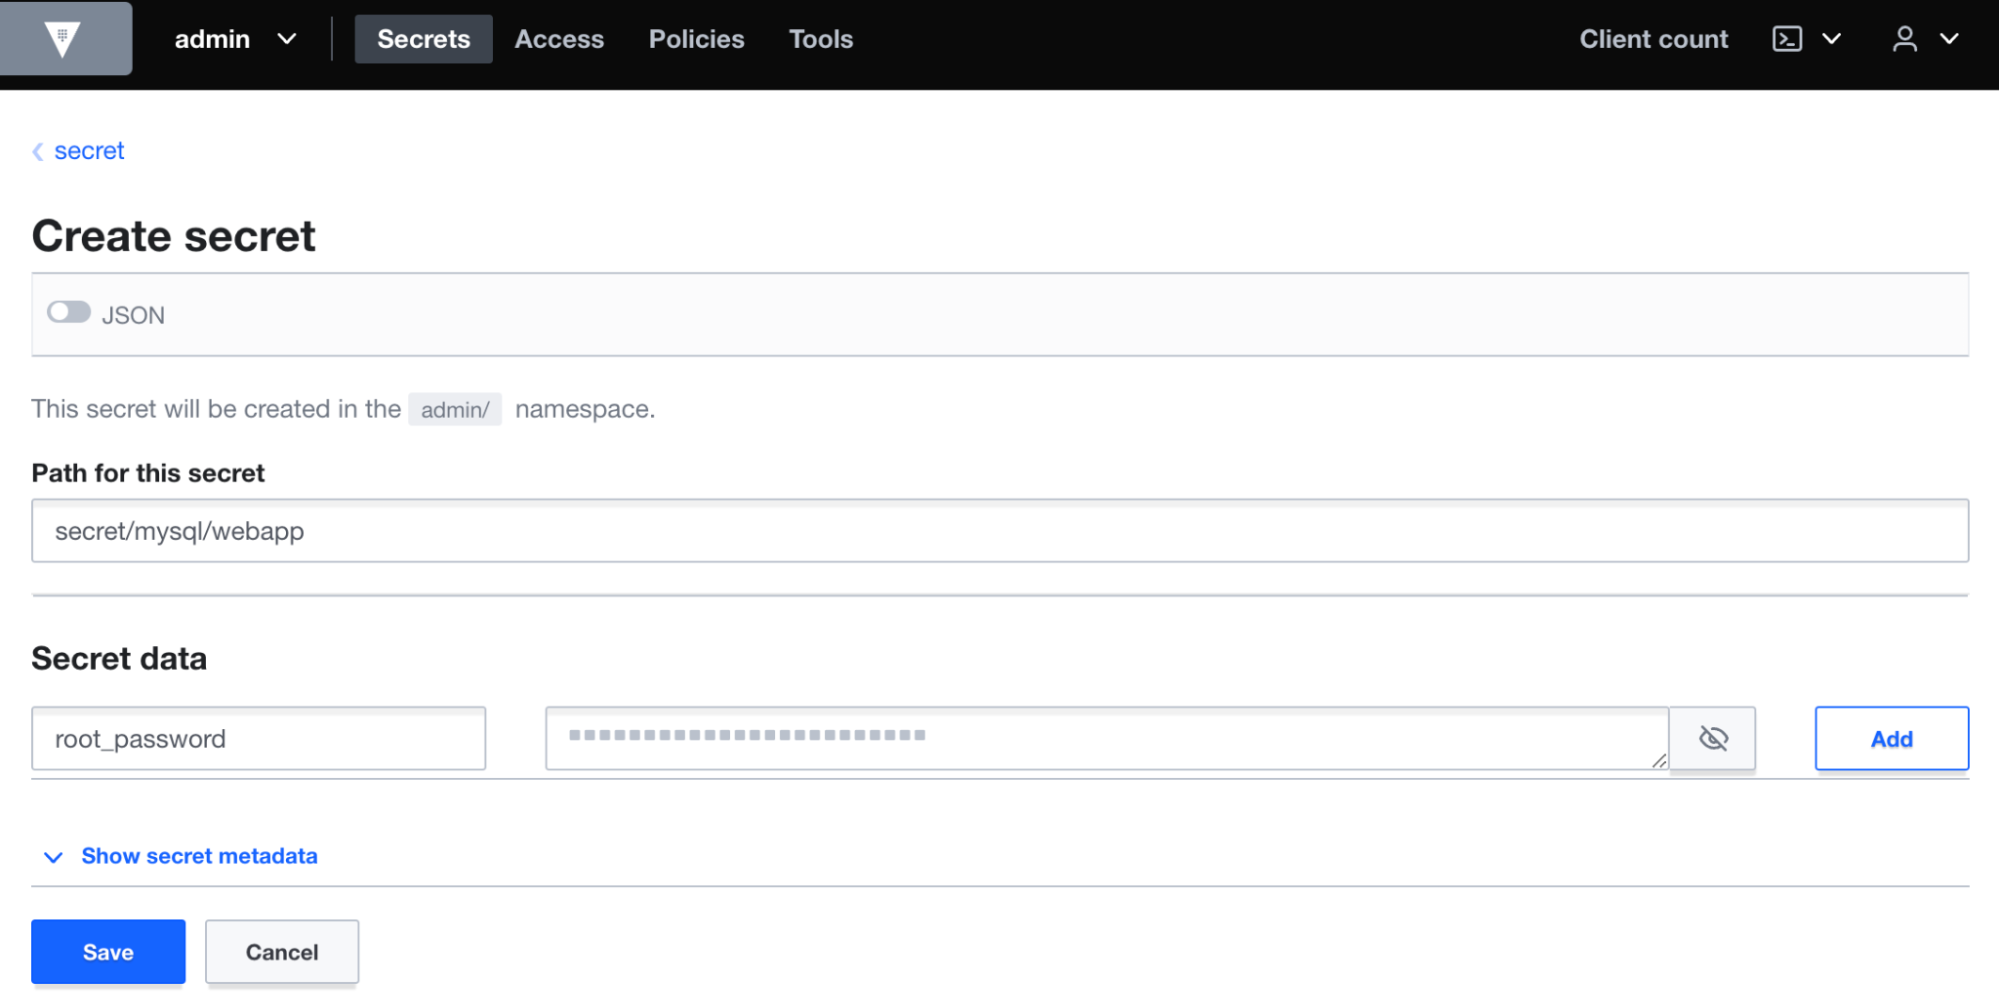
Creating static secrets in Vault is straightforward, allowing users to set unique paths and then applying policies that set permissions on who or what can access them.
»Establish Least-Privileged Access by Creating a Policy
Creating and retrieving static or dynamic secrets from Vault is done via application and machine identity. Since Vault centrally secures, stores, and controls access to secrets across distributed infrastructure and applications, it is critical to control permissions before any user or machine can gain access. Restrict the use of root policy, and write fine-grained policies to practice least-privileged access. This ensures your server or application has permission to access Vault before retrieving the secrets based on their identity. Policies you define determine which systems and applications can access which secrets.
Straightforward human-readable policies define the permissions you want for your secrets. These are called Vault system paths. Think of these as folder paths in an operating system that give specific permissions, like read and write. For example, the following policy written in HashiCorp Configuration Language (HCL), grants read-only access to the webapp secret created earlier. Notice that “data” is appended to the path (secret/data/mysql/webapp, not secret/mysql/webapp):
# Read-only permission
path "secret/data/mysql/webapp*"
{
  capabilities = ["read"]
}
The key takeaway is that permissions are explicitly set. As you work with Vault, you create policies and roles to fine-tune access to your secrets, always defaulting to the least permissive as a best practice. More details on creating Vault policies can be found at developer.hashicorp.com.
»Define a Role
As with policies, roles are created for specific purposes, such as an AppRole that gives applications of a certain type access to certain secrets. You can enable different roles and set parameters for the secrets they provide. When you apply your policy to a new role with the same name (for example,`webapp`), the role is given permission to access the token for one hour, and that token is good for four hours:
$ vault write auth/approle/role/webapp token_policies="webapp" token_ttl=1h token_max_ttl=4h
»Encryption as a Service
Vault Enterprise users can take advantage of the Transform secrets engine to automatically encrypt and encode secrets at rest, allowing them to transform plain-text values — such as credit card numbers or passwords — and save them in databases (or other endpoints) without having to alter the schema. Vault Enterprise’s Transform secrets engine encodes and decodes the secrets without revealing the actual values. This feature is available only with a Vault Enterprise license.
Additionally, you can secure data and secrets in transit with the Vault Enterprise Transit Secrets Engine. Part of the larger Encryption-as-a-Service functionality, Vault Enterprise’s transit secrets engine handles cryptographic functions on data-in-transit, but doesn't store the data sent to the secrets engine itself. The Transit secrets engine provides additional features (sign and verify data, generate hashes and HMACs of data, and act as a source of random bytes), but its primary use case is to encrypt data. This relieves the burden of proper encryption/decryption from application developers by enabling security teams to fortify data during transit and at rest. So even if an intrusion occurs, your data is encrypted with AES-GCM with a 256-bit AES key or other supported key types. Even if an attacker were able to access the raw data, they would have only encrypted bits. This means attackers would need to compromise multiple systems before successfully stealing data.
»Secure Applications with Vault
By pre-establishing roles and policies for your secrets and the applications and machines that access them, you can take advantage of dynamic secrets. This creates higher-level security by generating credentials on the fly and destroying them after a short time, with all data encrypted in transit and at rest.
Dynamic secrets are created when they’re requested and revoked immediately after they’re used, so there’s less risk of someone stealing or reusing them. This is ideal for credential rotation. For example, the Vault AWS secrets engine can create unique, on-demand credentials based on the roles, policies, and actions you want. When the role is accessed, Vault generates access keys:
$ vault read aws/creds/my-role
Key                Value
---                -----
lease_id           aws/creds/my-role/0bce0782-32aa-25ec-f61d-c026ff22106e
lease_duration     768h
lease_renewable    true
access_key         AKIAJELUDIANQGRXCTZQ
secret_key         WWeSnj00W+hHoHJMCR7ETNTCqZmKesEUmk/8FyTg
security_token     <nil>
The lease duration in the above example defaults to 768 hours, but it can be set to be revoked or rotated on a schedule that accommodates your workflow.
»Logging and Auditing
Also key to zero trust security is the ability to log and audit the management of your secrets and data. Audit devices are the components in Vault that collectively keep a detailed log of all requests and responses to Vault. Because every operation with Vault is an API request/response, when using a single audit device the audit log contains every authenticated interaction with Vault, including errors. Multiple audit devices can be enabled and Vault will attempt to send the audit logs to all of them. This gies you not only redundant copies, but also a way to check for data tampering in the logs themselves and ensure that everything is in compliance.
»Secure Services and Networks with Consul and Vault
After establishing zero trust security for secrets management with Vault, organizations can extend zero trust to the network with HashiCorp Consul. Similar to Vault, Consul’s security framework uses service identity as the foundational resource for securing network services. This capability can then become the basis of a service mesh for managing interconnections among ephemeral VMs, container orchestrators like Kubernetes, and other runtimes such as HashiCorp Nomad.
»Set Up Consul
As outlined above, get started by downloading and installing HashiCorp Consul. Follow the tutorials to set up Consul and begin integrating it with your infrastructure and Vault cluster.
»Connect Consul Clients
You can quickly set up Consul to connect your cloud platform of choice by following the Consul Cloud and Platform Integrations tutorial. This allows Consul to begin registering your running services and enforce your security rules.
Nodes that have joined the Consul datacenter appear in the Consul dashboard, as shown here:

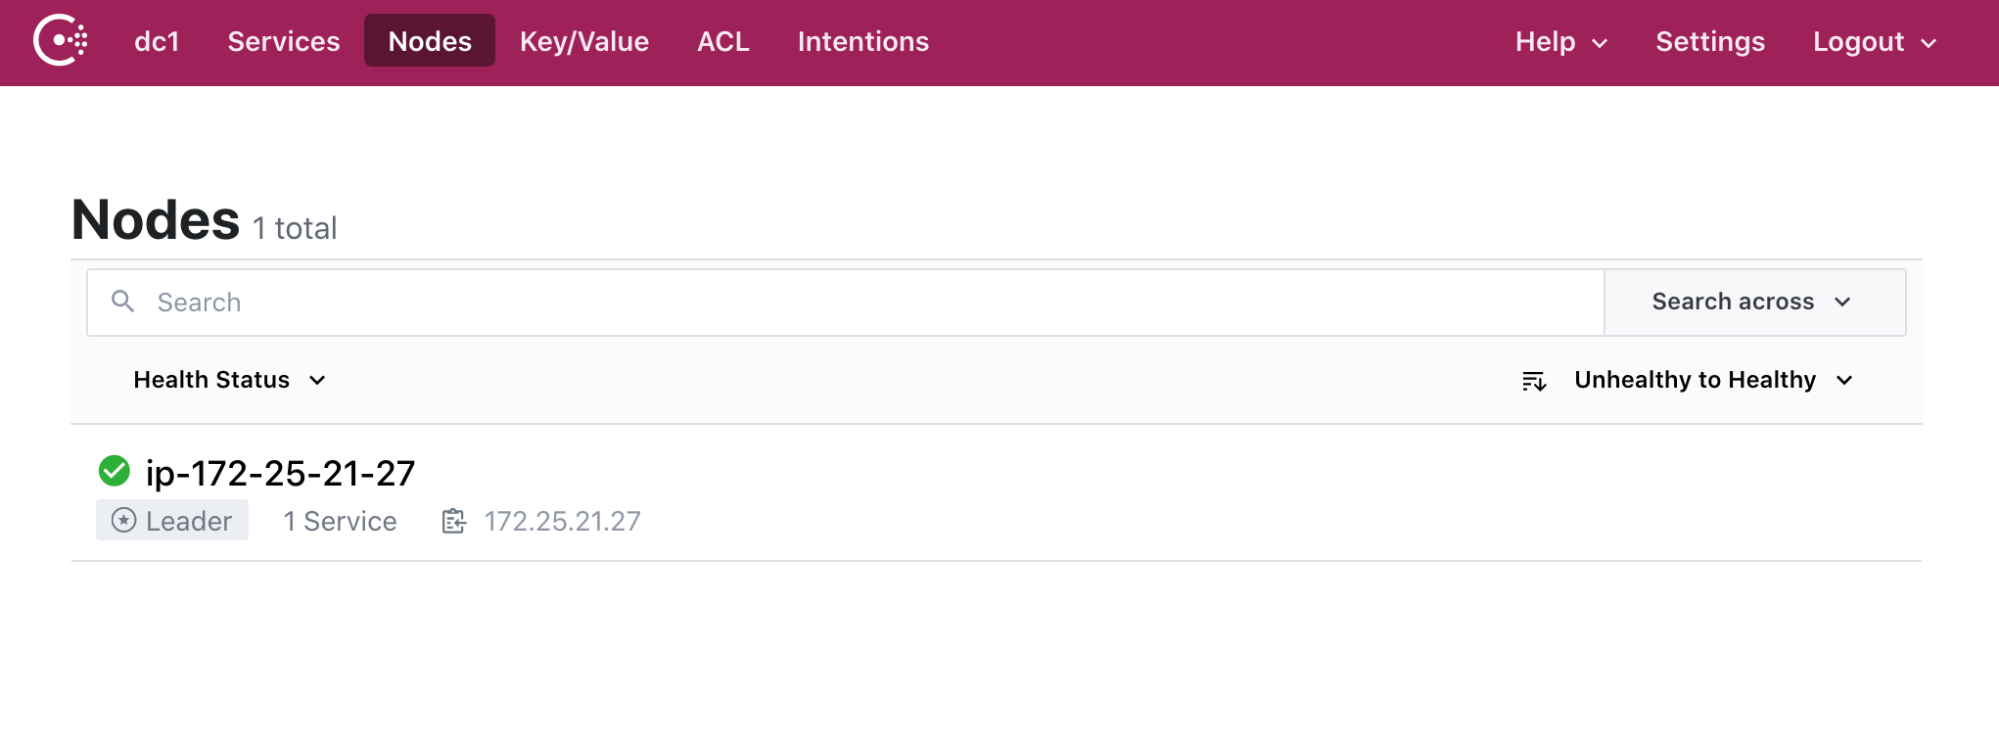
The nodes view in the Consul dashboard.
»Service Identity and Discovery
Registering services running on your nodes with Consul is straightforward, and can be done when a service is provisioned or after it’s running.
For services running on virtual machines, administrators can register them using the Consul CLI with a service definition file or using the HTTP API. Detailed steps to register services to Consul are provided in the Consul Learn tutorial.
Example service definition file:
service {
  name = "nginx-1"
  id = "nginx-1"
  port = 443
}
You can configure Consul to automatically discover services running on Kubernetes and register everything in the cluster by setting the connectInject.enabled and connectInject.default parameters to “true” in the Consul Helm values file.
Example snippet of Consul Helm values file:
connectInject:
  enabled: true
  default: true
Services that register with Consul get a service identity. This identity is used to authorize, authenticate, and encrypt all service-to-service communication. Once registered, services and nodes can be discovered and reached by other registered services via DNS or the HTTP API. All of these actions can be done without ever needing to use IP addresses.
In the Consul dashboard, you can see the running services across nodes. As services start and stop — or come and go — you can track their statuses and health:

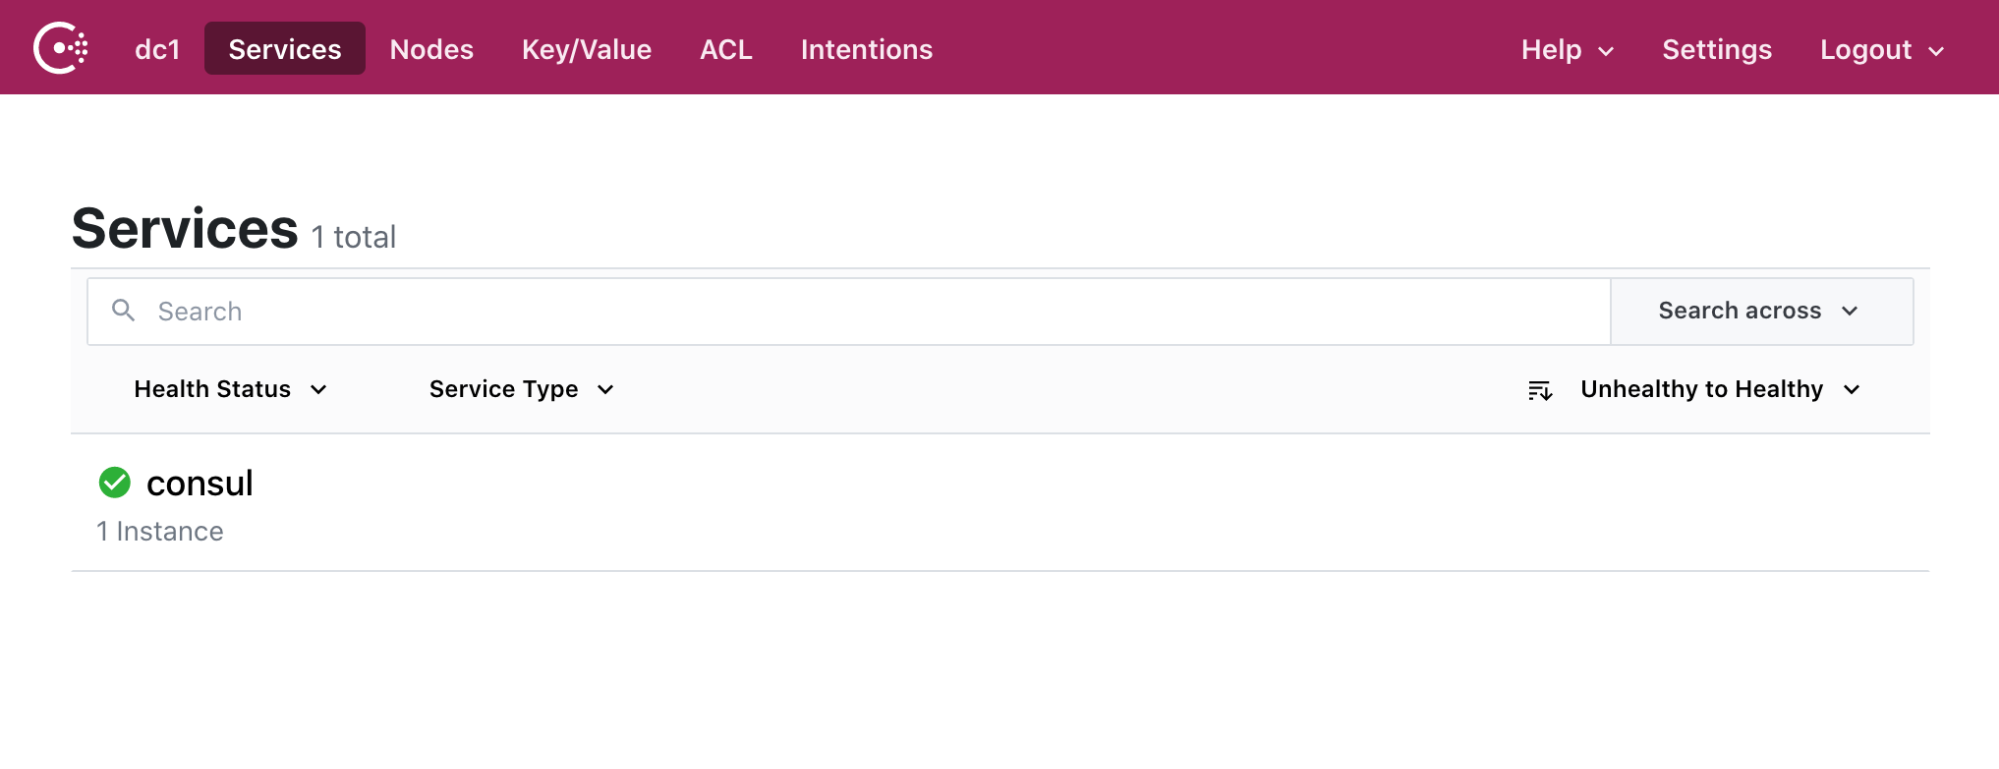
Consul discovers and keeps track of the services you want to secure.
»Zero Trust Networking with Consul Service Mesh
With your nodes and instances registered and discoverable with Consul, you can now use Consul’s service mesh capabilities. The service mesh lets you apply observability, security, and other features to each of your applications services.
Consul’s service mesh is composed of Envoy proxies installed alongside application services. Envoy performs many of the service mesh capabilities, including enforcing authorization policies and ensuring service-to-service communication is authenticated and encrypted. The tutorials below detail the steps to:
»Authorize Access to Systems and Services with Intentions
To achieve zero trust networking, the first step is to apply principles of least privilege to the network, and allow access only between services that are required to communicate. Consul’s service mesh includes an intentions feature that uses service identity to microsegment and authorize access between services. A deny-all policy is recommended to prohibit all services within the mesh from communicating. If you enable access control lists , a deny-all intentions policy will automatically be enabled. Additional intentions rules can then be layered on to allow individual service-to-service communication at a granular level. Intentions can be set several different ways, including the Consul CLI, UI, and HTTP API, or through Kubernetes custom resource definitions (CRDs).
The example below shows intentions that deny all connections except between:
product-api to product-api
public-api to payment-api
public-api to product-api

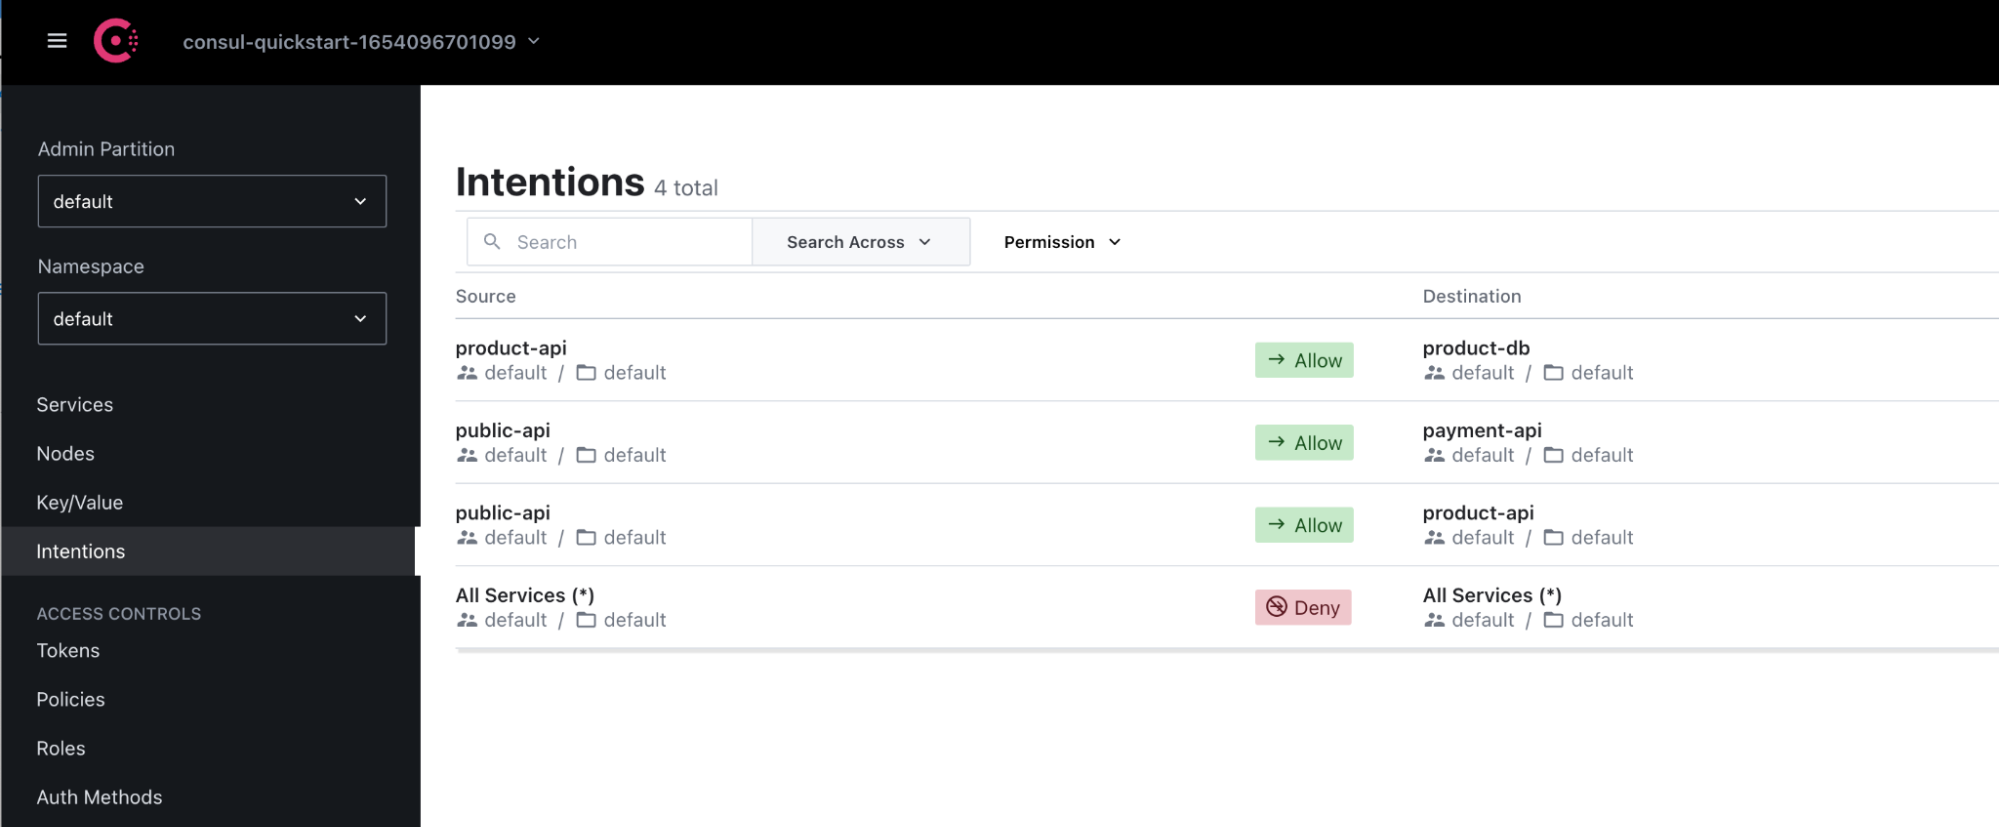
Consul intentions provide source and destination links, with users setting specific permissions. Systems refer to these intentions to perform secure connections.
»Authenticate and Encrypt
Zero trust networking requires all services communicating over the network to authenticate, even inside an organization's network firewalls. Consul’s service mesh ties each service identity to a TLS certificate used to ensure mTLS communication between network services. You can use Consul’s built-in certificate authority (CA), or an external CA like Vault, to auto-generate TLS certificates. This function is performed by Envoy, the Consul sidecar proxy deployed with every service within your service mesh.
Once services have been mutually authenticated, all traffic between the two services are automatically encrypted. Consul does this by diverting traffic from each service to its respective Envoy sidecar. Envoy then encrypts and decrypts traffic between the services. Offloading encryption onto Envoy makes security consistent across all services without requiring developers to bake these rules into their application code.
»Secure Remote Access with Boundary and Vault
Access to systems isn’t just the domain of machines. Human users, too, must have a secure, convenient way to get access to systems and applications, whether it’s through SSH, remote desktop protocol (RDP), or a service-specific port like PostgreSQL’s 5432.
HashiCorp Boundary makes that happen. Boundary integrates with Vault to broker secrets that allow human access to a wide variety of systems and runtimes — without admins ever having to share passwords, session tokens, or keys.
Boundary uses Vault to bind credentials with user sessions, surfacing those credentials when a session starts. This provides seamless user access to servers and applications while maintaining a high level of security.

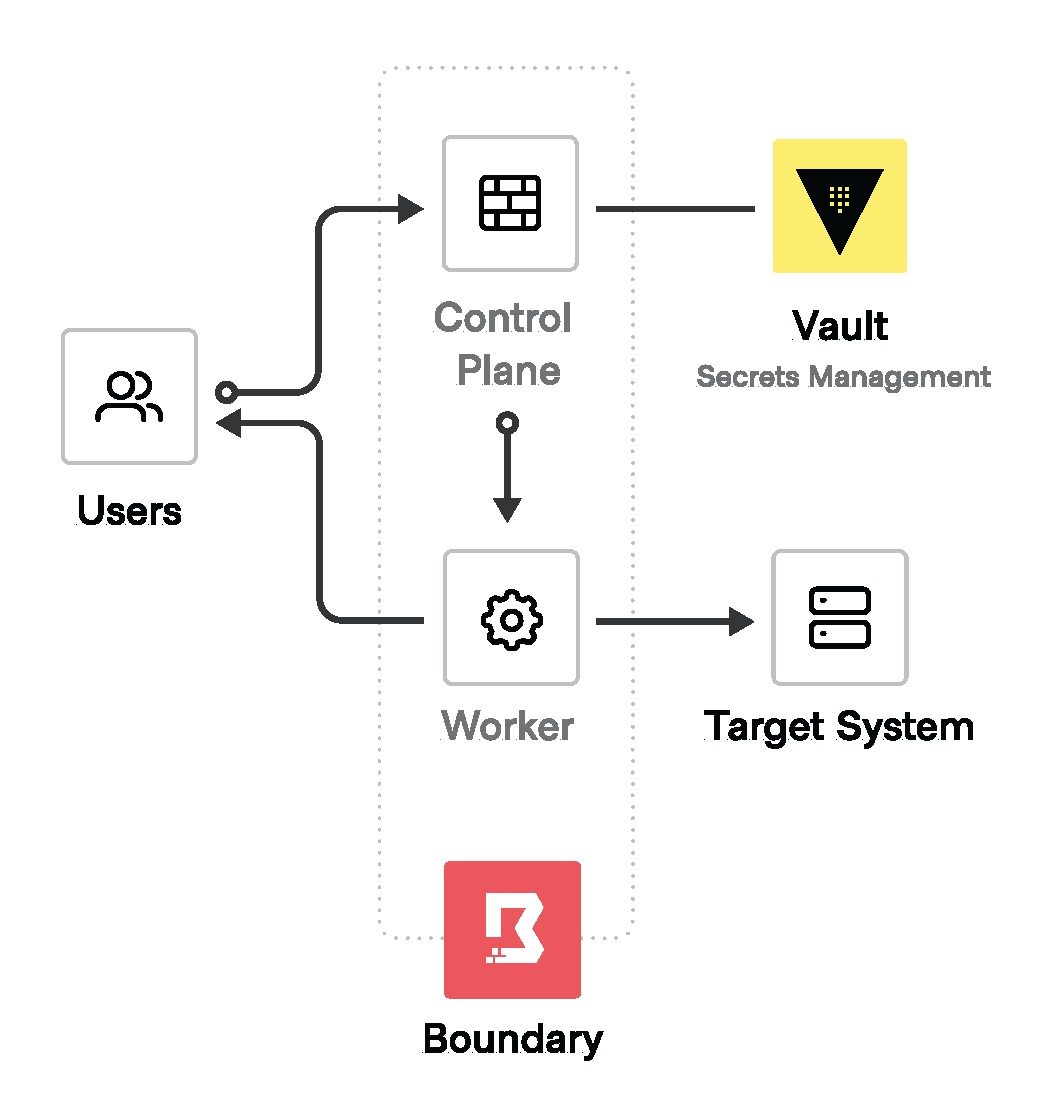
Traditional approaches like SSH bastion hosts or VPNs that require distributing and managing credentials (and network controls like firewalls) can expose your private network. Boundary provides a secure-from-anywhere way to access hosts and critical systems without having to manage credentials or expose your network.
You can get started with Boundary with the Get Started with Boundary Tutorials. Once Boundary is set up, authorized users see only the systems and applications you configured for them.
»Host Catalogs, Credential Stores, and Roles
Access is granted to your users when you set up Boundary host catalogs, which are accessible end-points (hosts, databases, and the like) you define within Boundary targets. As you build out your catalog of applications and the systems on which they live, you build out targets that users can access using credentials brokered by Boundary. Everything is centrally managed.

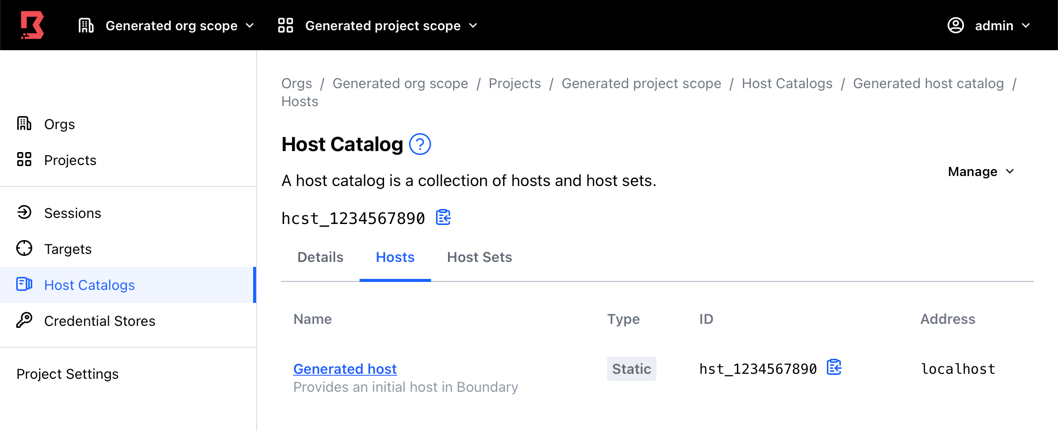
Host catalogs define the end-points you want users to access.
As with identities on Vault and Consul, Boundary uses roles to define permissions. Users with specific roles gain access to specific systems and resources without ever having to get machine-specific credentials or passwords. Vault can be used as the credential store, providing a way to centrally save secrets.
Roles can have one or more grants, which provide access for specific actions, as shown here:

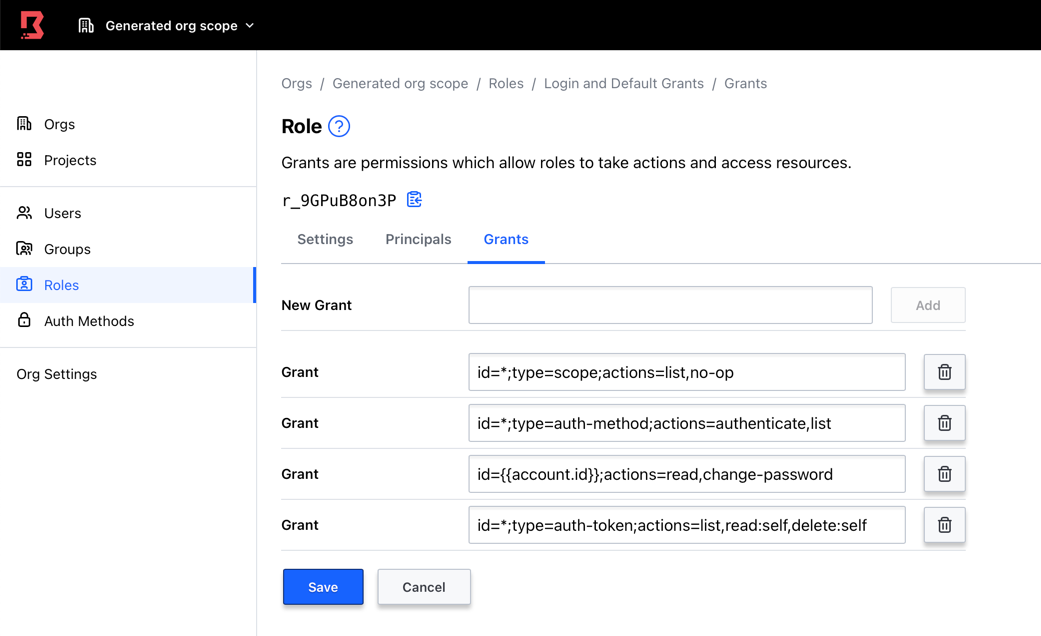
Roles grant specific permissions for actions your users will take.
Grants provide highly secure user-authentication because they’re deleted when the role or its associated resource is deleted. Boundary scopes and targets set the realms for the permissions you want to grant, and auth methods determine how users are verified.
»Creating and Implementing Auth Methods

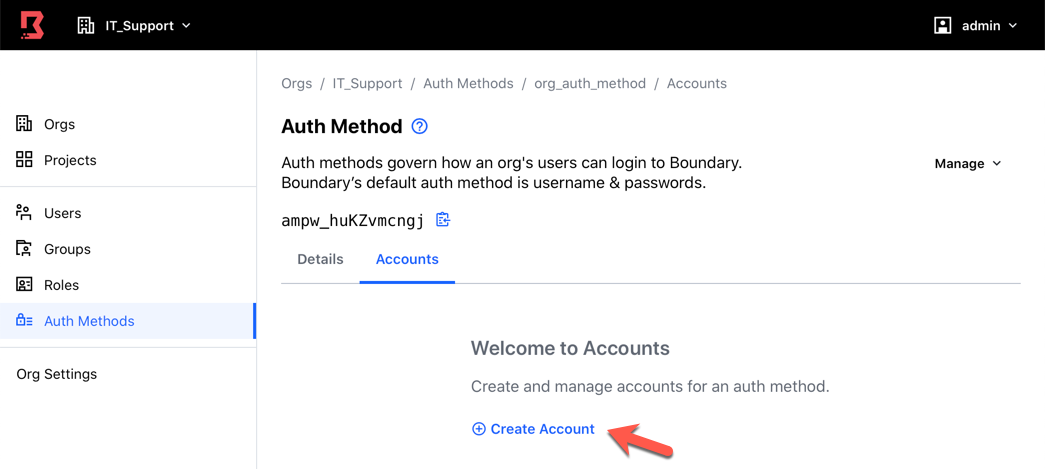
Auth methods establish the overarching authority users have to access Boundary, such as usernames and passwords or OIDC.
Boundary manages all the moving parts for your users. By using a Boundary target ID, users can issue various commands to securely connect to systems and applications. For example, using boundary connect ssh:
$ boundary connect ssh -target-id $TARGET_ID
Out of the box, Boundary supports the HTTP, Postgres, RDP, and SSH connection protocols. Your users never need to know the IP address of the targets or the specific credentials. Once they’ve authenticated with Boundary, Boundary does the work, meaning you don’t have to spend time handing out credentials to all the systems and applications running in your large-scale, ephemeral cloud environments.
»Bringing Zero Trust Security to the Public Sector
Zero trust security is not just a collection of products you purchase. It’s a new way of thinking about cloud security. The process is a journey, but it is imperative, and now mandated, for public sector organizations.
Fortunately, implementing a zero trust architecture has never been easier, and you can tap into the guidance and expertise from leading technology providers. HashiCorp’s principled approach to zero trust security, built upon a foundation of identity, helps public sector organizations safely migrate and secure their infrastructure, applications, and data. As you move to a multi-cloud world, organizations like yours across the public sector must transform their security posture to adhere to the new requirements specified in the executive order on Improving the Nation’s Cyber Security.
Regardless of where you stand with your zero trust security implementation, HashiCorp wants to be your guide. To learn more about our philosophy on zero trust security, please reach out to our public sector team at hashicorpfederal@hashicorp.com.


