
Build a Quick AKS Cluster the Easy Way with Terraform Cloud
Find providers in HashiCorp Terraform Cloud to help quickly spin up Kubernetes containers in Microsoft’s Azure Kubernetes Service.
HashiCorp Terraform Cloud is a managed service offering that eliminates the need for unnecessary tooling when using Terraform in production. A free and quick way to get started building, managing, and collaborating on infrastructure, Terraform Cloud allows for multiple workflows, allowing teams to run Terraform from their CLI, from the UI in their browser, or via a Git repository when merging pull requests into the main branch. And lately, Terraform Cloud has gotten even more accessible. You can now find public modules and providers to use and save them to your private registry so you can easily review the docs, point new collaborators to them, or even distribute them across your teams.
Terraform Cloud works seamlessly with the Terraform Registry, the primary source for publicly available Terraform providers and modules. The Terraform Registry offers a browsable and searchable interface for finding providers and modules that teams can use to reduce complexity within their infrastructure as code and automatically install dependencies.
In this post, we're going to show how Terraform Cloud can drastically simplify a workflow by walking through an example using Terraform Cloud to launch a Kubernetes container on Microsoft Azure Kubernetes Service (AKS) using pre-built providers and modules from the public Terraform Registry.
If you want to follow along, you'll need:
- A Terraform Cloud account
- A VCS account (we'll be in GitHub)
- A Microsoft Azure account
[Note: If you use Amazon Web Services (AWS), Google Cloud, VMWare, or another cloud provider, check out our Learn Guides for more information on how to launch Kubernetes containers.]
»Step One: Getting Set Up with Terraform Cloud
First, you'll need to log in to your Terraform Cloud account. If you don't have one yet, go here and sign-up: https://app.terraform.io/signup/account or follow along with this quick guide; we'll wait for you.
»Add Terraform Providers
Once you're logged in, we'll start by setting up some basics. First, we need a Terraform provider. Providers are plugins that interact with the APIs of cloud, SaaS, and DevOps tools. They add a set of resource types or data sources that Terraform can manage. We need two Terraform providers to build our Kubernetes container in Azure. First, grab the AzureRM provider.
To get the AzureRM provider and save it in your private registry, you need to:
- Navigate to and click on the Registry tab.
- Click the Search Public Registry button.
- In the search bar, type “azurerm”.
- Either click the Add button in the upper right-hand corner of the result, or click through to see the docs and other information about the provider and click the Add to Terraform Cloud button.
- Return to the Registry tab, where you should see the azurerm provider in your list.
Next, grab the Kubernetes provider the same way:
- Click the Search Public Registry button in the private Registry tab.
- In the search bar, type “kubernetes”.
- Either click the Add button in the upper right-hand corner of the result, or click through to see the docs and other information about the provider and click the Add to Terraform Cloud button.
- Return to the Registry tab, where you should see the kubernetes provider in your list.
»Add Terraform Modules
Now that we have our providers, we need modules to build out our infrastructure. Terraform modules are the preferred way to organize your Terraform configuration so it can be reused again and again. While you can always build your own modules, it’s faster to use ones already created by the Terraform community: in this case, azurerm/network and azure/aks.
We use the same method for finding and selecting modules as we did for the providers:
- From the Registry tab, click the Search Public Registry button.
- Select the Modules tab below the search bar.
- In the search bar, type “network”, and scroll down to Azure/network.
- Either click the Add button in the upper right-hand corner of the result, or click through to see the docs and other information about the module and click the Add to Terraform Cloud button.
- Confirm that you want to add the module to your organization.
- Return to the Registry tab and click the Search Public Registry button.
- Select the Modules tab below the search bar.
- In the search bar, type “aks”.
- Either click the Add button in the upper right-hand corner of the result, or click through to see the docs and other information about the module and click the Add to Terraform Cloud button.
- Confirm that you want to add the module to your organization.
- Return to the Registry tab, where you should see the network and aks modules in your list.
»Create a Workspace
Now, to complete the basic setup, we just need a workspace. From the Workspaces tab, click the New Workspace button. We're going to run this demo through our VCS, so you need to connect your VCS to Terraform Cloud. (Follow the in-app instructions, or you can find full instructions in our documentation: Connecting VCS Providers to Terraform Cloud.) Finally, you need to name your workspace. For this demo, we’re using: my-other-house-is-a-datacenter.
Now we are ready to get started building some infrastructure!
»Step Two: Writing Configuration
With our relevant providers and modules in hand, we're ready to create a Kubernetes container on Azure. At a high level, we're going to:
- Ensure we can authenticate
- Set up our configuration
- Deploy our configuration
»Authenticating to Azure
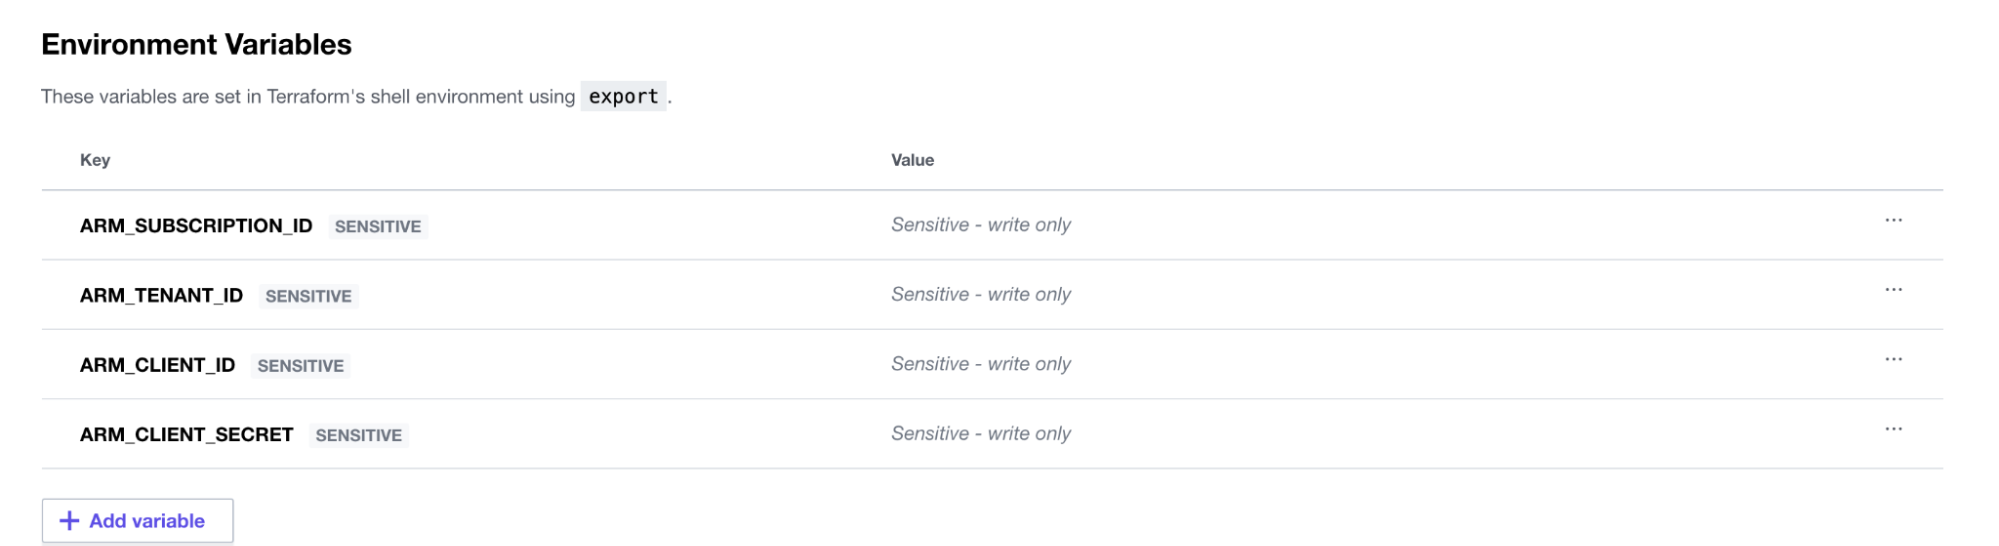
First, we need to set up our Azure credentials so that we can deploy our infrastructure. Terraform Cloud allows for these values to be set at a workspace level. We can allow our Terraform runs to authenticate by providing these Azure credentials via environment variables. (For more information on how to obtain these credentials, please refer to the Authenticating Using a Service Principal with a Client Secret guide or any of the relevant guides in the Azure Provider documentation.)
Then set the four required environment variables (ARM_SUBSCRIPTION_ID, ARM_TENANT_ID, ARM_CLIENT_ID, and ARM_CLIENT_SECRET) as shown below in the “variables” section of our Terraform Cloud configuration:
»Configuring an AKS Cluster
Terraform knows how to authenticate in Azure, so we're ready to set up our configuration. First, create a variables.tf file to maintain all the values we will be using regularly within our Terraform configuration. The file includes:
variable "project_name" { type = string description = "Globally used project name" default = "aks-in-action"} variable "region" { type = string description = "Azure Region that will be used" default = "West US"} variable "cluster_version" { type = string description = "The Kubernetes version for our clusters" default = "1.21.2"}Next, since we’re using Azure, we need to create a resource group to associate all our resources. Make a file called resource_groups.tf and configure it like this:
resource "azurerm_resource_group" "project" { name = var.project_name location = var.region}Then create a file called azure.tf where we'll invoke our provider. You can copy the code below or go to the provider in your TFC private registry, click Use Provider, and copy the configuration from there:
provider "azurerm" { features {}}Now, use our first module to define a network within our Azure account. For this, create a network.tf file and either copy the code below or go to the network module in our private registry, click Use Provider, and then copy the configuration from there:
module "network" { source = "Azure/network/azurerm" version = "3.5.0" resource_group_name = azurerm_resource_group.project.name address_space = "11.0.0.0/16" subnet_prefixes = ["11.0.1.0/24"] subnet_names = ["subnet1"] depends_on = [ azurerm_resource_group.project ]}Finally, we need to add an aks.tf file that instantiates the AKS module. Again, copy the config code below or find the module in your private registry and copy the configuration from there:
module "aks" { source = "Azure/aks/azurerm" version = "4.13.0" kubernetes_version = var.cluster_version orchestrator_version = var.cluster_version resource_group_name = azurerm_resource_group.project.name prefix = var.project_name agents_count = 3 vnet_subnet_id = module.network.vnet_subnets[0] os_disk_size_gb = 100 # see https://www.terraform.io/docs/language/meta-arguments/depends_on.html depends_on = [ module.network ]}All the configuration we need is now in place, and we can now deploy our AKS cluster.
»Deploying an AKS Cluster
We're moments away from having an AKS cluster up and running.
Terraform Cloud gives you the choice of a few different workflows for provisioning. You can:
- Employ a GitOps-style workflow where commits to
mainor another branch drive your infrastructure deployments. (See the UI- and VCS-driven Run Workflow documentations for information on how to set that up.) - Run the following commands (in the order listed) locally via the CLI:
terraform init,terraform plan, andterraform applyto apply your infrastructure. - Manually trigger from the Terraform Cloud UI by clicking on the workspace you created, choosing Actions, Start New Plan, and then Apply.
Once the deploy has run, we can watch the Terraform Cloud run in the UI and see instant feedback on where our cluster is at in its instantiation process:
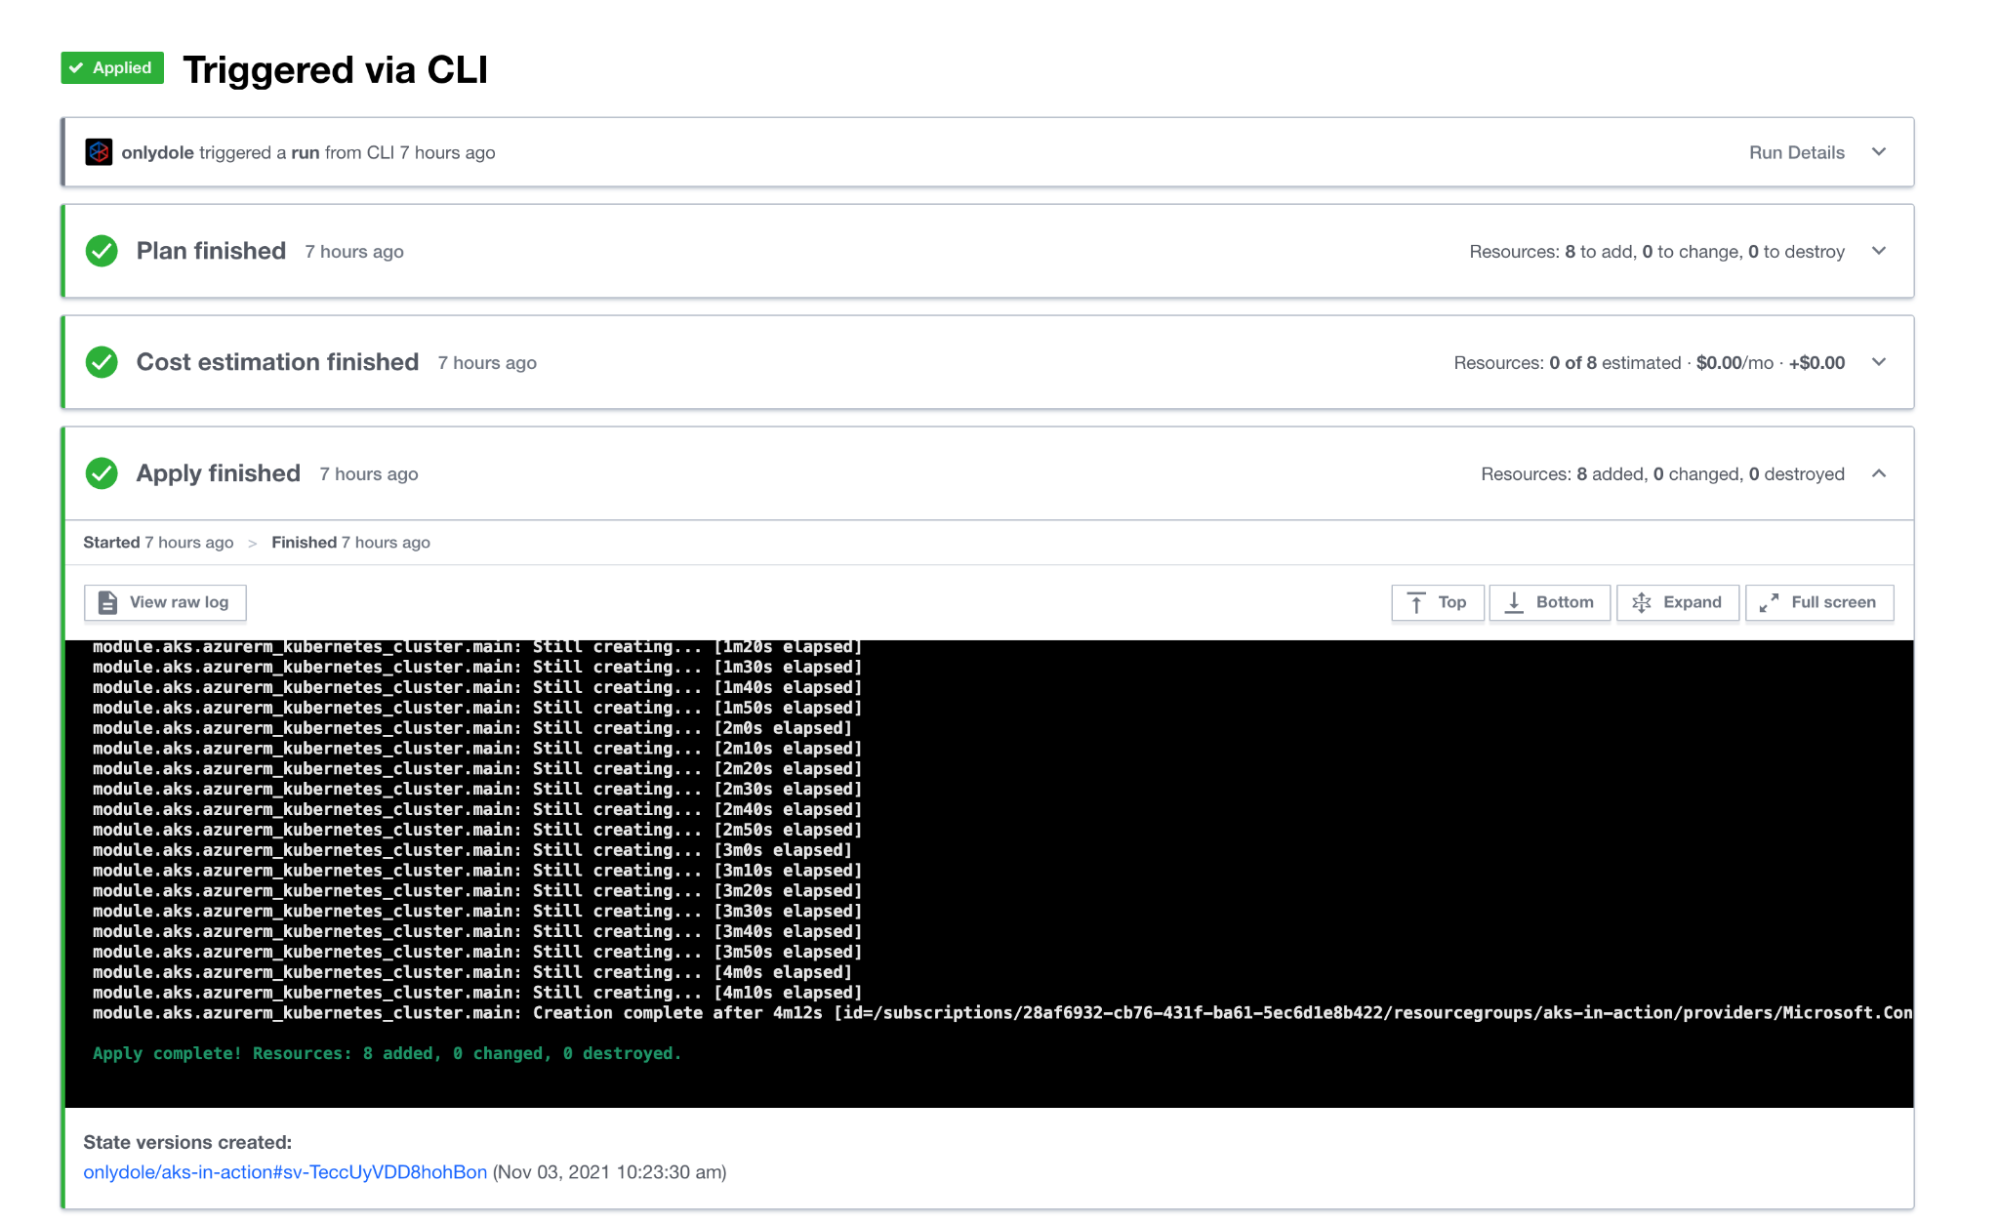
When the deployment has finished, Terraform displays the following message:
Apply complete! Resources: 8 added, 0 changed, 0 destroyed.
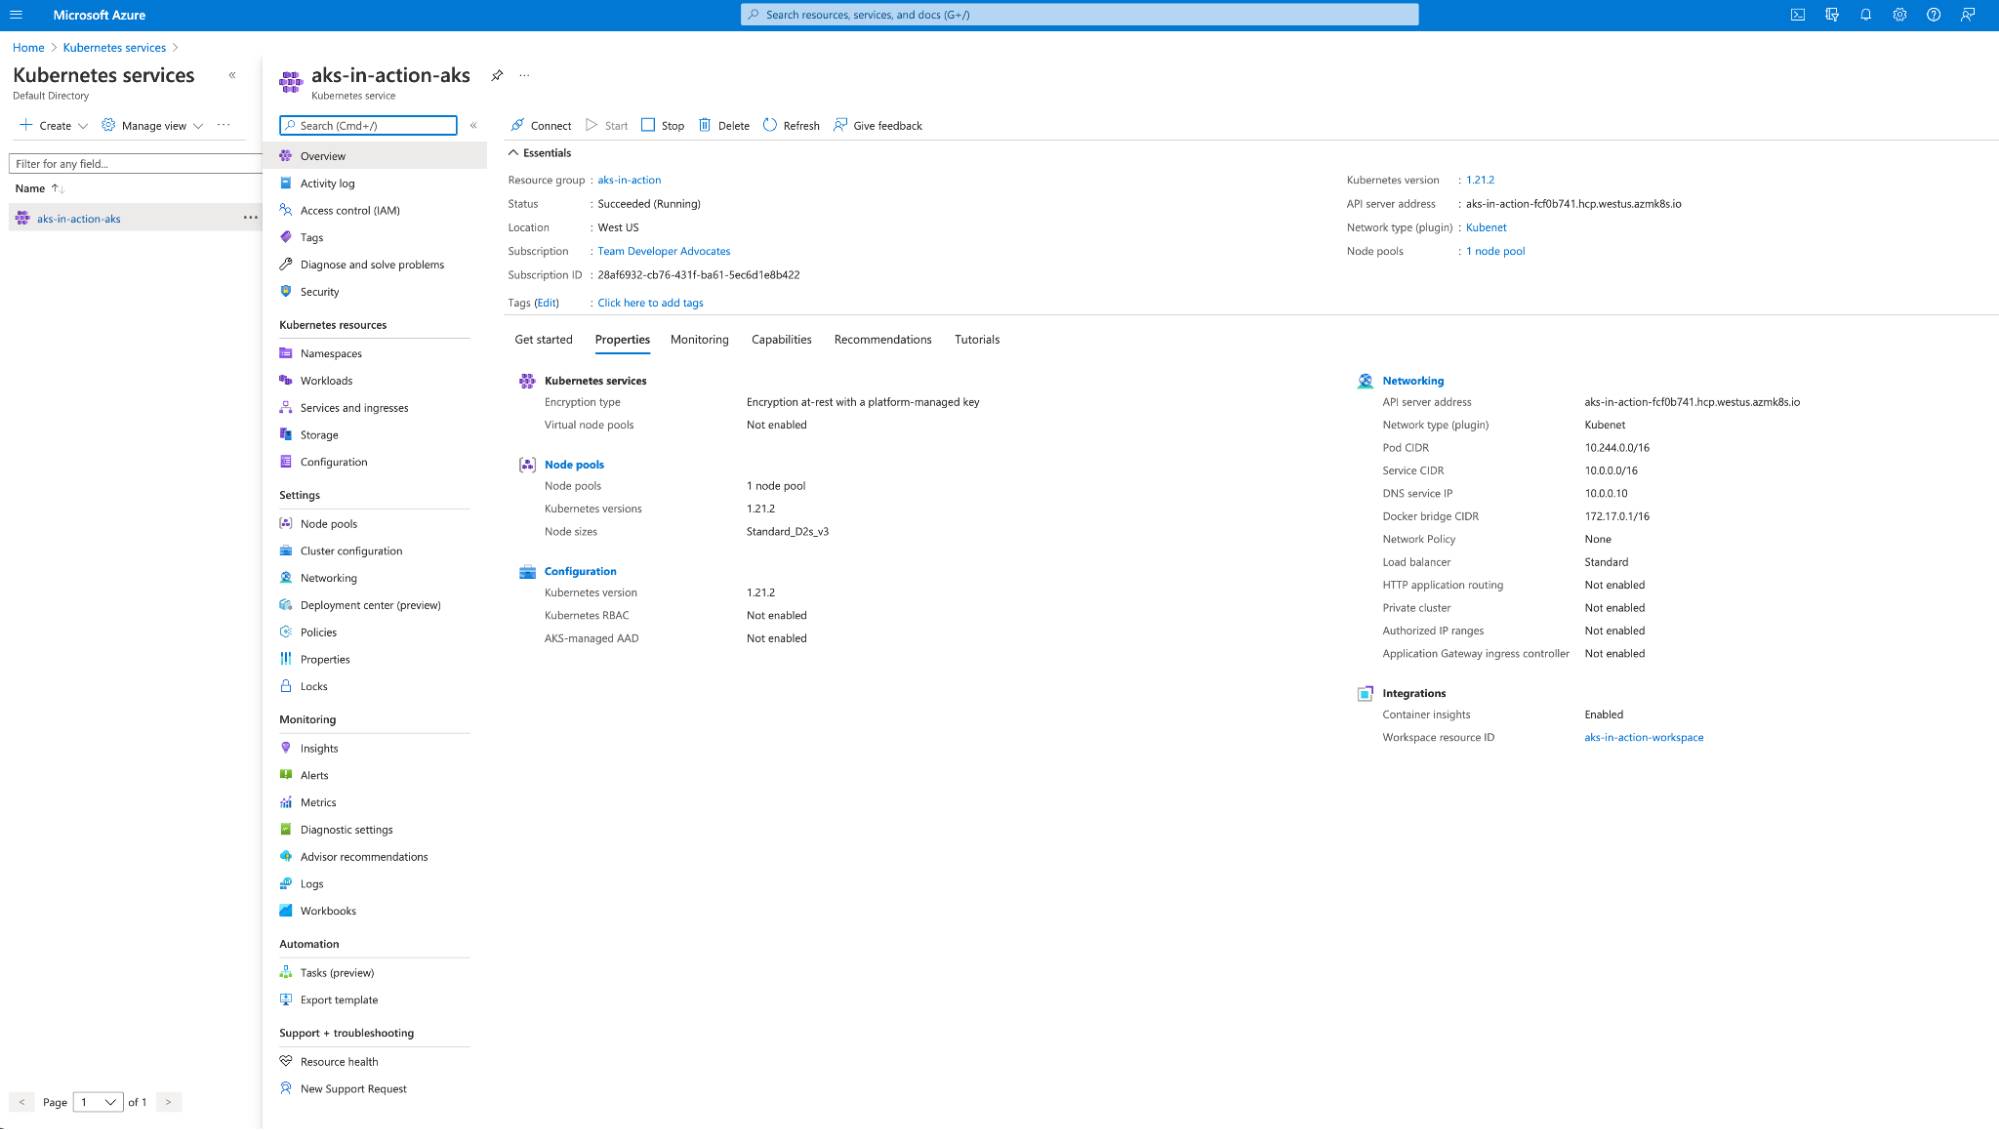
To confirm the creation of the AKS cluster in our Azure cloud interface, browse to the Kubernetes Services blade in the interface and click into our cluster for more details:
That’s it. Now, if you’d like to keep this AKS cluster up and running, you can simply leave it be. If you’d like to not be billed for this, you can tear down the cluster by running terraform destroy and answering Yes to the prompt when asked, or via the Terraform Cloud UI according to the UI- and VCS-driven Run Workflow instructions.
»Conclusion
The Terraform Registry has more than 7,000 modules and 1,600 providers to choose from. And now it's all available within Terraform Cloud.
We've shown you just one option among many for building infrastructure. Check out our HashiCorp Learn Guides to see how to set up essential AWS, Docker, GCP, or OCI infrastructure, and get in-depth information on many other Terraform topics. Show us what you've built by tweeting @hashicorp.
Check out these links for more information on:
Sign up for the latest HashiCorp news
More blog posts like this one

A blueprint for cloud success with HashiCorp at Google Cloud Next
A recap of HashiCorp infrastructure and security news and developments from Google Cloud Next, from scaling infrastructure as code to fighting secrets sprawl and more.
Terraform 1.8 improves extensibility with provider-defined functions
New in Terraform 1.8: Provider-defined functions let users extend Terraform with custom capabilities. Plus, refactoring can now be done across resource types.

Terraform 1.8 provider functions for AWS, Google Cloud, and Kubernetes
See usage examples of Terraform 1.8's new launch-day provider-defined functions for AWS, Google Cloud, and Kubernetes.