"Developers always take easy path. So if you make the easiest way the right way, then you have the right outcome.”— Suneer Pallitharammal Mukkolakal, Lead Platform Engineer, World Bank
That’s the philosophy that drove the World Bank's platform engineering transformation as they went from 5-day infrastructure provisioning timelines filled with manual processes and configuration drift, to a 30-minute self-service platform that manages 27,000 cloud resources and supports 1,700 applications across Azure, AWS, and GCP.
The backbone of this new strategy was HCP Terraform, which World Bank’s platform team used to build golden paths that make security, compliance, and best practices the default.
Learn how they turned their hybrid, “snowflake” infrastructure pipelines into standardized platform products.
This blog post is based on a HashiConf session from Suneer Pallitharammal Mukkolakal, a Lead Platform Engineer at the World Bank.
Hybrid cloud challenges
There were five categories of complexity challenges that World Bank was facing:
Manual processes
- Click ops and ticket ops everywhere
- Configurations done by hand across multiple cloud subscriptions
- Manual processes leave fingerprints that become technical debt you manage forever
Configuration drift
- Inconsistent dev environments that looked nothing like production
- Lack of standard workflows to prevent drift
Compliance
- New cyber threats and regulations emerging every day
- Cloud vendors improving products constantly, everyone playing catch-up
- Keeping up with compliance requirements in a fragmented environment
Bespoke apps
- Every app treated as a special case requiring custom care
- Data teams needed handcrafted data platforms
- App teams needed custom application hosting environments
- Each request meant: gather requirements → sit with the team → design specifically for them → build and manage forever
- Hundreds or thousands of these one-off platforms running across their estate
Cognitive load
- Platform teams were managing unique snowflakes
- Developers, data engineers, and data scientists had to deal with complex, inconsistent setups
The turning point: The CIO put forward a transformative digital transformation plan that focused on building a strong platform engineering strategy.
Platform engineering strategy
Their platform engineering strategy is built on four pillars:
Developer experience
- Internal developer portal for self-service capabilities
- Golden paths for apps, data, and AI applications
- Scorecards to track platform quality and usage
Security by design
- Security policies converted to code instead of sitting in Word documents
- Version control, auditing, and automated, pre-deploy enforcement for all security policies
- Strong secrets management strategy
- Security scorecards for visibility
Unified platform standards
- Reusable, composable Terraform modules as the foundation
- Modules published in an internal private registry in the HashiCorp Cloud Platform (HCP) version of Terraform
- Standard governance: changes happen through code with a proper pull request process
- Standards can be changed and applied in a versioned manner
AI embedded workflow
- Coding assistance for all developers
- AI-assisted policy checks
- Strategy for AI-generated test cases, intelligent observability, and AI ops
- Automated documentation (not just for humans; also for prompt libraries to guide AI coders)
Platform engineering framework
To implement their platform strategy, World Bank planned their framework from the bottom up, using a pyramid approach:
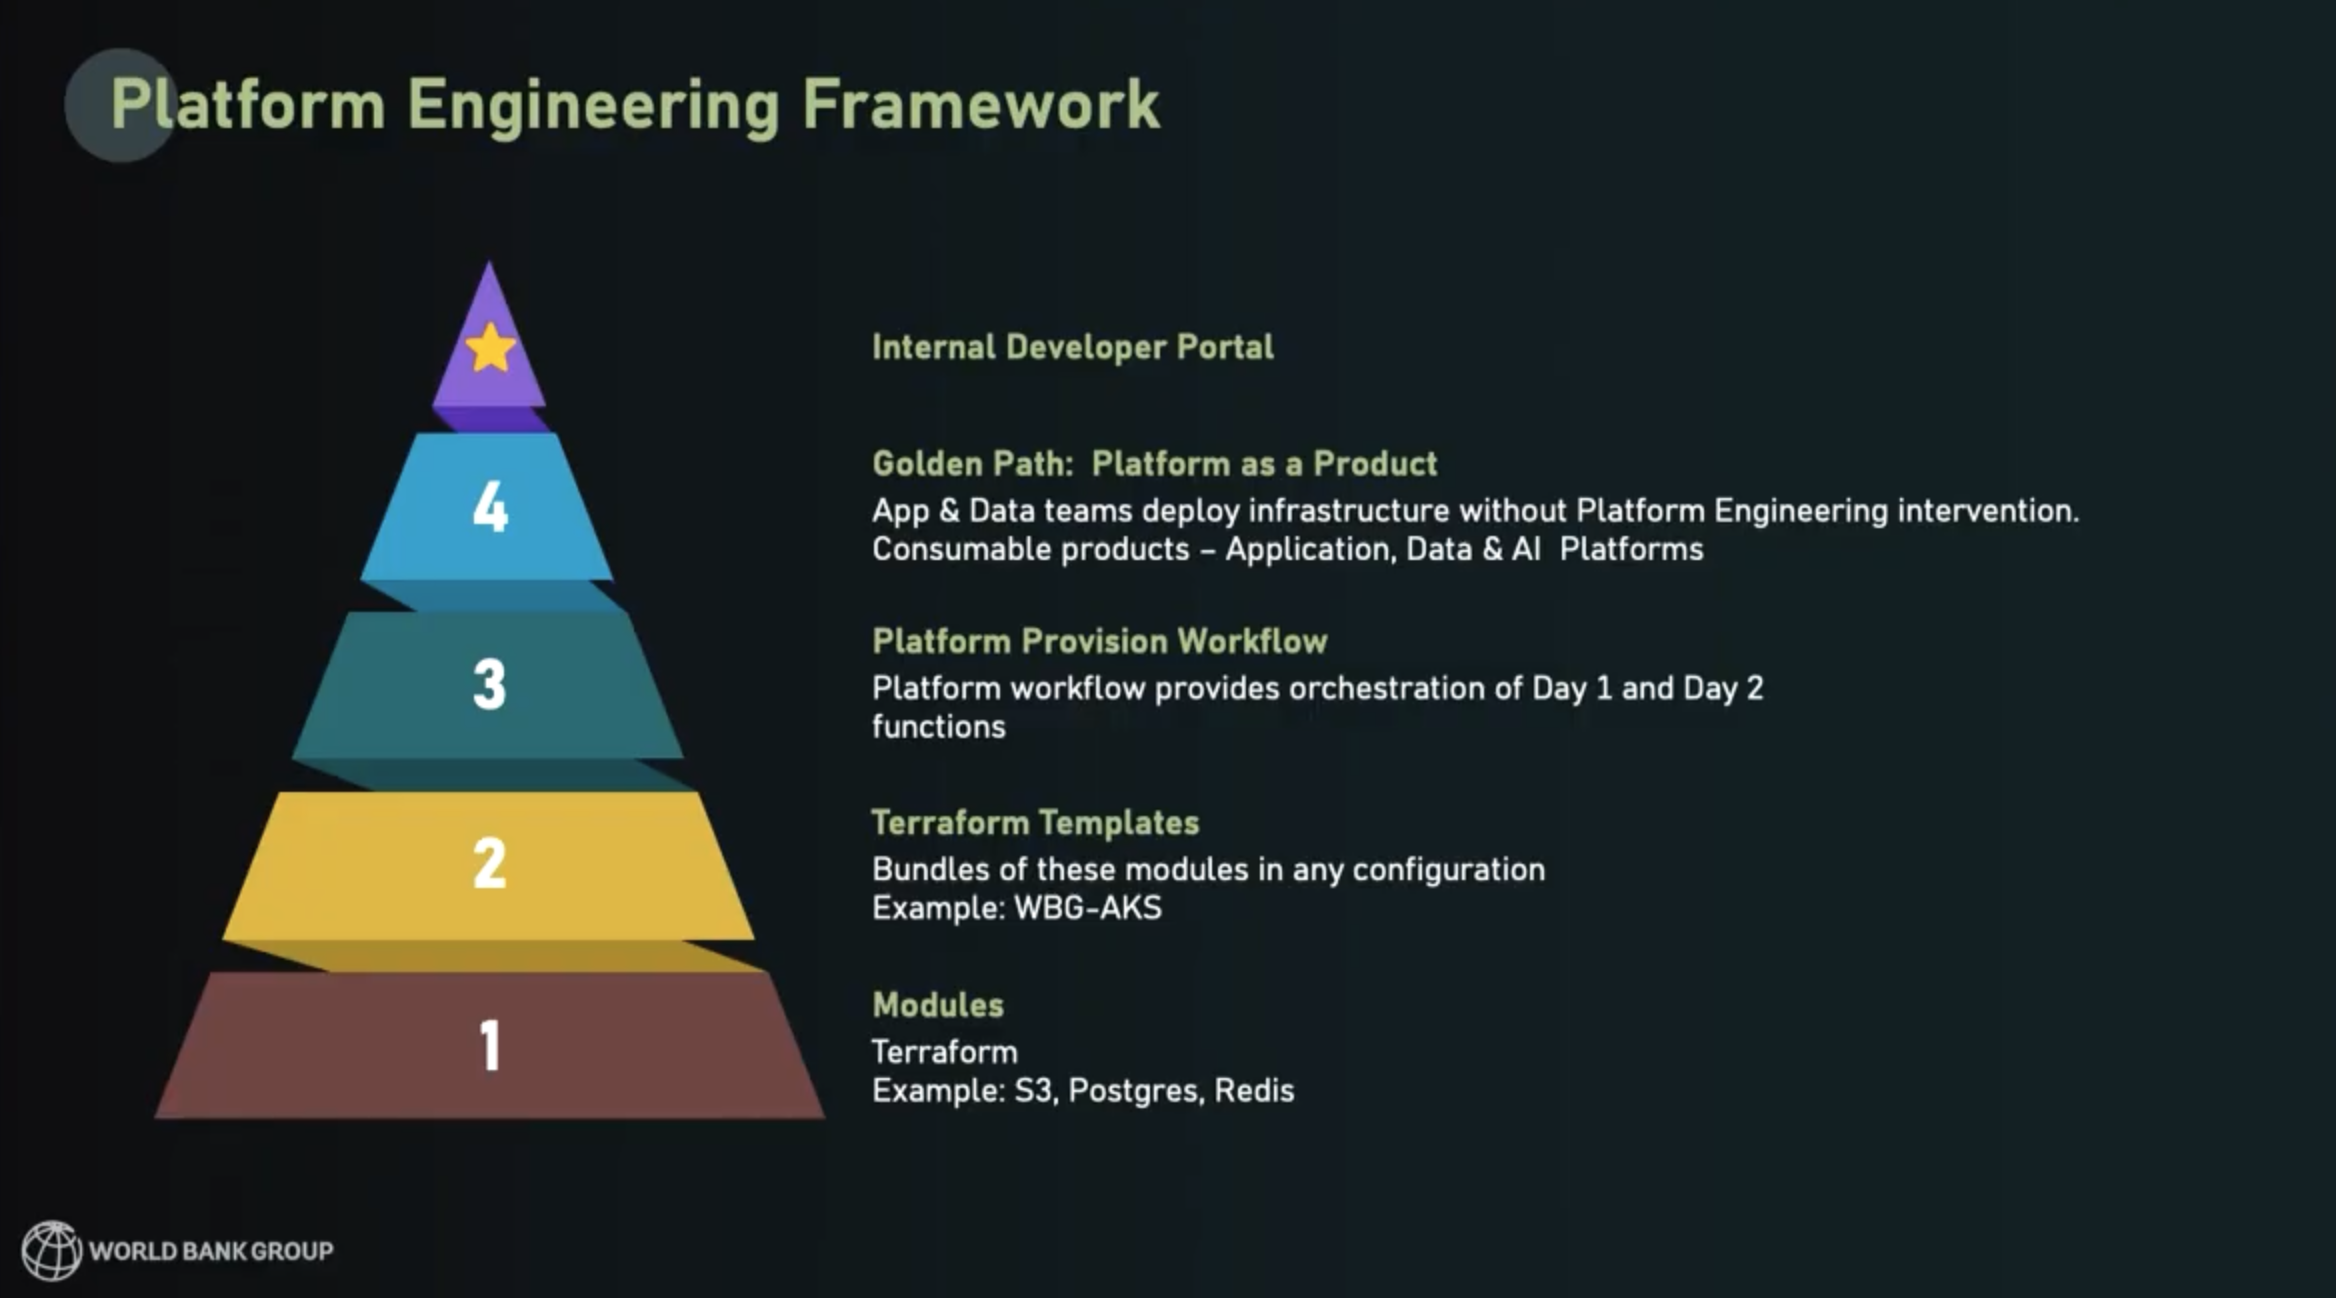
- Build all the necessary infrastructure components as Terraform modules that have security hardening and best practices built in.
- Build module bundles or “templates” that provide complete, usable deployments for developers (HashiCorp note: Terraform Stacks can help with this).
- Provide workflows to developers that orchestrate Day 1 and Day 2 functions with Terraform and other tools.
- After building layers 1-3, observe the common patterns that emerge and encode those workflows with best practices and controls built-in. Those workflows will be options in a golden path, available through the platform-as-a-product.
- Finally, build a ‘storefront’ for the platforms — an internal developer portal.
The Terraform self-service workflow
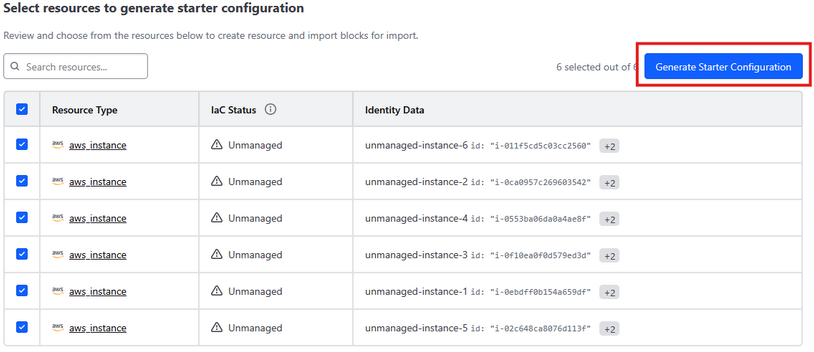
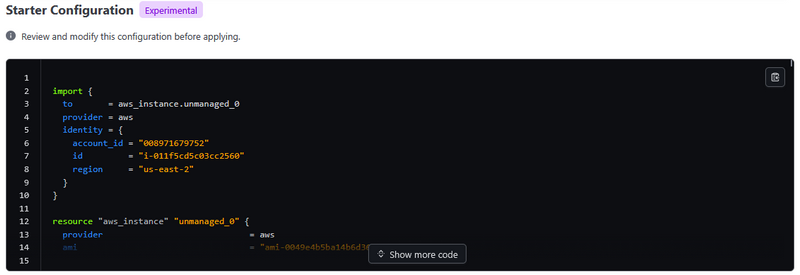
After World Bank built out their framework, they were able to provide developers with a secure, streamlined way to start using a pre-built application deployment stack. The process follows these steps:
- Developer requests a golden path product in the IDP
- This triggers a platform management pipeline that:
- Deploys HCP Terraform workspaces
- Prefills all variables
- Connects to the agent that will execute
- Configures the Git repository with golden path definitions
- HCP Terraform runs plan and execute to deploy golden path patterns
Within this setup, platform engineers can manage their operations at the Git-repository level, keeping maintenance simple for everyone.
The other half of this workflow is the shift-left security functions in the workflow.
Security embedded in the flow
It’s a fairly mainstream practice now to embed security in the software design and delivery workflow, not bolt it on at the end. This shift-left workflow reduces redevelopment costs and results in better security — so really, it’s better in every way.
Here’s how World Bank weaves security into their self-service workflow:
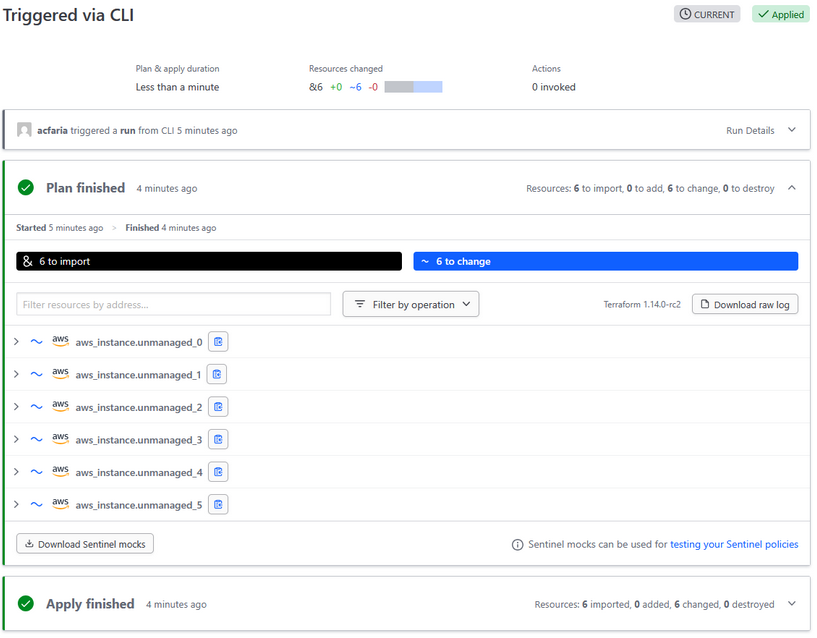
- When Terraform plan execution completes, the plan gets sent to World Bank’s security scanning tools using a Terraform run task integration.
- Security scans happen right at the gateway to provisioning
- Infrastructure only deploys if it's in compliance with security standards
- Policy as code checks also happen at this stage and they are enforced automatically
- If everything passes, the infrastructure is deployed to World Bank’s hybrid cloud environment: Azure, AWS, on-prem, and GCP, all in one unified workflow
You can see a diagram of the overall self-service workflow below:

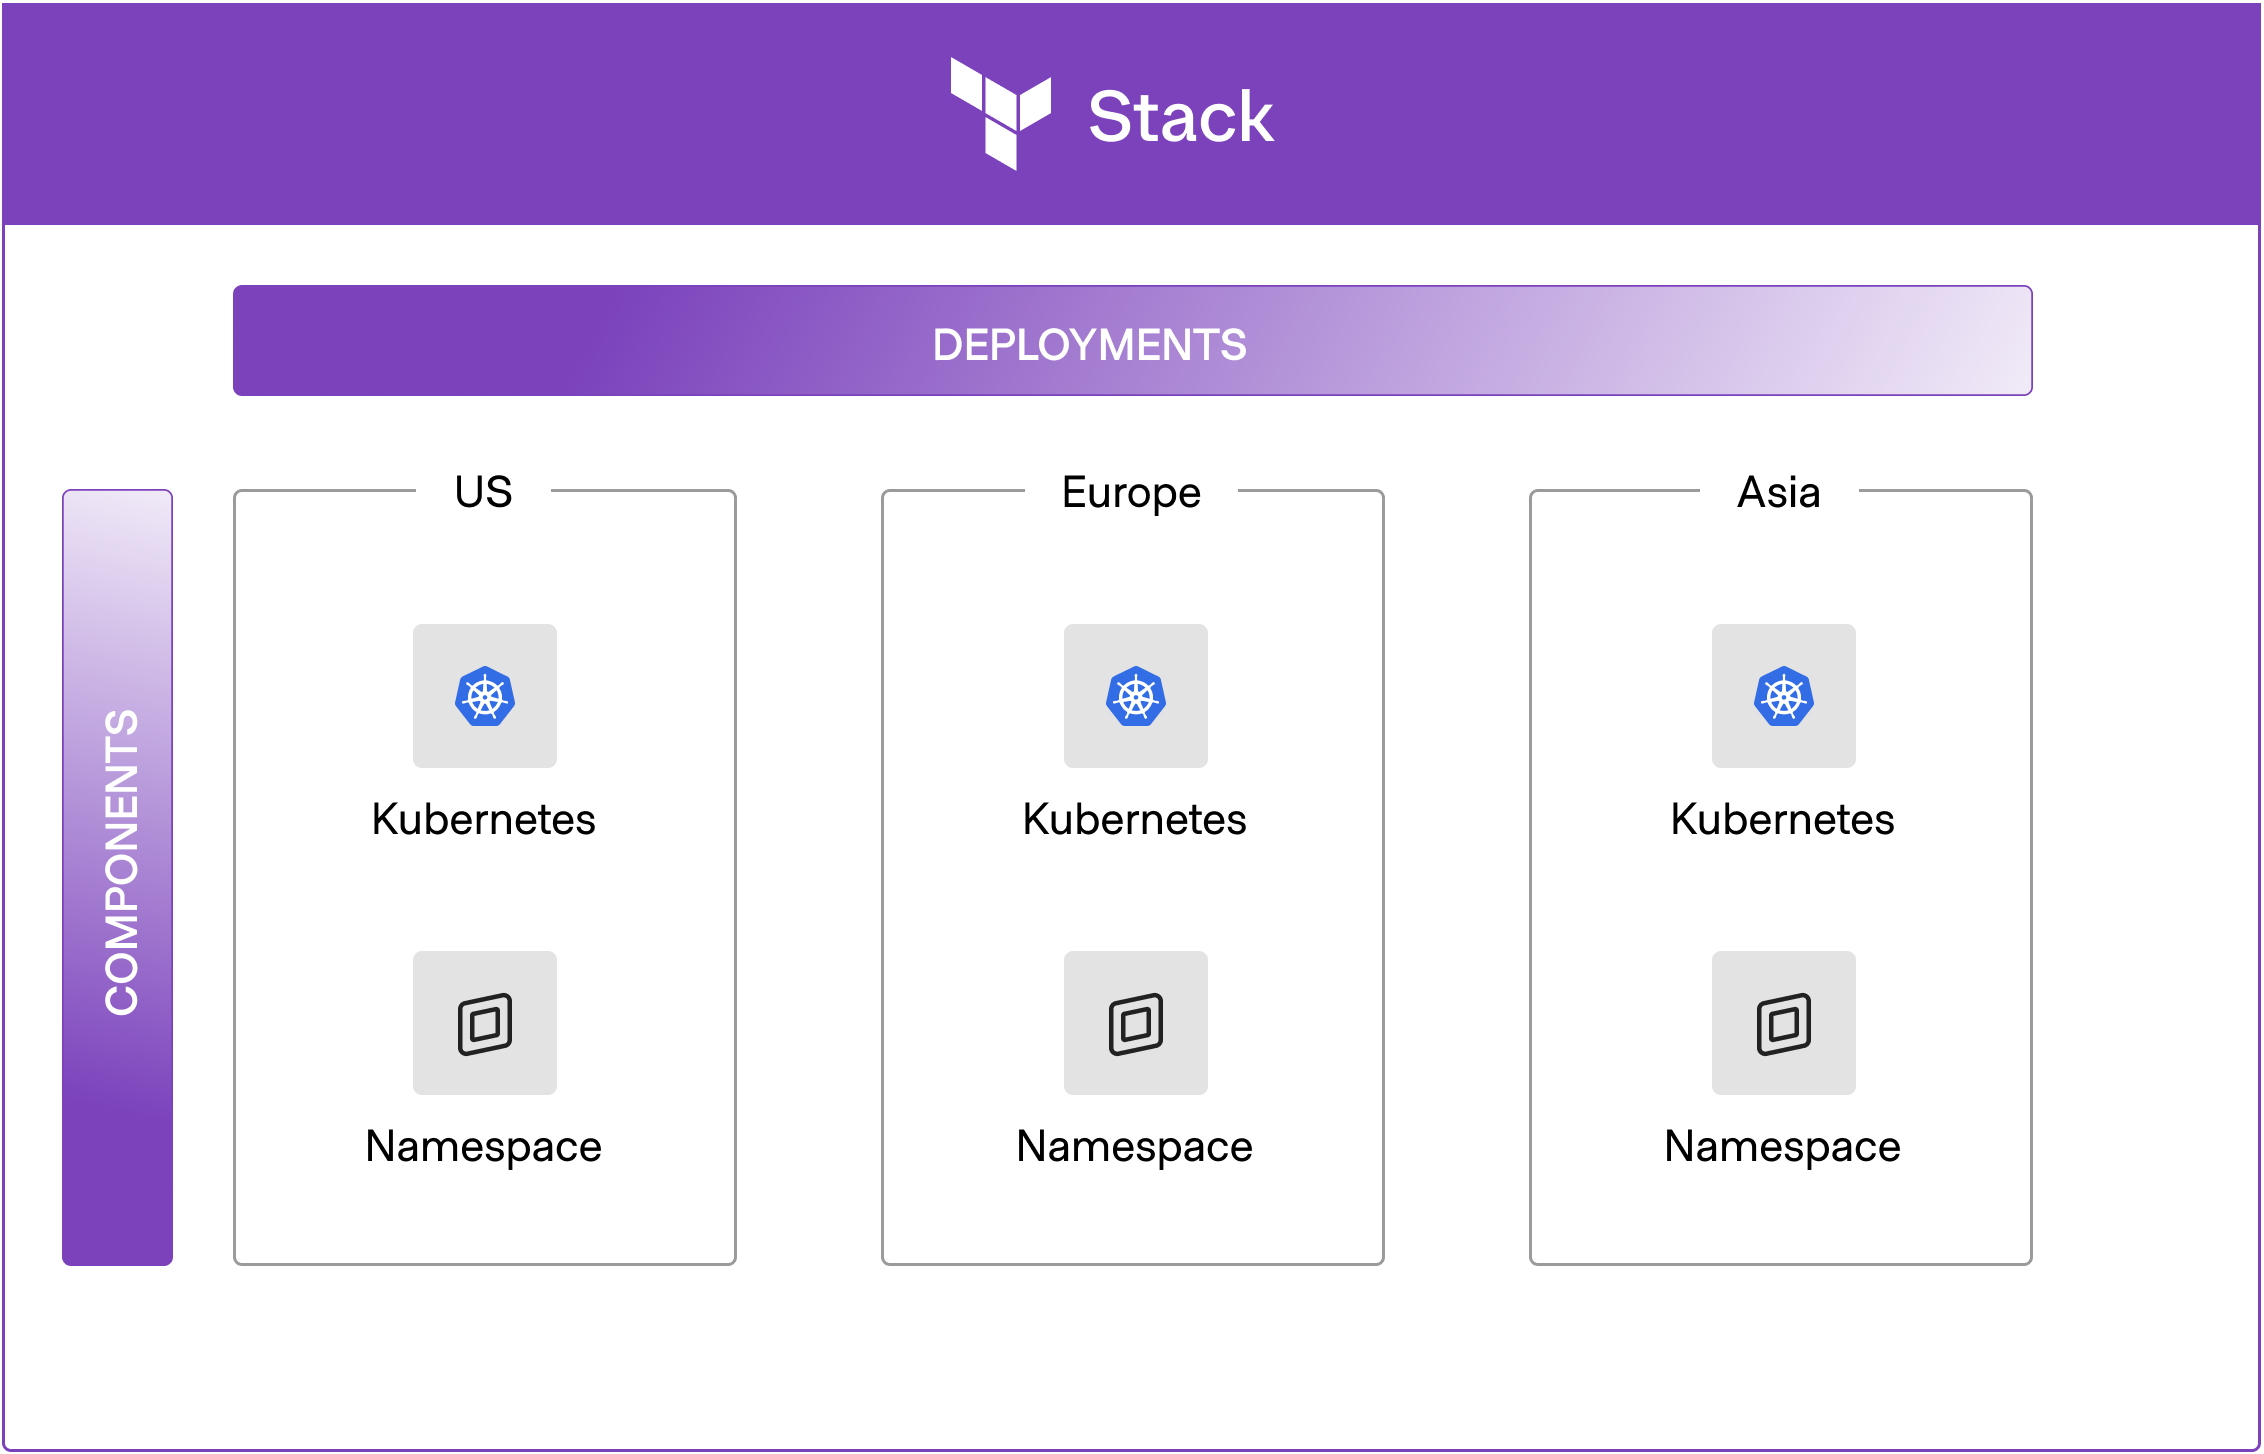
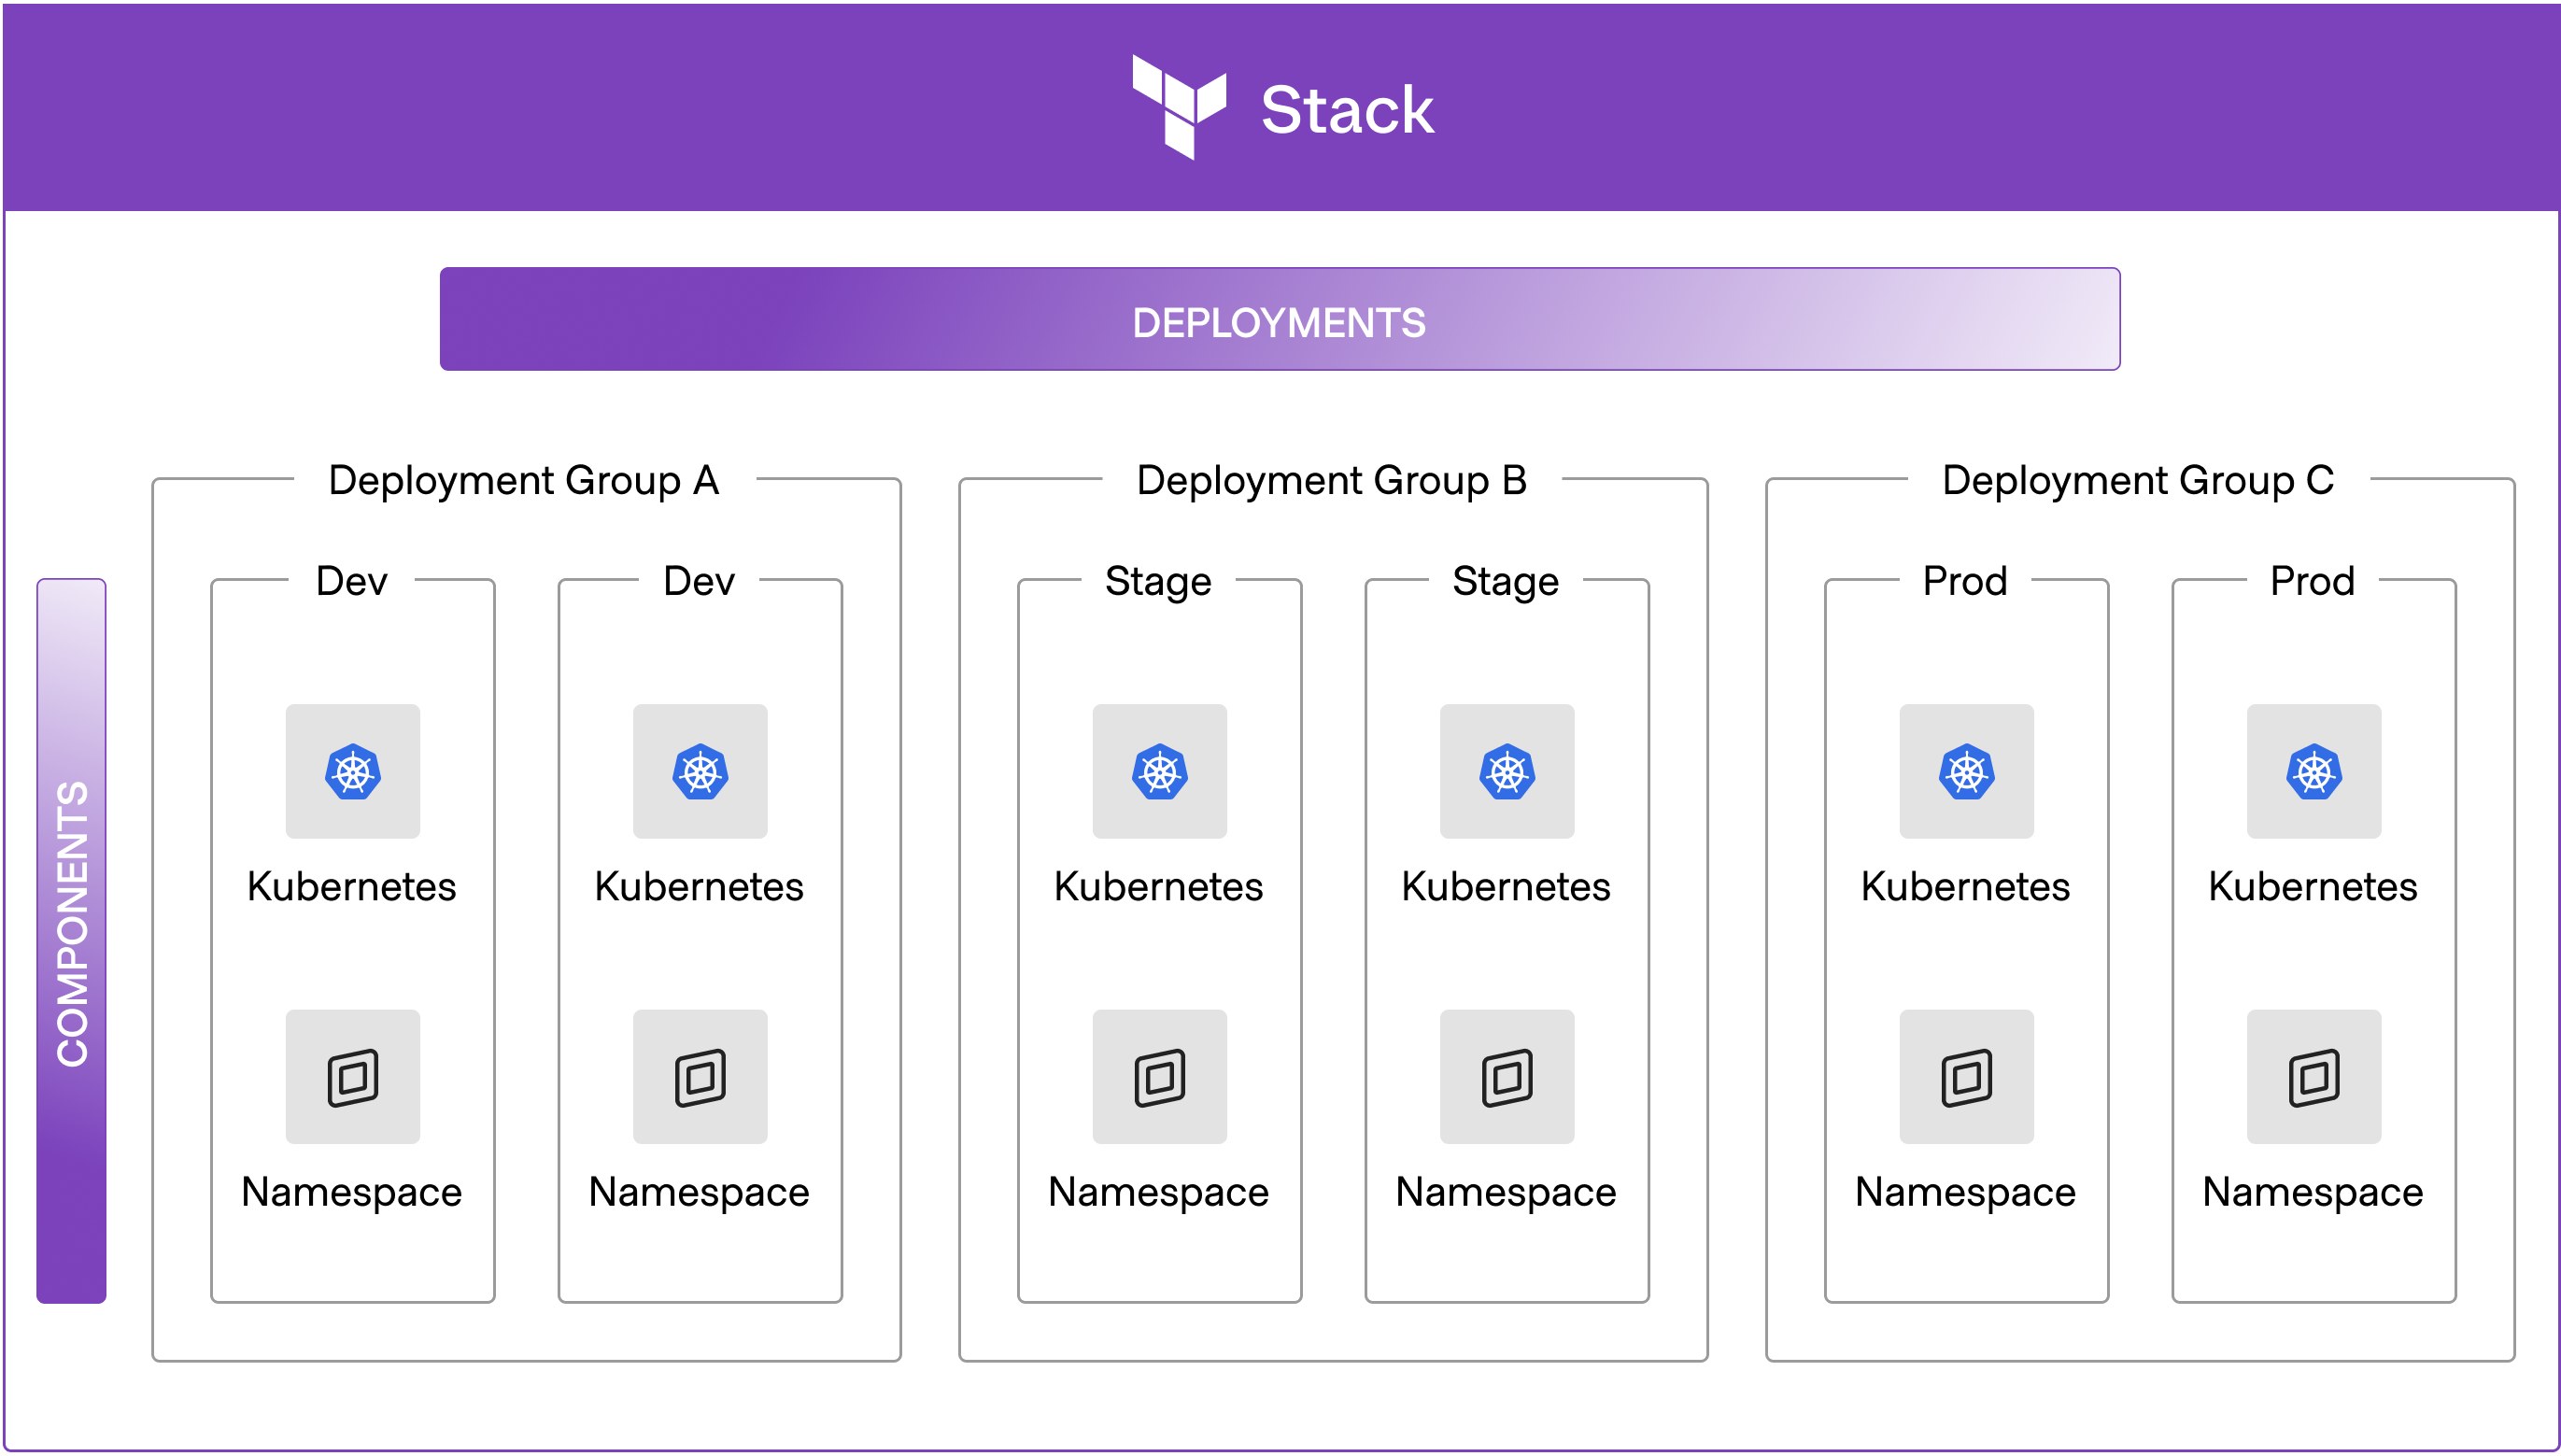
The architecture view
From an architect’s point of view, each standard template was built with the intention of striking a balance between flexibility and standardized consolidation. This is what the typical logical architecture looks like for World Bank’s platform deployments:
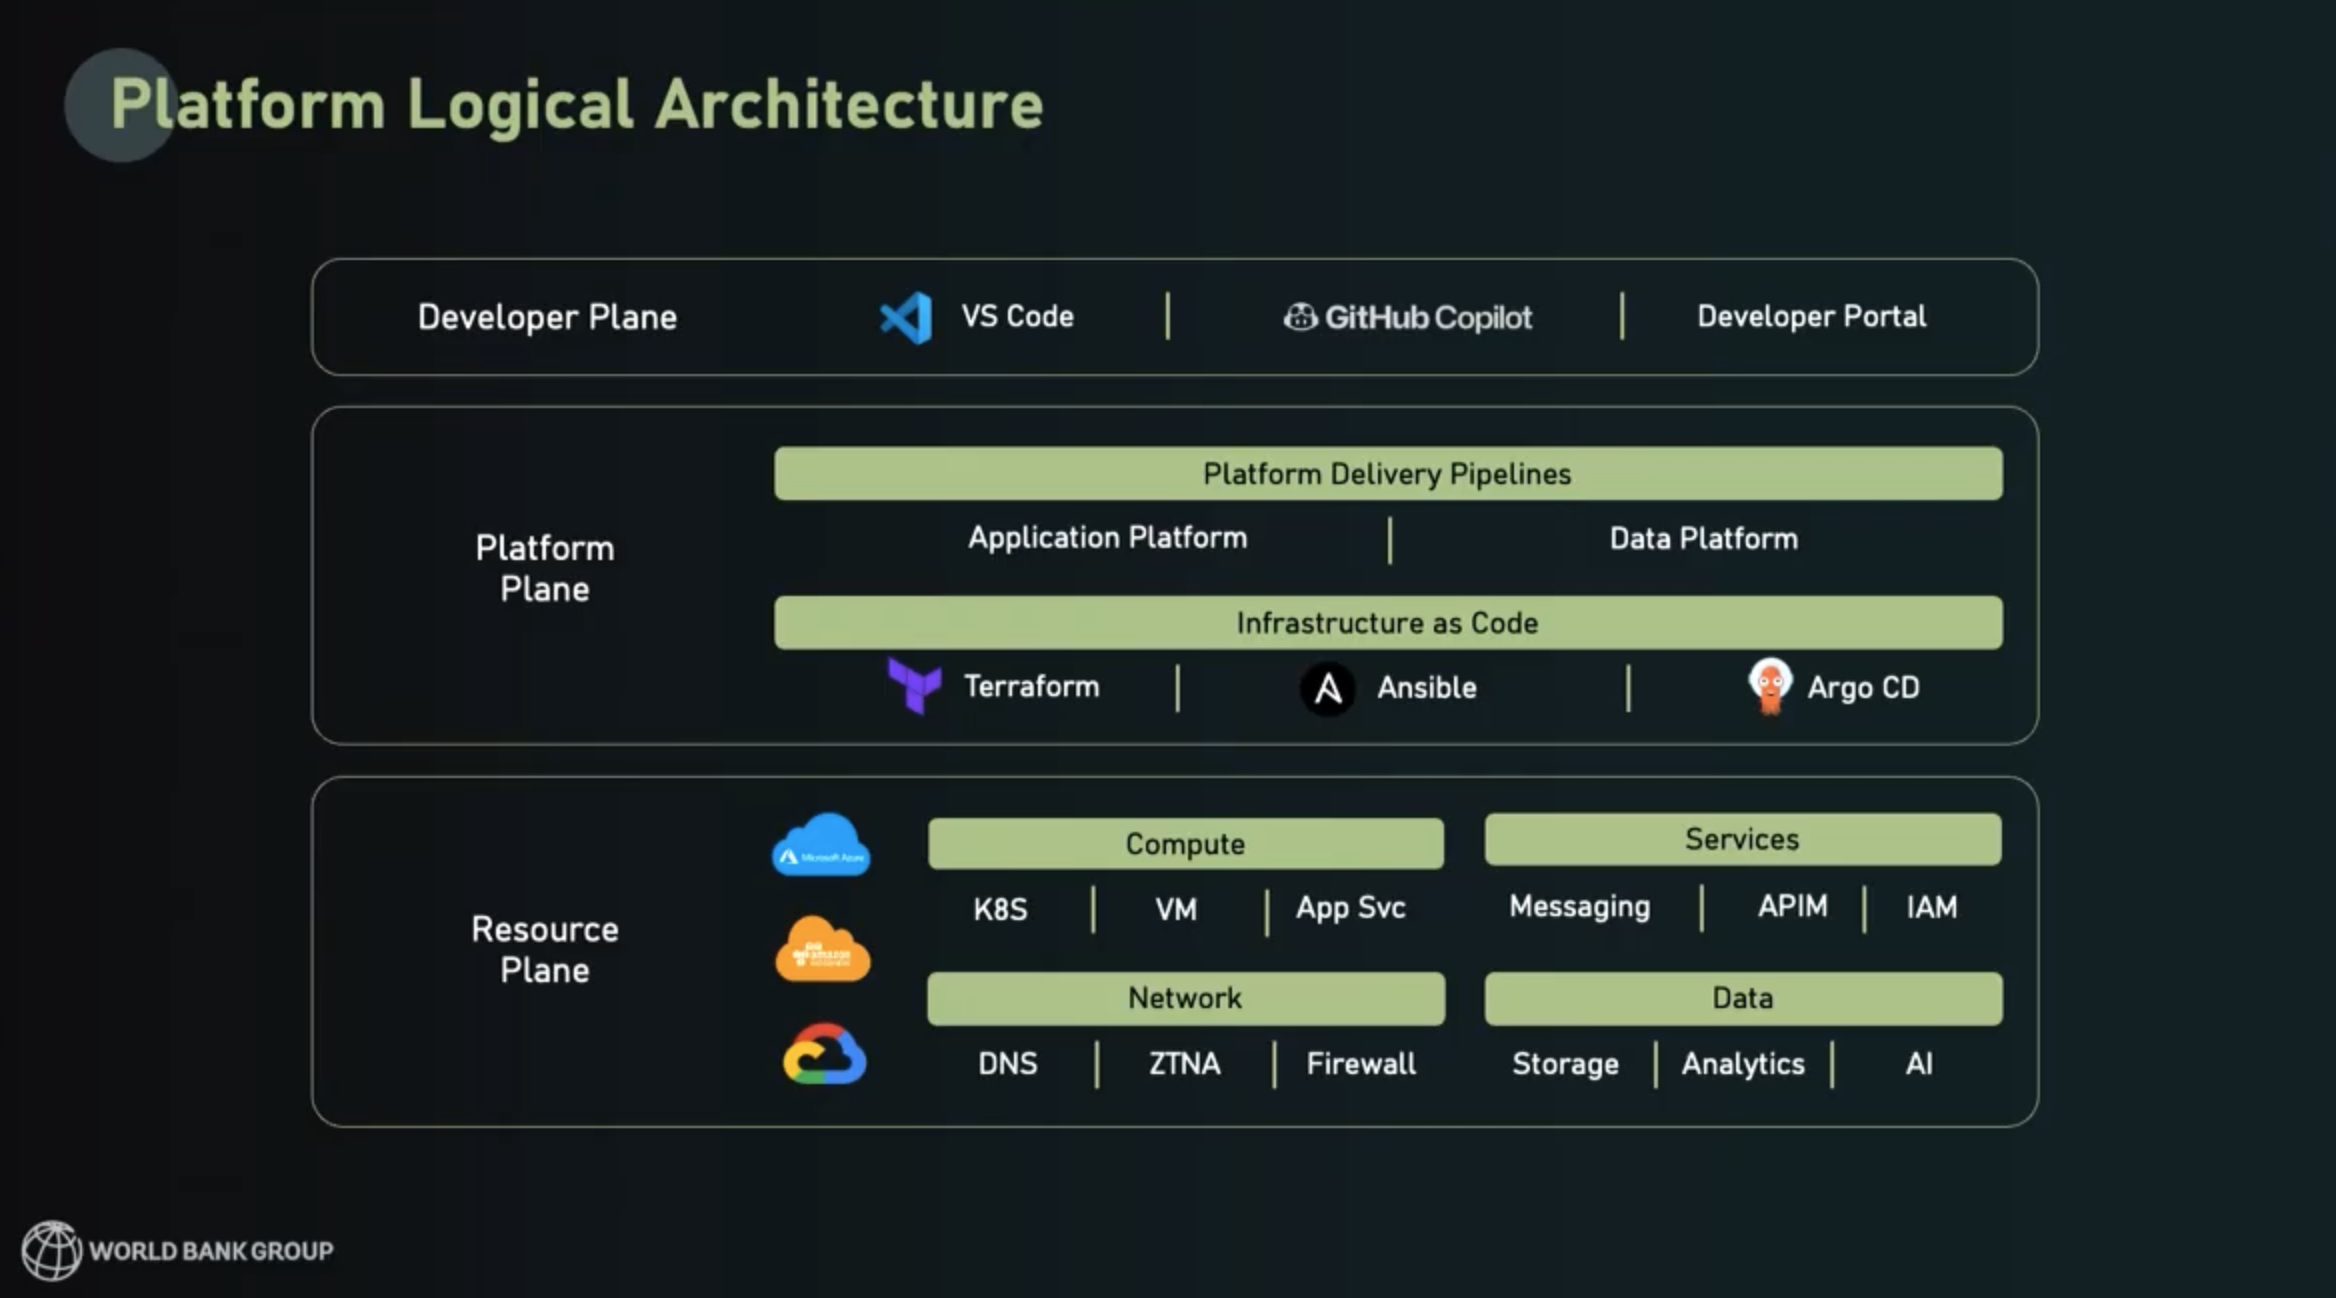
Each deployment has a resource plane, a platform plane, and a developer plane:
Resource plane (bottom layer)
- Includes services consumed from Azure, AWS, GCP, and on-prem
- Engineers have an array of choices under compute, network, services, data
Platform plane (middle layer)
- World Bank extensively uses Terraform, Ansible, and ArgoCD for platform delivery pipelines
- Their two platform products — Application and Data — are delivered as a service
Developer plane (top layer)
- Developers, data engineers, and data scientists have the most flexibility at this layer, which supports their use of IDEs, MCP servers, and AI tools like Copilot
- Users also have the internal developer portal (the “storefront”) available through a simple web interface.
Platform products: Application and data
Suneer described World Bank’s two main platform products from the platform team’s point of view. These platforms show where they thought flexibility and options were needed, and where certain capabilities were non-negotiable.
Application platform
Core stack:
- VNet with network security controls
- User interface, API, and database capabilities
- Standardized on NodeJS, Java, and .NET (not top-down—looked at what was most used in their estate)
- Multiple database options including PostgreSQL, MySQL, and Cosmos DB (NoSQL)
Optional capabilities (toggle on/off):
- Serverless functions (Azure Functions, Lambda-style)
- Caching (Redis standardized with security controls baked in)
- Object storage for videos and files
Security and authentication (non-negotiable):
- Authentication enabled everywhere
- Native authentication wherever possible
- Managed identity for most use cases
Standard components (always included):
- Monitoring, logging, key management, DNS, managed identity
These standard security and monitoring components were embraced by developers, because now they don’t have to think about how they want to add these things into their deployments. Security and observability are now built-in for every deployment.
The toggle approach is also beneficial because applications can start small, with most optional capabilities toggled off, and then add more capabilities later if their needs expand.
Suneer also described the data platform component for their work on data products and AI products.
Data platform components
Compute options:
- Analytical platforms: large compute clusters like Databricks, AWS EMR
- Data movement: data integration platforms like Data Factory, AWS Glue
- Protected with private endpoints
Storage options:
- Data lake
- Relational databases
- NoSQL databases
AI capabilities:
- Vector databases for retrieval augmented generation (RAG)
- LLM APIs: Azure, OpenAI, Claude, etc.
Security:
- Entire platform integrated with private endpoints/private links (whichever cloud vendor)
- Strong key management system for database connections
The best part of the toggle approach is that no one has to ask the platform team for support when they want to add capabilities. The toggles and flexibility of the platform products make these actions self-service.
Day 2 operations for platform engineers
Platform teams became much more productive as they developed these platform products. Instead of maintaining dozens of bespoke processes and fielding tickets for every single change request, they could do a lot more management and maintenance tasks in bulk and at scale. For example:
- The platform products are completely managed in GitHub and codified in Terraform code
- Version changes can be made quickly at scale - example: security vulnerability found in cloud vendor product → change Terraform module → release new version
- Security and compliance stakeholders can also make changes to checks and policy code in a scalable, versioned way
Key results: From days to minutes
Here were the major impact metrics that World Bank saw through the implementation of their platform strategy:
Greater delivery velocity
- Reduced infrastructure provisioning from 5 days to 30 minutes
- The 30 minutes is just execution time
Standardized infrastructure across the org
- 70% of teams now use the standardized platform offerings
- Built optionality within golden paths so everyone consumes the same services
- Organic increase in standardization across the organization
Scale and reach
- Deployed 27,000 cloud resources in record time
- Supporting 1,700 applications with just these patterns alone
- All while keeping infrastructure secure, consistent, and compliant
Lessons learned
There were six major lessons that World Bank learned during this transition:
Start small, standardize, and automate relentlessly
- Start with one bottleneck
- Automate as much as possible from start to finish
Adopt modular, flexible architectures
- Don't overengineer your Terraform modules
- Don't make them over-configurable
- Build the minimum viable module for your templates to function, then evolve accordingly
Apply team topologies and agile ways of working
- Critical when dealing with multiple teams: security, dev, data science, compliance
- All teams (security, dev, data science, compliance) have to work together for incremental progress
- Team topologies helped streamline teams and create clarity
Have clarity on the patterns that serve a majority of use cases
- You'll never succeed if you try to standardize workflows for 100% of all enterprise use cases
- You will still have bespoke “snowflakes” — deal with those separately
Embed AI in platform engineering workflows effectively
- Policy checks
- Coding assistance
- AI-powered automation throughout
Make the easy path the right path
Developers want to be secure and compliant, but it’s the platform team’s job to make that path easy. If it’s too hard, developers will find a way around it and you’ll have shadow IT. The less time developers spend handling the operational aspects of their development workflow, the more time they’ll have for creativity and bringing value to the business.
"Your developers' creative work truly begins where their wait time ends." — Suneer Pallitharammal Mukkolakal, Lead Platform Engineer, World Bank
To learn more about how we can help your company navigate the complexities of hybrid infrastructure for more secure, automated operations, read our guide to navigating cloud complexity and drop us a line to talk about your unique IT challenges.
Watch the full session from HashiConf below:
]]>