HashiCorp Coin: Building a Charitable Cryptocurrency Donation System with the HashiStack
Watch the HashiCorp developer advocate team work together on HashiCorp Coin using Nomad, Consul, and Vault to schedule and secure the system.
Watch members of HashiCorp's Community / Developer Relations team use Vault, Nomad, and Consul to secure and optimize resource utilization for their HashiCoin cryptocurrency system. The demo is massive in scope, showing you: - How to manage sensitive credentials and secrets like APIs, TLS certs, and DB credentials - How to monitor resource usage and optimize your container scheduling for peak usage and low usage - How to secure service network communications with a service mesh pattern, creating a zero trust network
Here's a Table of Contents:
00:00 - Introduction
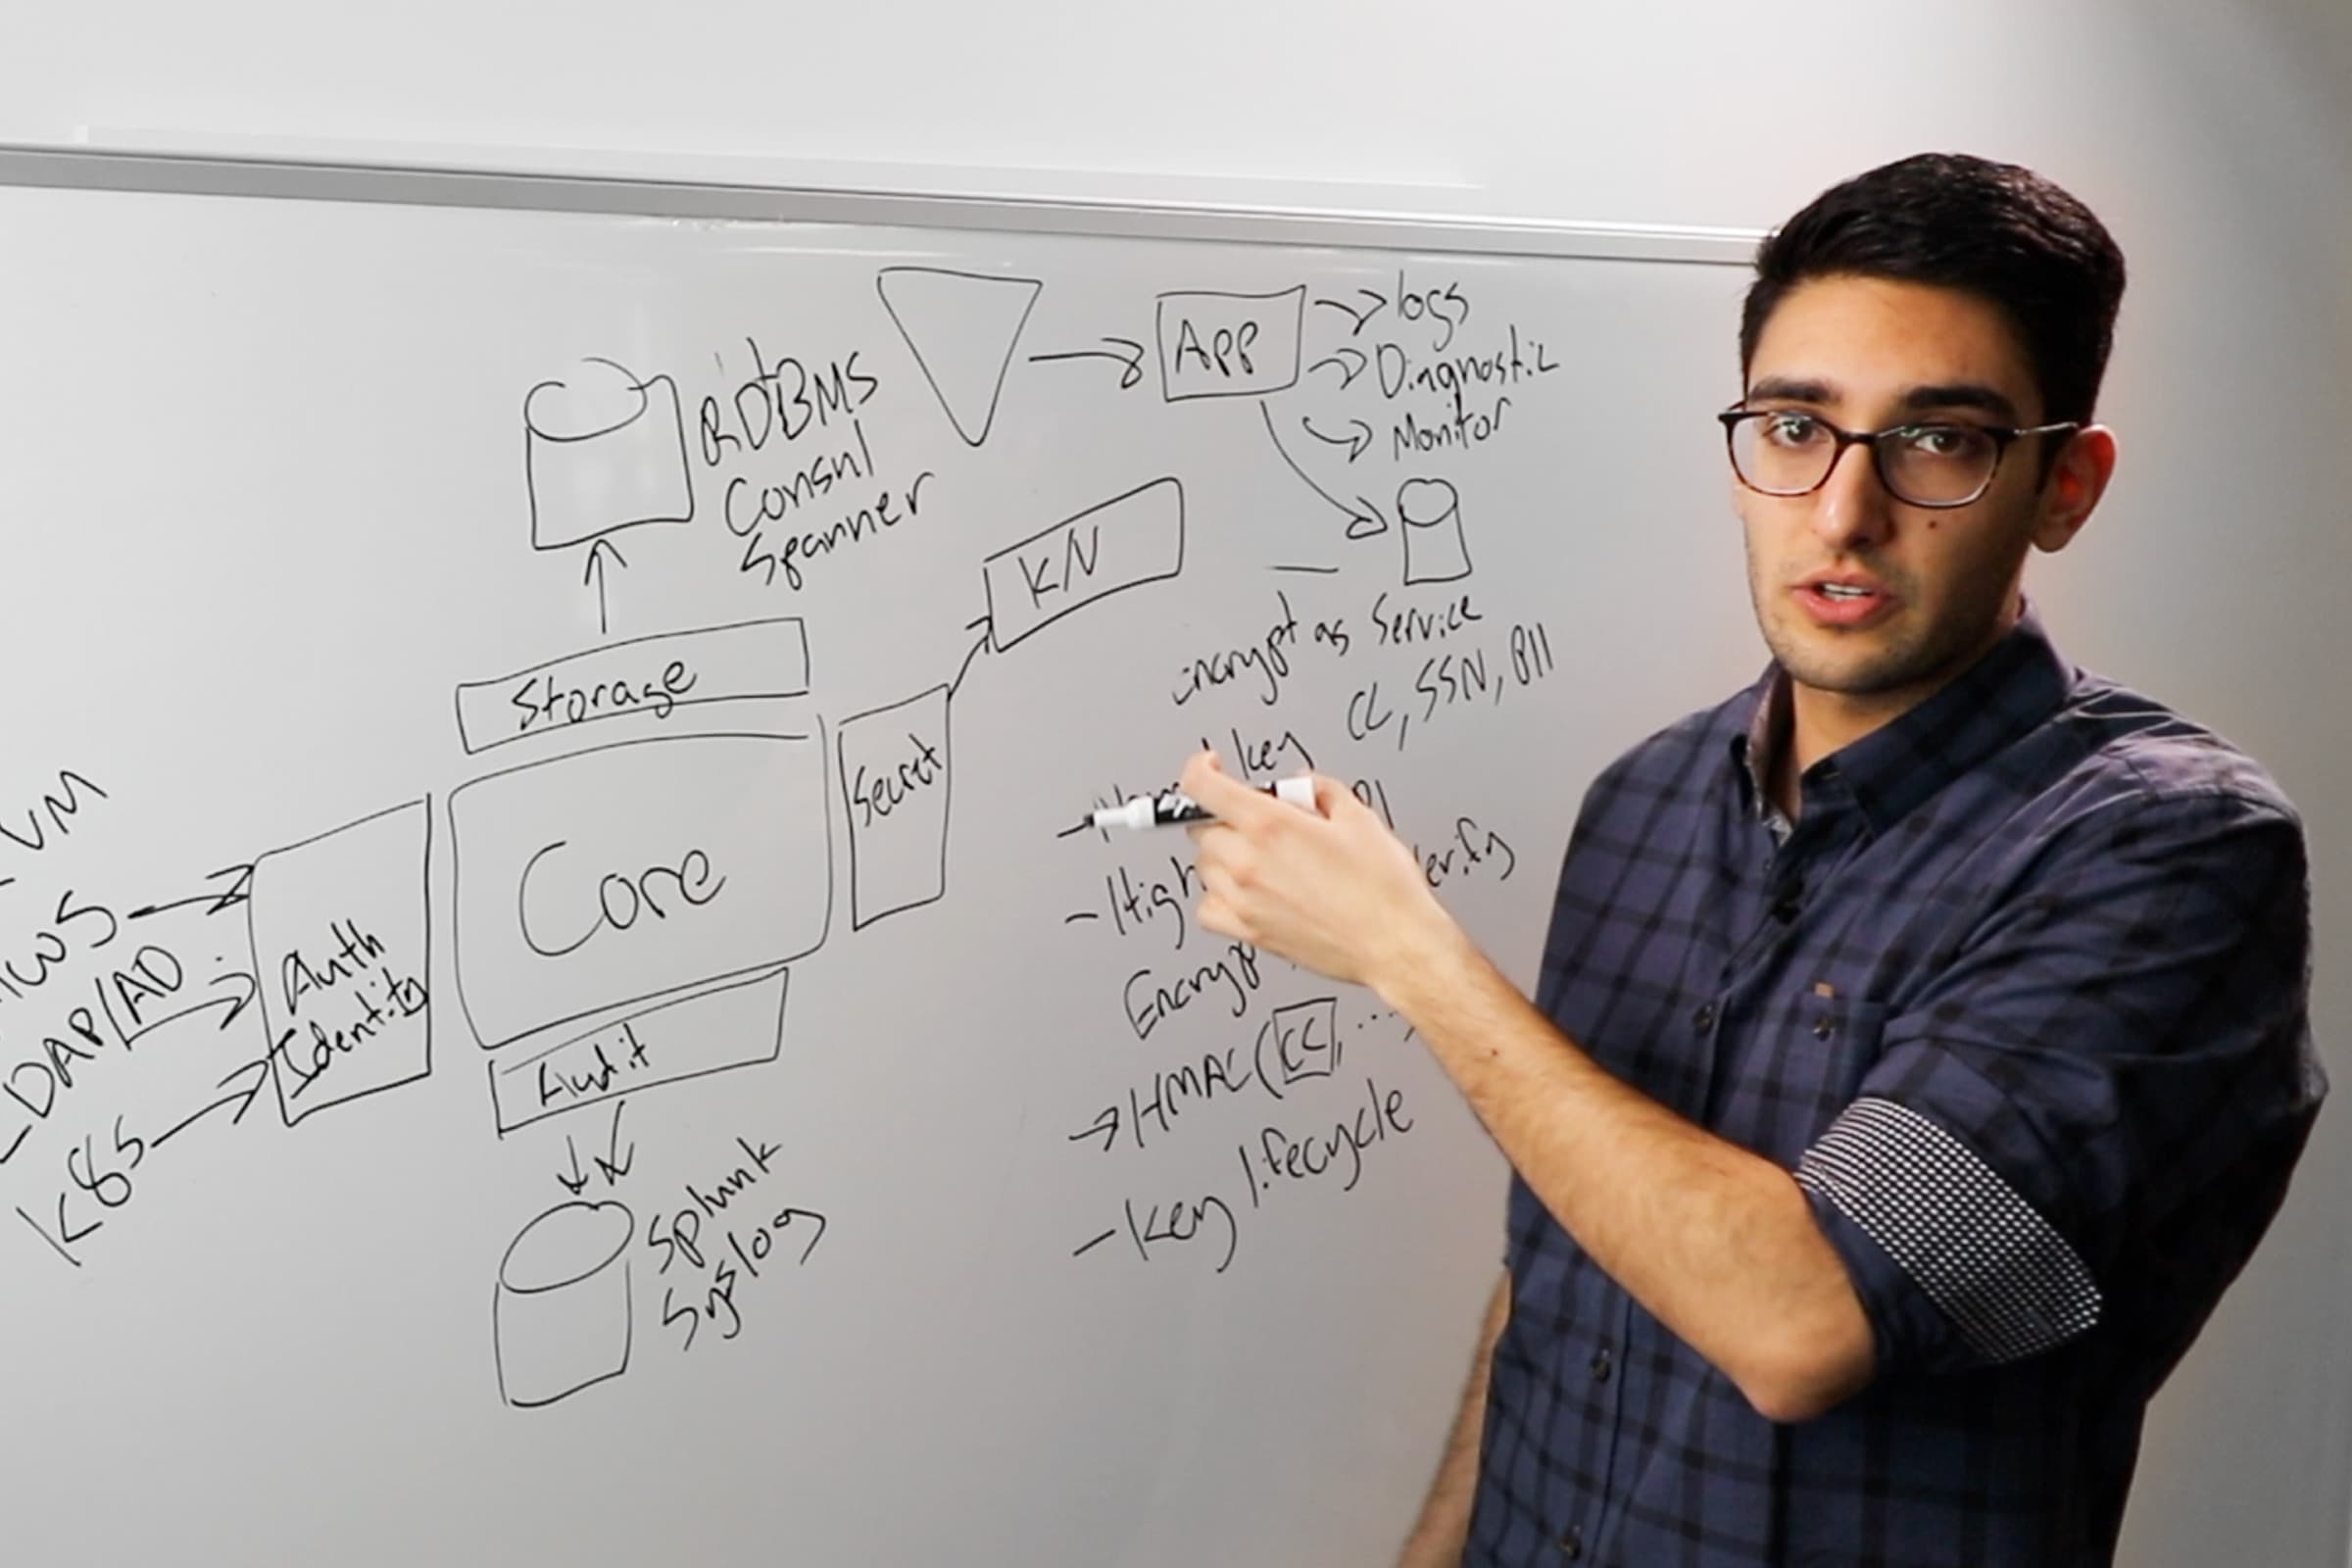
01:18 - Architectural Overview
03:30 - Digital Signing with Vault Transit Secrets Engine
08:10 - Batched Workloads with Nomad
10:30 - Network observability with Consul Service Mesh
12:44 - Dynamically shaping workloads with Nomad Autoscaler
18:22 - Validating Digital Signatures with Vault Transit Engine
20:32 - Secure Communications to Managed Datastores using Consul Service Mesh Terminating Gateways
27:26 - How to Vote
HashiCoin can be used for charitable donations and you'll learn more about how to contribute at the end of the video.
Speakers: Nic Jackson, Rob Barnes, Nicole Hubbard, Erik Veld, Katie Reese, Melissa Gurney, Kerim Satirli, Jacquie Grindrod, Jono Sosulska, Alexandra Freeman
Transcript
Melissa Gurney Greene: Hello, HashiCorp community. Wow. We made it. Let's take a moment and just take a breath. These are without a doubt, challenging times at the moment, and we want to treat them with the seriousness and the respect that they deserve. In light of that, a keynote that is technical and about this utopian future right now just didn't feel like the right thing to do.
Kerim Satirli: Exactly. When we want to do instead is to allow you to take 30 minutes to lean back while we take you on a journey, we'd like to show you something new about how our tools can work together.
Melissa Gurney Greene: From our home to yours, thank you for engaging with us and each other. Because while infrastructure may bring us together, that's what we do in those times that has the potential to make the biggest impact. Now, let's work together and build something cool.
Nic Jackson: So I'm sitting having conversation with Armon (Dadgar) and he starts to express his passion and his love for the blockchain. So we had to build a demo for this talk. We're thinking, "Well, we have to use a blockchain because Armon loves them so much. And well, it just sounds like a great idea." And well, if we're going to use a blockchain, we've really needed a cryptocurrency. And if we need a cryptocurrency, the cryptocurrency needs a purpose and what is that going to be? Well, that led to HashiCorp Coin and HashiCorp Coin is a cryptocurrency specifically designed for charitable donations.
Nic Jackson: One thing first though, we are professionals. None of the code that you see in this demo should be tried at home. But our system, right? What did we build? So we built a typical multi tier system. It has an API, it has, of course a blockchain, all of the services are running under Nomad.
Nic Jackson: We're employing good zero trust practices. The public facing apps and data stores are running in separate VPCs and we've got Consul service mesh managing network access between them. We're going to take you on a journey of a HashiCorp Coin as it travels through the system. And it all starts with the birth of a HashiCorp Coin. To ensure the security of a coin. It needs to be cryptographically signed.
Nic Jackson: We then need to mine a bunch of these so that we can use them in the voting process. The application cluster is running two very different types of workloads. One is mining the coins and the other is handling voting requests. We need to ensure that the server is able to serve your requests, even under a heavy load. And this all starts with understanding the demands on the server. Once we understand these demands, we can start to dynamically allocate resources between voting and mining. We then need to ensure that a coin is valid before we commit your to a life of digital purgatory on the blockchain.
Nic Jackson: It's shipped off over the river Styx via a secure transport between the application server and the managed data stores. And this all begins with digital signing. We're going to use Vault's transit secret engine to do this. Transit secret engines often regarded as encryption as a service. Developers and operators don't need to worry about the implementation of the encryption process.
Rob Barnes: So all I have to do is use the APIs to generate a digital signature. I don't need to write any fancy cryptographic code or anything and understand the inner workings of how I can keep that secure. Vault takes care of that for me. And thankfully in Vault, we have a secrets engine, which we call the transit secrets engine. And what that does is you can send some data to Vault and using your cryptographic key that's in Vault, you can encrypt that data and it will send it back to you for you to store it in whatever place that you originally store your data.
Rob Barnes: So the first thing that we need to do is enable the transit secrets engine. So let's go ahead and do that. To do that, we're just going to run this command, which is, Vault secrets enable transit. And when we run that command, we get feedback saying that it's been successful. So the next thing we need to do now is we need to create a cryptographic key in Vault using the transit secrets engine. Now we run this command here, and I just want to flag that the type of key that we're using in this instance is the ED25519 key. We use in that key because that's one that's compatible with sign in and verification.
Rob Barnes: The benefit of actually writing the key to Vault is we don't have to worry about holding onto the key, Vault takes care of that. It holds it for us. So we don't have to look off the, the security of that key. So now that we have our encryption key in Vault, we need a way to manage who can use this key to sign data and validate data and the way we go about doing that in Vault is using the Vault policy. And we give it the capability of update, so this will allow someone to sign some data using this coin.
Rob Barnes: Something else we should point out in this policy is we have a second path that we're protecting against, which is the transit sign HashiCorp Coin SHA one, because we don't want anyone to use that encryption algorithm. In terms of validating, we can create a separate policy, because it might not necessarily be the same principles that need to sign and validate data. We'll do a similar thing where we just point out the path, which goes through the HashiCorp Coin. Instead, the action will be to verify.
Rob Barnes: And again, we're also denying SHA one algorithm. Now that we have these two policy documents, we can go ahead and write this to Vault. So the next thing that we want to do is we actually want to sign the coin. So I think what we'll do is we'll take a look at what a coin looks like. So here we have some [inaudible 00:05:54] with my famous friend, Eric.
Rob Barnes: We're going to ignore the serial number for now, but the point is, this is what the client looks like, and this is what we want to sign using Vault. So to do that again, we'll use the CLI and we're going to use our encryption key that we created. So the command that we're going to run is, Vault transit sign HashiCorp. And basically we want the output of this command to come in JSON format. In terms of actually getting the client into Vault to actually get that signed, we're going to use the plain text argument. But Vault is expecting the payload to be Base64 encoded.
Rob Barnes: So it quite simple, we'll use a sub SHA and we'll just pause that in straight into Base64. A few things to point out here, the first thing we'll look at is the request ID, so we can trace exactly what was done. So anytime we want to come back to this request we've made, this will be the ID that we use. But more importantly is the signature that you can see. So together with the coin and the signature, we now have the ability to verify the coin. So let's put all this together now. So what we'll do is we're going to create a batch script, nothing too fancy. And we'll take the command that we've just run to sign the coin and pop that inside a batch script.
Rob Barnes: Okay. The differences here, we're going to use JQ because we want to actually isolate the Vault signature that comes back and we want to store that. Once we've done that, then we can just use SED just simply to put the HashiCorp Coin ASCII alt together with the signature that comes from Vault, and we can store that into a file called coin.text. So hopefully this works, let's run that and see. And here we have it. We have a signed HashiCorp Coin. As you can see, we have the Vault signature there at the bottom, just like we had hoped.
Nic Jackson: We need to ensure that we have enough of these coins for everyone out there who wants to vote. And that means that we're going to take the batch script that we built and run it on Nomad as a batch job.
Jacquie Grindrod: Let's take a look at the file for it. We start out by defining the name of our job, which is miner in this case. Then Nomad gives us the option to choose what location we're going to run it in. So we specify that using the data center variable. We set the type of the job to batch and then we give a name to the group that is going to run in. So our task group consists of more than just our miner in this case, but we're going to focus on specifically just generating our coins. So let's scroll down to the next part. Here, we have our miner task, which you can see we specify that Docker's the driver, because again, we're using a Docker container. And we're using this template stanza to pass in the data for our coin. And we're using Nomad allocation IDs to be able to assign the coin serial number.
The reason we're doing that is that they're unique user IDs. So that should ensure that none of our coins have overlapping serialization. Next up, we have the short and sweet Vault policy declaration. Which it's specifying the Vault policies that our job requires. So our Nomad client will automatically retrieve a Vault token, which is limited to the policies that we've specified. In this case, that's our transit side. We're declaring our environment variables.
We now tell the job which image we're going to pull and what volume to mount. The entry point scripts that I'm about to show you is where a lot of the magic happens in less than five lines. So the first three lines probably look familiar to you. We're doing the same thing here that Rob showed us in his demo. So we're generating a coin, we're getting the payload and then we're making a call to Vault to get our signature. Then we put all the coins together. And finally, in our last line, we're pushing that coin to Redis. Now that we've generated our coins and we're even storing them somewhere, we're ready to make a bunch of them.
Nic Jackson: So I mentioned earlier on that we're running two very different types of workloads and that we need to understand how these workloads behave under pressure. And this all starts with observability. Unfortunately, our application isn't emitting any metrics, but we can use Consul's service mesh to fill that gap. This is going to give us the opposite of ability into the system that we need.
Jono Sosulska: Surface mesh isn't just a buzzword, it provides you benefits straight out of the box, like network observability, security and reliability. In a conventional deployment of services, one service talks directly to another. In a service mesh, each service talks to a proxy locally. All traffic flows between the proxies and this is how you're able to provide detailed information and control over your network traffic. Proxies are also protocol aware and understand things like HTTP requests and GRPC error codes. This allows the proxy to provide a high level of information on the state of your traffic.
Jono Sosulska: You can see things like number of requests per second, histograms regarding the duration of request, bytes transferred, number of successful requests, errors, and much, much more. These metrics can be emitted in a variety of different formats, such as StatsD, Datadog StatsD or Prometheus, like what we're using here. Nomad can automatically deploy and configure these proxies to give you the exact metrics that you need.
Nic Jackson: So now we have these metrics, we've identified that there are a number of periods where the resources in the cluster are under utilized. If you look at the chart, you can see that traffic slowly builds up from the 20% at 6:00 AM when people are getting out of bed through the course of the morning. Now we reach our first peak around lunchtime, and then we see a little drop off before things start to rise again as folks start to enjoy their free time.
Nic Jackson: We reach our max utilization of around 90% once all the kids have gone to bed and everybody is hitting peak line saturation. After this, we start to see a downward curve until the pattern repeats itself. What this presents us, however, is opportunity. If you look at the area above the curve, you're going to see that we have unused capacity. We can leverage this capacity to save money, drive maximum efficiency out of the system and handle these peak load moments during the day. How would we do this? Is that we're going to use the metrics provided by Consul service mesh. And we're going to feed them into Nomad's autoscaler. This is going to allow us to dynamically shape the different workloads based on our traffic demands.
Erik Veld: Because if we look at this Grafana dashboard, we can see that we currently have one instance of the API service running and the traffic is fairly stable. But as soon as the traffic starts to peak, we're going to have issues, so we need to start scaling those applications. So let me show you how to do that. Okay. So what you see here is the API job and specifically the task that we'll be scaling up and down. Now, currently this is running with count equals one, but we want to define a policy that the autoscaler can use to scale this up and down for us. So we need to add the scaling stanza and then a policy for that autoscaler. Now, as Jono showed before we have these metrics coming in from the Envoy proxies, and we're grabbing these to send to our Prometheus instance. So we're going to set source to Prometheus. And then we need to define a query, if I could type.
Erik Veld: Now the auto scaler wants a singular value to act upon. So that's why I'm wrapping this query in a scaler. Now, if you are like me, you hate writing Prometheus queries. So we're lucky that we already have these dashboards and we can use these queries that we've already defined there. So we're going to be grabbing the average amount of requests per second, going into each of these API instances. And we can just copy paste that query in directly.
Erik Veld: So let's head on over to the dashboard and then grab that query out of here. And then we can paste that in, and now what we need to do, now that we have that value, the system needs to be able to react to that. So we're going to need to add a strategy. And a strategy we want to be using is the target value strategy. And we're going to configure that so that it will try to make the factor equal to one. And that's mostly because I'm running this on my Tao desktop, and I don't want to overload it, otherwise I couldn't be recording this video. So we're going to set the value to one.
Erik Veld: Now, if I would apply this, the autoscaler would go crazy and start scaling up infinitely. So I want to add some guard rails. Now I want to be running a minimum of one instance of this job, and let's just say, I want a maximum of three API instances running. Now, all that's left to do is to run the API.HCL instance to Nomad. Okay, cool. So now we're scaling the API service dynamically up and down to handle for that peak load. But what do we do with that headroom that we still have left? We're paying for that compute. So let's use that. Let's add a scaling stanza to the miner to actually fill up those gaps. Now we can actually grab the query that we have on the dashboard again, where we're showing how many instances of the miner and how many instances of the API we're running.
Erik Veld: So if we grab that query and change that slightly, we can add a scaling's policy again. And this time I want to have a min of zero, cause I want to scale all the way down and set a max of four to not go crazy. We're going to define the policy again from Prometheus and then paste in our query. Again, put a scale around it and then paste our query in, but I want to deduct those number of instances that we're running of the miner and the API, and then take that and subtract that from the maximum amount of instances so that the query will actually fill up that room in between.
Erik Veld: Okay, let's close that quote. And then we need to add that strategy again, so strategy, name, total value, and configure that again with a value for one. In this case, I'm choosing one because out of that query, I'll get a factor and that factor, I want to match directly with the number of instances. So let's submit this job. Okay. So now that we've actually used that autoscaling stanza, we can see that all the headroom is now being used by the miner when it's available. So as you can see, we have two instances of the API service running and right now, one of the miner instances, but they'll start balancing out to around five. So now we have a very dynamic system that will take care of that load while not wasting any resources.
Nic Jackson: And this brings us to the final part of our journey, storing those votes.
Nicole Hubbard: Before we can actually stick your vote on the blockchain, we still need to verify that that signature that's with your vote is indeed a valid signature. And so to do that, we have to communicate with Vault. So now let's talk about how that works.
Rob Barnes: So what we're doing is we're taking the basics to for encoded input. We're taking a signature from Vault, and we're going back to Vault and saying, "Do the pair matchup, is it valid pairing?" And if it comes back true, then that tells us that our HashiCorp Coin is in fact, a legitimate HashiCorp Coin, and then it can go off to the blockchain. So what I'll do is I'm going to step through it into a demo, and it's mainly just a bit of a code walk through just to kind of show you how we can do it. But this time, instead of doing it in batch with API calls, we'll do it in Go, again with API calls. So just a quick code walkthrough. So pretty much all we're doing here is we are creating the API request here and we're pausing the payload as a JSON document through, in terms of bytes.
Rob Barnes: And here we're constructing the URL that we're going to use to make the API call. And essentially we're making the request here. And if we step through a little bit, what we're now doing is when we make that, we're just checking the response that we're getting here. We're checking that we do get A200 and everything's okay. As long as everything is okay, we should get something that looks a little like that, which will tell us that the data is in fact valid. And once we get that response, we'll just pass it through our Go struct, and it will just simply return a true or false. So what we'll do is we'll just look at the test that's been written for that. So to run that code, I'm just literally going to run a test against again, a local dev environment that I have.
Rob Barnes: If we run this, we should get passing tests, hopefully. So what we can see here, this is the signature from Vault. See that the data has been signed. And obviously we're running this test to validate it here, and that test is passing, so that tells us that it's working. So now we have a coin which is signed by Vault, and we've now validated that is signed by Vault. We cannot ship it off to the blockchain, which is the next step.
Nicole Hubbard: So we're building a very dynamic system here. In order to store your vote on the blockchain, we need to consider the security of this system. And this instance, we need to think about a zero trust policy for networking. So your vote travels from the application cluster in the public VPC to the managed data store in the data VPC. However, we need to ensure that only the specific applications in the public VPC can communicate with those managed data stores. Now in a traditional networking model, you would use location-based restrictions on firewalls and routers, but in dynamic systems, this is just not possible. So to achieve this, what we can do is we can leverage the power of Consul service mesh and the sidecar, proxies
Jono Sosulska: The thing about proxies. They act like doors allowing control over the traffic between our services. Unlike a door to your house, which is referenced by location though, proxies use identity. By simply saying, "I want to allow web to connect to database." We set a rule which applies to all web and database instances regardless of their location, so they're all treated the same. So we have the secure service communication that connects all of the services we own. But what about the services we don't own? In Consul 1.8, we have this new feature introduced called terminating gateways. These gateways enable outbound connections from the services inside the service mesh, so services that exist outside of it, such as managed data stores, like our blockchain database. These gateways effectively act as proxies that can represent more than one service. They terminate the mutual TLS connections and force the intentions that we talked about earlier and forward requests to the appropriate destination.
Erik Veld: So let's see what we need to do to configure our Consul terminating gateways, and to store these blocks in our managed data store. We have our environment up and running and we have Vault., Redis our PCI gateway, we can see Nomad here in Consul. While we don't have as our blockchain. And the reason for that is our blockchain requires access to the Postgres data store. And Postgres has a managed data store sitting externally, and it has no access, so it can't start. In order to be able to route traffic between our blockchain and our managed data store, what we need to do is route that through the terminating gateway. And in order to configure the terminating gateway, we need three things. We need a running terminating gateway, we need our external services registered with Consul, and we need our layer seven configuration for the terminating gateway.
Erik Veld: So we do have our PCI gateway up and running. Let's take a look at the configuration for that and the start up command. So it's very simple. All we're doing is running Consul connect to Envoy. This is going to bootstrap the terminating gateway for us. You can see here, we use the parameter gateway for the type of terminating. We're saying we want to register with this service with Consul automatically, and we're giving it the name, PCI gateway, and specifying the address that it's going to run at. The next thing we need to do is register our external services inside of Consul. So in order to do that, we need to service declaration. If you're familiar with Consul, there's nothing particularly unusual about this. What we're doing is registering a Postgres database has an external service. To do this, we provide the external service address and we mark it as external.
Erik Veld: Then we are doing the standard service declaration. We give it a name of Postgres, and since we only have one of them, we can keep the name and the ID the same. Then we register the port for the data store, and then we specify a health check. Now we need to register this in Consul. So to do this, we'll write this to the catalog register API end point. And so we'll do that like this. Now that this has all registered, what's next? So the next step is we need to configure the layer seven configuration. So what is that? What it means is we're going to use the new layer seven configuration for terminating gateway. We're going to specify which external services our PCI terminating gateway has access to. So here you can see we're using the kind declaration and the type is terminating gateway. And the name is PCI gateway.
Erik Veld: And that relates to the name of our gateway running here, as you can see in Consul. The services are our external services, so we just have the one at the moment, which is Postgres. And so if we look back here in our UI, we can actually see that our Postgres service that we registered has now come up. So let's write this configuration. What I'm going to do this time is use the Consul CLI, could have used the API, but let's go ahead and write this using the Consul config right command, and then the name of our file, and so now that's written. So now we have three pieces configured. So what we need to do now is restart our blockchain Nomad job. So let's go into here and click restart and hit, yes. So this is going to go ahead and restart our Nomad job.
Erik Veld: And now, because we have connection to our terminating gateway and ultimately the database, this will come up and be healthy. So we can see that this is now running. So if we log into here and we take a look at the logs, we can see that this is starting to process the queue here. So as a final confirmation, let's go ahead and open up a shell command on this container. So let's see if we can make a direct connection to the database here.
Erik Veld: So let's go ahead and get a shell open. And if I just go in and run the PC equal command here and provide the host as local host. And so this is because we're going to use the service mesh to route this traffic to our data store. So if we press enter here, we can see that this go ahead and starts and it's working. And we can look and we can see there are tables, and we can see that this is all configured and everything here is working. So that connection is going via the service mesh to our terminating gateway and then to our managed data store that is in our special PCI VPC.
Nic Jackson: So this brings our talk to a close. We've taken you on a journey of the HashiCorp Coin and how we use Nomad, Consul, and Vault to schedule and secure our system. Now, in the beginning of this talk, we said that HashiCorp Coin is a cryptocurrency for charitable donations, but we haven't explained how you can actually use the coin to make a donation. So let's take a step away from the computer and visit Katie and Alexandra outside. While we've been locked up indoors creating these demos, Risa, Reno, and Marge have had the good sense to work out doors, take in the fresh air. Let's join them as they tell us how the voting process works.
Alexandra Freeman: Go get the ball. Oh, Hey Katie, are you here?
Katie Reese: Hey, Alexandra, I'm here. And I'm excited to talk about HashiCorp Coin and what we're going to contribute to using HashiCorp Coin.
Alexandra Freeman: Yes, let's take this deep dive we just listened to and put these coins to work. Thank you everyone for following along with our team of developer advocates on the final journey of HashiConf Digital. Please take a moment to navigate to HashiCorp.vote, to help us make donations towards several charities in support of our global and local communities.
Katie Reese: We recognize that during these times of uncertainty, it can feel hard to choose between one place to contribute. But don't worry if you can't decide on just one, you don't have to, your HashiCorp coin can be used to vote on any of the listed charities. And that can mean one of them, all of them, or something in between. With all this voting talk, you may be asking, "But how does my vote actually work?"
Katie Reese: HashiCorp will be making donations amongst the listed charities. Your votes decide the percentage of the total that will be donated to each charity, as we want our contributions to be a reflection of what's important to you, our community.
Alexandra Freeman: We're so pleased to see so many of you already submitting your votes, but don't worry if you can't complete the process immediately. We will share the link so that you can vote over the next few days, asynchronously. And if you have any questions, find us in the chat that you have come to love during HashiConf Digital.
Katie Reese: And of course, if you want to learn more about the tools that were used to create HashiCorp Coin, please head over to our learn platform and our community forum.
Alexandra Freeman: And with that, we want to thank you all for joining us. While we do look forward to the days where we can meet up in person again, we're perfectly happy to meet with you like this right here.
Katie Reese: Thanks everyone. Happy voting.