
In part 1 and part 2 of this blog series, I discussed using how the OIDC auth method can be implemented to provide user authentication to HashiCorp Vault using Azure Active Directory identities.
In this third and final installment of the blog series, I will demonstrate how machines and applications hosted in Azure can authenticate with HashiCorp Vault, and explain how to set this up using HashiCorp Terraform.
»Machine Authentication and Secret Zero
There is a difference between human authentication and machine authentication. Humans store credentials in our minds or password managers (and hopefully not on a sticky note attached to our desks). If someone forgets their credentials, there are multi-factor systems in place that allow people to securely reset them. A machine or application (workload) is far more accessible, and since in this case a workload would also need credentials to authenticate to Vault, it increases the risk of credential exposure.
One approach used to mitigate this risk isf environment variables; however, this approach has risks of its own. For example, environment variables can be inadvertently leaked when environments are printed out for debugging purposes. Another risk is the fact that environment variables are passed down to child processes. This can allow unintended access, which breaks the principle of least privilege.
In this scenario, the Vault token is known as secret zero because it unlocks access to any other secrets that a workload requires to perform its function. Since we don't want to hard code our Vault token into the codebase or expose it using environment variables, we can use Azure's Managed Identity in combination with the Azure auth method to authenticate to HashiCorp Vault in a similar way to OIDC.
»Azure Managed Identities
Managed identities in Azure is an identity and access management feature that assigns identities to workloads. There are two types of managed identities:
System-assigned identities
User-assigned identities System-assigned identities are tied to the lifecycle of the workload it belongs to, whereas user-assigned identities have their own standalone lifecycle and can be attached to multiple workloads simultaneously.
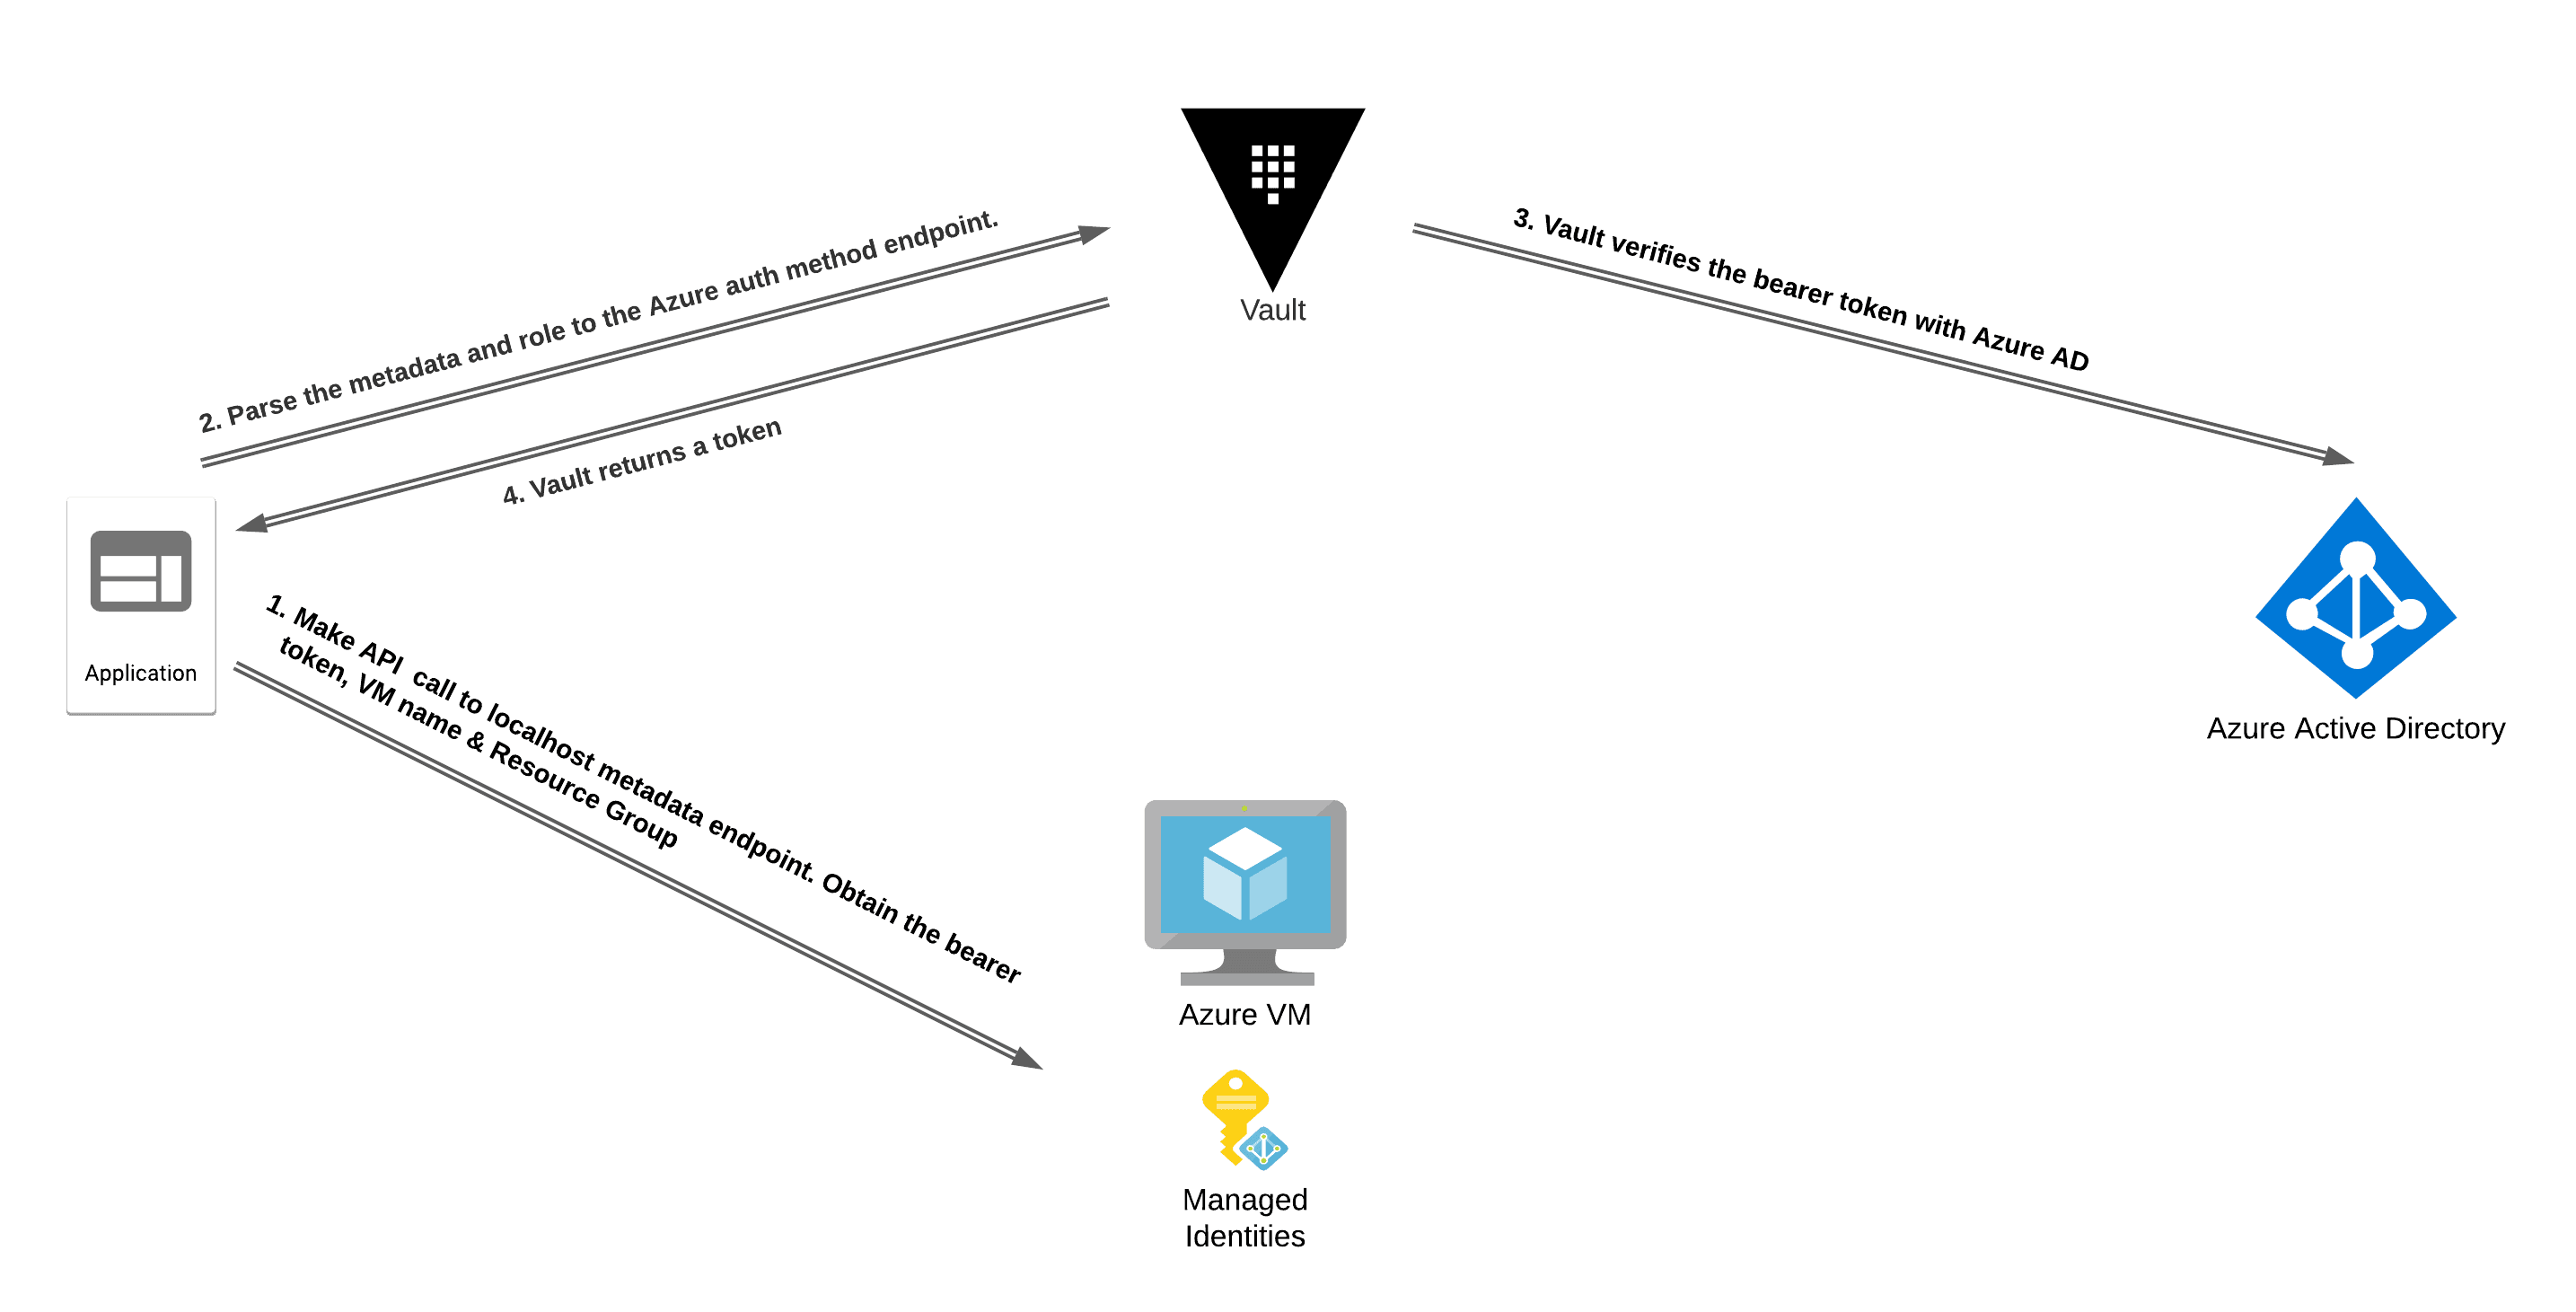
The managed identity is embedded as metadata in the Azure workload and can be accessed only by that workload. This contains the blast radius of this identity and its associated metadata to the individual workload. It enables workloads to obtain their bearer tokens, which can be presented to Vault and exchanged for a Vault token upon verification of the bearer token’s validity.
The Azure auth method supports both types of managed identities for authentication to Vault. The workload will need to have a managed identity assigned. To automate the setup and configuration of Azure managed identities for authentication to Vault, you can use Terraform.
»Configuring Azure Managed Identities with Terraform
To enable this workflow, the first step is to create an Azure application registration for Vault to use when verifying the validity of the bearer token. This can be done using the Azure AD application registration Terraform module demonstrated in part 1 of this blog series:
module "app-vault" {
  source  = "devops-rob/app-vault/azuread"
  version = "0.1.2"
}
The next step is to enable the Azure auth method in Vault and configure the auth backend with connectivity details from your Azure subscription. This can be done using the Azure auth method Terraform module. The details required for this step are provided as module outputs from the previous step:
module "azure_auth"{
    source = "devops-rob/azure-auth-method/vault"

    client_id               = module.app-vault.application_id
    client_secret           = module.app-vault.client_secret
    tenant_id               = module.app-vault.tenant_id
    azuread_application_url = sort(module.app-vault.application_uri)[0]
}
The final configuration step is to create one role per workload on Vault. Each role will be scoped to the level of secret access that each workload requires on a least privileged basis. For example, if we have a service called payment-encryptor that is used only to encrypt credit card details using an encryption key named payment-encryptor, we can create a policy that only permits updates to the payment-encryptor ciphertext:
resource "vault_policy" "payment_encryptor" {
  name = "payment-encryptor"

  policy = <
path "transit/encrypt/payment-encryptor" {
   capabilities = [
       "update"
   ]
}
EOT
}
We can then add this policy to the Vault role:
resource "vault_azure_auth_backend_role" "payment_encryptor" {
  backend                         = module.azure_auth.path
  role                            = "payment-encryptor"
  token_ttl                       = 60
  token_max_ttl                   = 120

  token_policies                  = [
      "default",
      "payment-encryptor"
  ]

  bound_subscription_ids = [
      data.azurerm_subscription.current.subscription_id
  ]
}
Note: The default policy is a built-in policy that contains basic functionality such as the ability for the token to look up data about itself and to use its cubbyhole data. For more information about the default policy, refer to the documentation.
To bring all of these steps together, the next Terraform code snippet provides the complete configuration for the Azure auth method:
provider "vault" {
    address = "http://localhost:8200"
    token = var.token
}

provider "azuread" {}
provider "azurerm" {
    features {}
}

variable "token" {}

data "azuread_client_config" "current" {}
data "azurerm_subscription" "current" {}

module "app-vault" {
  source  = "devops-rob/app-vault/azuread"
  version = "0.1.2"

  app_owners = [
      data.azuread_client_config.current.object_id
  ]
}

module "azure_auth"{
    source = "devops-rob/azure-auth-method/vault"

    client_id               = module.app-vault.application_id
    client_secret           = module.app-vault.client_secret
    tenant_id               = module.app-vault.tenant_id
    azuread_application_url = sort(module.app-vault.application_uri)[0]
}


resource "vault_policy" "payment_encryptor" {
  name = "payment-encryptor"

  policy = <
path "transit/encrypt/payment-encryptor" {
   capabilities = [
       "update"
   ]
}
EOT
}

resource "vault_azure_auth_backend_role" "payment_encryptor" {
  backend                         = module.azure_auth.path
  role                            = "payment-encryptor"
  token_ttl                       = 60
  token_max_ttl                   = 120

  token_policies                  = [
      "default",
      "payment-encryptor"
  ]

  bound_subscription_ids = [
      data.azurerm_subscription.current.subscription_id
  ]
}
To authenticate with Vault from a VM workload, we need to obtain the bearer token, subscription ID, resource group name, and VM name. This information can be obtained locally from the workload by making an API call to the relevant route of the http://169.254.169.254/metadata endpoint. The code snippet below shows an example using cURL to obtain the required details and the Vault CLI to authenticate from an Azure VM:
vault write auth/azure/login role="payment-encryptor" \
     jwt="$(curl -s 'http://169.254.169.254/metadata/identity/oauth2/token?api-version=2018-02-01&resource=https%3A%2F%2Fmanagement.azure.com%2F' -H Metadata:true | jq -r '.access_token')" \
     subscription_id=$(curl -s -H Metadata:true "http://169.254.169.254/metadata/instance?api-version=2017-08-01" | jq -r '.compute | .subscriptionId')  \
     resource_group_name=$(curl -s -H Metadata:true "http://169.254.169.254/metadata/instance?api-version=2017-08-01" | jq -r '.compute | .resourceGroupName') \
     vm_name=$(curl -s -H Metadata:true "http://169.254.169.254/metadata/instance?api-version=2017-08-01" | jq -r '.compute | .name')
When running an application on an Azure VM, the same logic can be implemented to authenticate with Vault using the VM's identity. I have written a demo application in Go that demonstrates this workflow.
»Series Summary and Video
In part 1 of this blog series, I exploredOpenID Connect (OIDC) in detail, along with the role it plays in human authentication. In part 2, I showed how to implement OIDC with Vault using Azure AD as the IdP. Finally, in this last installment, I examined the challenges of secret zero introduction and the main differences between human authentication and workload authentication. I also looked at some examples of how Azure workloads can use their identity to authenticate with Vault. Lastly, I walked through our collection of Terraform modules to help ease the implementation of some of these workflows. For more information about other authentication possibilities in Vault, refer to the Auth methods documentation.
To learn how to configure Azure Managed Identities in Azure with Terraform, I have a video walkthrough:


