
Building your application layer on top of Kubernetes can be tough. You need to:
Provision a cluster.
Get platform-wide services like CertManager, Istio, Grafana, Prometheus, etc. set up.
Educate developers on how to get their service deployed.
Ensure everyone is following Kubernetes best practices.
Glue the tool to deploy the server to the workload deployment tools (Helm or plain kubectl).
Let’s try to simplify this by using the CDK for Terraform, which allows you to express infrastructure needs in a common programming language. In this tutorial, I’ll show you how to provision and manage a Google Kubernetes Engine (GKE) cluster using TypeScript via the CDK for Terraform.
I chose Typescript as it’s the language I’m most familiar with, but CDK for Terraform also supports Go, Python, Java, and C#. If you want to learn more about the CDK, please read our guide. If you want to skip ahead to the full code, you can read through the GitHub repo for this tutorial and follow along.
»Setting Up the Cluster
First of all, we need to have a GKE cluster set up. We will do this in a separate TerraformStack so that the Terraform state is separated from our application state. We use a class extending the Resource class here that will be our abstraction over a Kubernetes Cluster on GKE. This allows us to enforce methods of operation. Some examples could be setting the service account on each of the node pools or suggesting a default node pool or instance size.
import {
  ContainerCluster,
  ContainerNodePool,
  ContainerRegistry,
  DataGoogleContainerCluster,
  GoogleProvider,
  ProjectIamMember,
  ServiceAccount,
} from "@cdktf/provider-google";
import { CLUSTER_NAME } from "./config";

// https://developers.google.com/identity/protocols/oauth2/scopes
const oauthScopes = [
  "https://www.googleapis.com/auth/devstorage.read_only",
  "https://www.googleapis.com/auth/logging.write",
  "https://www.googleapis.com/auth/monitoring",
  "https://www.googleapis.com/auth/servicecontrol",
  "https://www.googleapis.com/auth/service.management.readonly",
  "https://www.googleapis.com/auth/trace.append",
  "https://www.googleapis.com/auth/cloud-platform",
];

class KubernetesCluster extends Resource {
  private sa: ServiceAccount;
  private cluster: ContainerCluster;

  constructor(scope: Construct, name: string, serviceAccount: ServiceAccount) {
    super(scope, name);

    this.sa = serviceAccount;
    this.cluster = new ContainerCluster(this, "cluster", {
      name,
      removeDefaultNodePool: true,
      initialNodeCount: 1,
      nodeConfig: [
        {
          preemptible: true,
          serviceAccount: this.sa.email,
          oauthScopes,
        },
      ],
    });
  }

  addNodePool(name: string, nodeCount = 3, machineType = "e2-medium") {
    new ContainerNodePool(this, name, {
      name,
      cluster: this.cluster.name,
      nodeCount,
      nodeConfig: [
        {
          preemptible: true,
          machineType,
          serviceAccount: this.sa.email,
          oauthScopes,
        },
      ],
    });
  }

  addAutoscalingNodePool(
    name: string,
    minNodeCount = 3,
    maxNodeCount = 10,
    machineType = "e2-medium"
  ) {
    new ContainerNodePool(this, name, {
      name,
      cluster: this.cluster.name,
      autoscaling: [
        {
          minNodeCount,
          maxNodeCount,
        },
      ],
      nodeConfig: [
        {
          preemptible: true,
          machineType,
          serviceAccount: this.sa.email,
          oauthScopes,
        },
      ],
    });
  }


class InfrastructureLayer extends TerraformStack {
  constructor(scope: Construct, name: string) {
    super(scope, name);

    new GoogleProvider(this, "google", {
      zone: "us-central1-c",
      project: "dschmidt-cdk-test",
    });

    const sa = new ServiceAccount(this, "sa", {
      accountId: "cluster-admin",
      displayName: "Cluster Admin",
    });

    const pushSa = new ServiceAccount(this, "registry-push", {
      accountId: "registry-push",
      displayName: "RegistryPush",
    });

    new ProjectIamMember(this, "sa-role-binding", {
      role: "roles/storage.admin",
      member: `serviceAccount:${sa.email}`,
    });

    new ProjectIamMember(this, "push-role-binding", {
      role: "roles/storage.admin",
      member: `serviceAccount:${pushSa.email}`,
    });

    new ContainerRegistry(this, "registry", {});

    const cluster = new KubernetesCluster(this, CLUSTER_NAME, sa);
    cluster.addNodePool("main");
    cluster.addAutoscalingNodePool("workloads");
  }
}

const app = new App();
new InfrastructureLayer(app, "infrastructure");
app.synth();
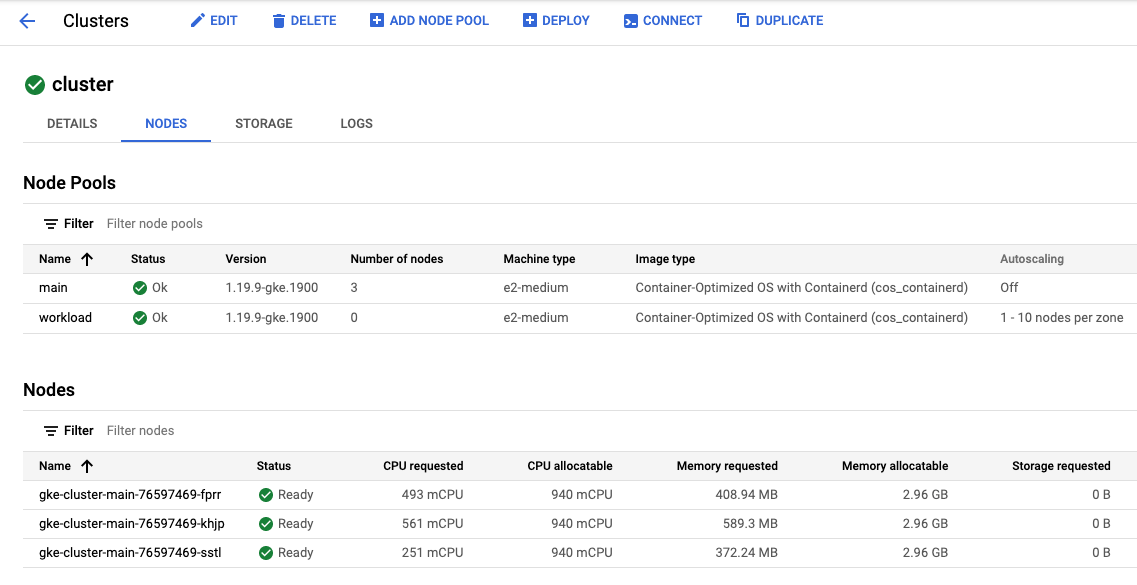
After setting up the cluster, we’ll create a separate service account that we are going to use to push Docker images to the Google Container Registry. Configure this cluster with two node pools: The first one is fixed in size for the baseline infrastructure, the second one has autoscaling enabled. The cluster we create looks like this:
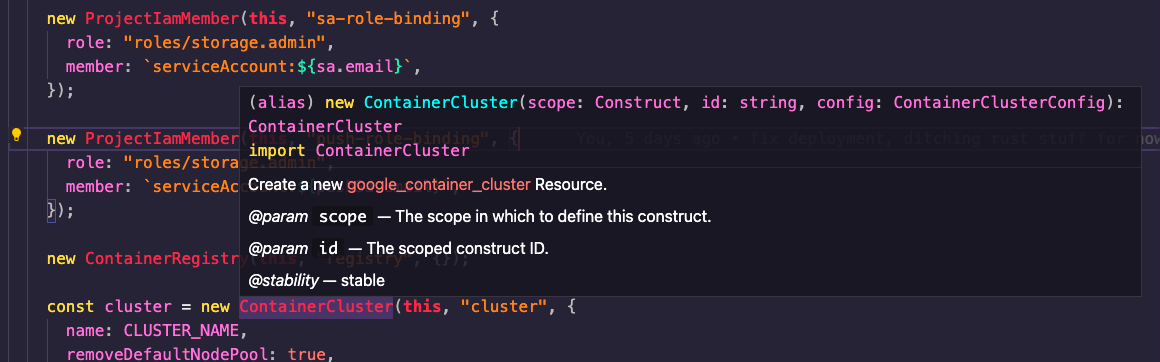
Yes, you can do this in Terraform directly without the CDK for Terraform, but the advantage of doing it in TypeScript is that it helps teammates that are not familiar with HCL to better understand what’s going on and shields some of the underlying complexity from them. Also, if they use a modern editor they get tooltips that link to the Terraform documentation like this one:
»Accessing the Cluster
With the cluster ready, we want to access it to deploy our workloads. To make this super easy, we’ll add a static method to our Kubernetes cluster abstraction to get an abstraction over the cluster. Use the pre-build provider for Google Cloud, which you can download directly through the package management tool of your language.
Now we need to tap into the power of Terraform and get providers and modules. In this case, we are going to use the Kubernetes and Helm providers as well as the GKEAuth module to authenticate against the GKE Cluster.
To use these providers and modules we need to configure them in our cdktf.json file:
{
  "language": "typescript",
  "app": "npm run --silent compile && node main.js",
  "terraformProviders": [
    "hashicorp/helm@ ~> 2.1.2"
    "hashicorp/kubernetes@ ~> 2.2.0",
    "hashicorp/local@ ~> 2.1.0",

    // we will come to these a little later
    "kreuzwerker/docker@ ~> 2.11.0",
    "hashicorp/null@ ~> 3.1.0",
  ],
  "terraformModules": ["terraform-google-modules/kubernetes-engine/google//modules/auth@ ~> 14.3.0"],
  "context": {
    "excludeStackIdFromLogicalIds": "true",
    "allowSepCharsInLogicalIds": "true"
  }
}
With this in place, we can run cdktf get. That generates the bindings we can access under ./.gen. The folder might change depending on the language you are using.
The `onCluster` method uses a DataSource to get information around the GKE cluster. We pass the information down to the GKEAuth module, which configures the Kubernetes and Helm providers.
class KubernetesCluster extends Resource {
  // see above
  static onCluster(scope: Construct, name: string) {
    const cluster = new DataGoogleContainerCluster(scope, "cluster", {
      name,
    });

    const auth = new GKEAuth(scope, "auth", {
      clusterName: cluster.name,
      location: cluster.location,
      projectId: cluster.project,
    });

    new KubernetesProvider(scope, "kubernetes", {
      clusterCaCertificate: auth.clusterCaCertificateOutput,
      host: auth.hostOutput,
      token: auth.tokenOutput,
    });

    new HelmProvider(scope, "helm", {
      kubernetes: [
        {
          clusterCaCertificate: auth.clusterCaCertificateOutput,
          host: auth.hostOutput,
          token: auth.tokenOutput,
        },
      ],
    });

    return {
      installHelmChart(config: ReleaseConfig) {
        new Release(scope, config.name, config);
      },

      exposeDeployment(
        namespace: Namespace,
        name: string,
        image: string,
        labels: Record,
        dependencies: ITerraformDependable[]
      ) {
        return new KubernetesService(
          scope,
          namespace,
          name,
          image,
          labels,
          dependencies
        );
      },
    };
  }
}
We return an object with methods we want to expose for a Kubernetes cluster: one for creating a Helm release, and one for creating an exposed deployment. We will go into detail about both in the next sections.
»Baseline Setup
To make the cluster production-ready, we need some software that provides fundamental services for our applications to use. Secret management, service mesh capabilities, and user authentication are common services that could be handled once for the entire cluster. These services are commonly deployed using Helm charts. I will deploy CertManager as an example of how to deploy Helm charts. In production you would likely have more chart-based functionality in place.
class BaselineLayer extends TerraformStack {
  constructor(scope: Construct, name: string) {
    super(scope, name);
    new GoogleProvider(this, "google", {
      zone: "us-central1-c",
      project: "dschmidt-cdk-test",
    });

    const cluster = KubernetesCluster.onCluster(this, CLUSTER_NAME);
    cluster.installHelmChart({
      name: "cert-manager",
      repository: "https://charts.jetstack.io",
      chart: "cert-manager",
      createNamespace: true,
      namespace: "cert-manager",
      version: "v1.3.1",
    });
  }
}
»The Application
So far, we’ve made use of a lot of Terraform functionality, but we haven't tapped into all the power of the CDK for Terraform yet. In our project setup, we have a few services in the ../services folder that need to be deployed. We don’t want to force anyone to learn much about Kubernetes or Docker to get their application deployed. We also want to ensure users are following best practices, so let’s see how this can be done:
import * as fs from "fs";
import * as path from "path";
import { DockerProvider } from "./.gen/providers/docker/docker-provider";
import { Namespace } from "./.gen/providers/kubernetes/namespace";
import { buildAndPushImage } from "./docker";

class ApplicationLayer extends TerraformStack {
  constructor(scope: Construct, name: string) {
    super(scope, name);
    new GoogleProvider(this, "google", {
      zone: "us-central1-c",
      project: "dschmidt-cdk-test",
    });
    new DockerProvider(this, "docker", {});
    const cluster = KubernetesCluster.onCluster(this, CLUSTER_NAME);

    const ns = new Namespace(this, "ns", {
      metadata: [
        {
          name,
        },
      ],
    });

    const servicePath = path.resolve(__dirname, "../services");
    fs.readdirSync(servicePath).forEach((p) => {
      const [tag, image] = buildAndPushImage(
        this,
        p,
        path.resolve(servicePath, p)
      );
      cluster.exposeDeployment(
        ns,
        p,
        tag,
        {
          application: p,
        },
        [image]
      );
    });
  }
}


const app = new App();
new InfrastructureLayer(app, "infrastructure");
new BaselineLayer(app, "baseline");
new ApplicationLayer(app, "development");
new ApplicationLayer(app, "staging");
new ApplicationLayer(app, "production");
app.synth();
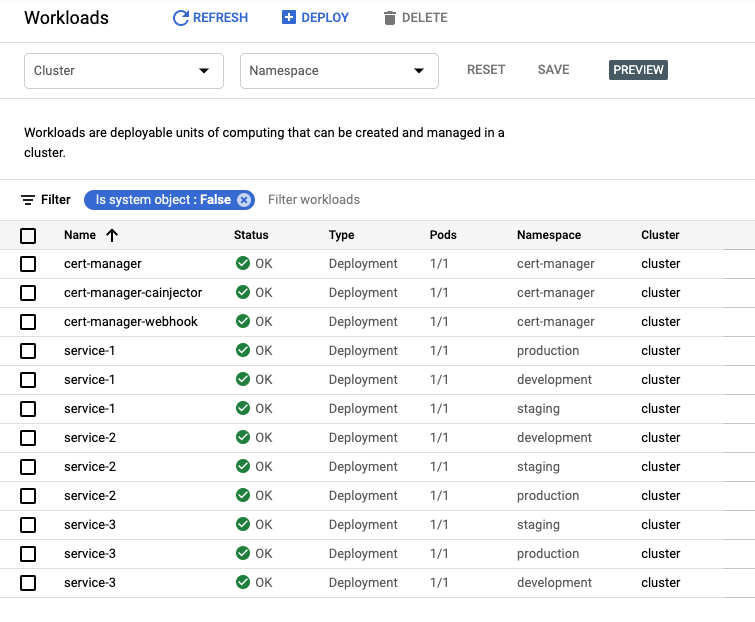
We create one of these application layers for each environment we want to deploy. Each of these layers deploys their namespace and iterates through the service folders. For each of these applications we build and push a Docker image that we then deploy onto the cluster. Let's first see how the image is built:
import { TerraformAsset } from "cdktf";
import { Construct } from "constructs";
import * as fs from "fs";
import * as path from "path";
import { VERSION, DOCKER_ORG } from "./config";
import { Resource } from "./.gen/providers/null/resource";
import {
  DataGoogleServiceAccount,
  ServiceAccountKey,
} from "@cdktf/provider-google";

export function buildAndPushImage(
  scope: Construct,
  imageName: string,
  p: string
): [string, Resource] {
  const _ = (name: string) => `${imageName}-${name}`;
  const files = fs.readdirSync(p);

  function getDockerfileFlag() {
    if (files.includes("Dockerfile")) {
      return "";
    }

    if (files.includes("package.json")) {
      const asset = new TerraformAsset(scope, _("node-dockerfile"), {
        path: path.resolve(__dirname, "Dockerfile.node"),
      });

      return `-f ${asset.path}`;
    }

    if (files.includes("Cargo.toml")) {
      const asset = new TerraformAsset(scope, _("node-dockerfile"), {
        path: path.resolve(__dirname, "Dockerfile.rust"),
      });

      return `-f ${asset.path}`;
    }

    throw new Error(
      "Unknown application language, please add a Dockerfile or use node or rust"
    );
  }

  function getVersion(): string {
    if (files.includes("package.json")) {
      return require(path.resolve(p, "package.json")).version;
    }

    return VERSION;
  }

  const dockerfileFlag = getDockerfileFlag();
  const content = new TerraformAsset(scope, _("content"), {
    path: p,
  });

  const sa = new DataGoogleServiceAccount(scope, _("sa"), {
    accountId: "registry-push",
  });

  const key = new ServiceAccountKey(scope, _("sa-key"), {
    serviceAccountId: sa.email,
  });

  const version = getVersion();

  const tag = `gcr.io/${DOCKER_ORG}/${imageName}:${version}-${content.assetHash}`;
  const image = new Resource(scope, _("image"), {
    triggers: {
      tag,
    },
  });

  const cmd = `echo '${key.privateKey}' | base64 -D | docker login -u _json_key --password-stdin https://gcr.io && docker build ${dockerfileFlag} -t ${tag} ${content.path} && docker push ${tag}`;
  image.addOverride("provisioner.local-exec.command", cmd);

  return [tag, image];
}
We want to support Node.js and Rust projects out of the box, so we put standard Dockerfiles in place. In getDockerfileFlag you can see that we compose the docker build -f command to either use the default Dockerfile inside the context folder or the standard Dockerfile.
We get the version of the project in the getVersion function so that we can compose the tag for the Docker image. As you can see in the code above, we can act based on local files so we can shape the interface our devs need to interact with however we like.
Want to provision a PostgreSQL or Redis instance by setting a value in the package.json? You can do it. Want to write a module that defines which environment variables to pass from where, and at the same time delivers these in the application context? No problem. Your devs want more flexibility and want to write their CDK code local to their application? As long as you stay in the same language there is no problem.
Remember the service account we set up to push images? We are going to use that now to generate ServiceAccountKeys. Armed with the key, we use a Null Resource and the local-exec it provides to run a docker login, build, push chain that gets our image pushed into GCR.
Now let's talk about deploying the container. In this example we make some assumptions about the service — that it runs on port 80 and has a /health endpoint for health checks. We also assume that every deployment should have its own service. We have the KubernetesService class that deploys the image based on these assumptions. We pass down the image tag and the image resource, so that the deployment resource knows when the image was pushed.
class KubernetesService extends Resource {
  constructor(
    scope: Construct,
    namespace: Namespace,
    name: string,
    image: string,
    labels: Record,
    dependencies: ITerraformDependable[]
  ) {
    super(scope, name);
    const deployment = new Deployment(scope, `${image}-deployment`, {
      dependsOn: dependencies,
      metadata: [
        {
          name,
          labels,
          namespace: namespace.id,
        },
      ],
      spec: [
        {
          selector: [
            {
              matchLabels: labels,
            },
          ],
          template: [
            {
              metadata: [
                {
                  labels,
                },
              ],
              spec: [
                {
                  container: [
                    {
                      name: "application",
                      image: image,
                      port: [{ containerPort: 80 }],
                      livenessProbe: [
                        {
                          httpGet: [
                            {
                              path: "/health",
                              port: "80",
                            },
                          ],
                        },
                      ],
                    },
                  ],
                },
              ],
            },
          ],
        },
      ],
    });

    new Service(scope, `${image}-service`, {
      dependsOn: [deployment],
      metadata: [{ name: image, namespace: namespace.id }],
      spec: [
        {
          selector: { application: image },
          port: [{ port: 80 }],
        },
      ],
    });
  }
}
Running cdktf apply <stack> for development, staging, and production deploys the workloads directly on the cluster.
»Summary
In this tutorial, we set out to...
Create a GKE cluster
Set up platform-wide services like CertManager, Istio, Grafana, Prometheus, etc.
Educate developers on how to get their service deployed
Ensure everyone is following Kubernetes best practices
Glue the tool to deploy the server to the workload deployment tools (Helm or plain kubectl)
To some degree, this walkthrough achieves all of these. And now we can now see why the CDK for Terraform is so useful.
It allows you to find abstractions over infrastructure that fit your team. Which abstractions you choose depend on the company, the setup, and the familiarity of your developers with infrastructure, but you have lots of choices. I am certain the abstractions I chose are not the right ones for your use case. Luckily it’s quite easy to change them and introduce new ones that work for you.
The last thing to mention is that, in general, infrastructure automation should be run inside of a CI engine (e.g. Google Cloud Build if you are working in GCP already), so that the access and execution environment can be controlled in one place.
»What's Next?
If you want to learn more about the CDK for Terraform you can visit these resources:
For feedback you can send me a DM on Twitter or an email to dschmidt(at)hashicorp.com.


