

In our conversations with numerous customers, we’ve learned that HashiCorp Vault is usually brought into an organization for a single use case that mitigates one specific risk, but interest then spreads quickly. Soon, many more departments want to adopt Vault and implement it in a more systematic way using more features. At this point, a plan for scaling and automation is needed to onboard and service a myriad of applications and use cases. A manual approach is unsustainable and goes against the ethos of using Vault in the first place.
At this stage, we recommend codifying Vault configurations and using infrastructure as code to manage Vault. Key benefits of this approach include:
Repeatability: Infrastructure as code (IaC) allows for a predictable and consistent process for applying changes. Every configuration begins with code.
Version Control: Configuration codified in a version control system is the source of truth. Security policy and organizational standards can be enforced on IaC modules. All changes are tracked and inspected through a code review process.
Automated workflows: Properly implemented IaC practices enable GitOps or CI/CD driven workflows that do not require manual intervention. Changes and updates can be safely tested before applying to production.
By taking this approach to Vault onboarding, companies usually see two major benefits:
Increased productivity from automation
Mitigation of risk by reducing human errors
The benefits of using IaC are truly realized when you are able to onboard applications to Vault hundreds of times through a single, automated workflow. Many of our customers already do this.
In this tutorial, I’ll walk through the typical patterns and best practices we share with customers for onboarding applications to Vault.
»Process Milestones
Here is a flow chart outlining the key milestones of the onboarding process:
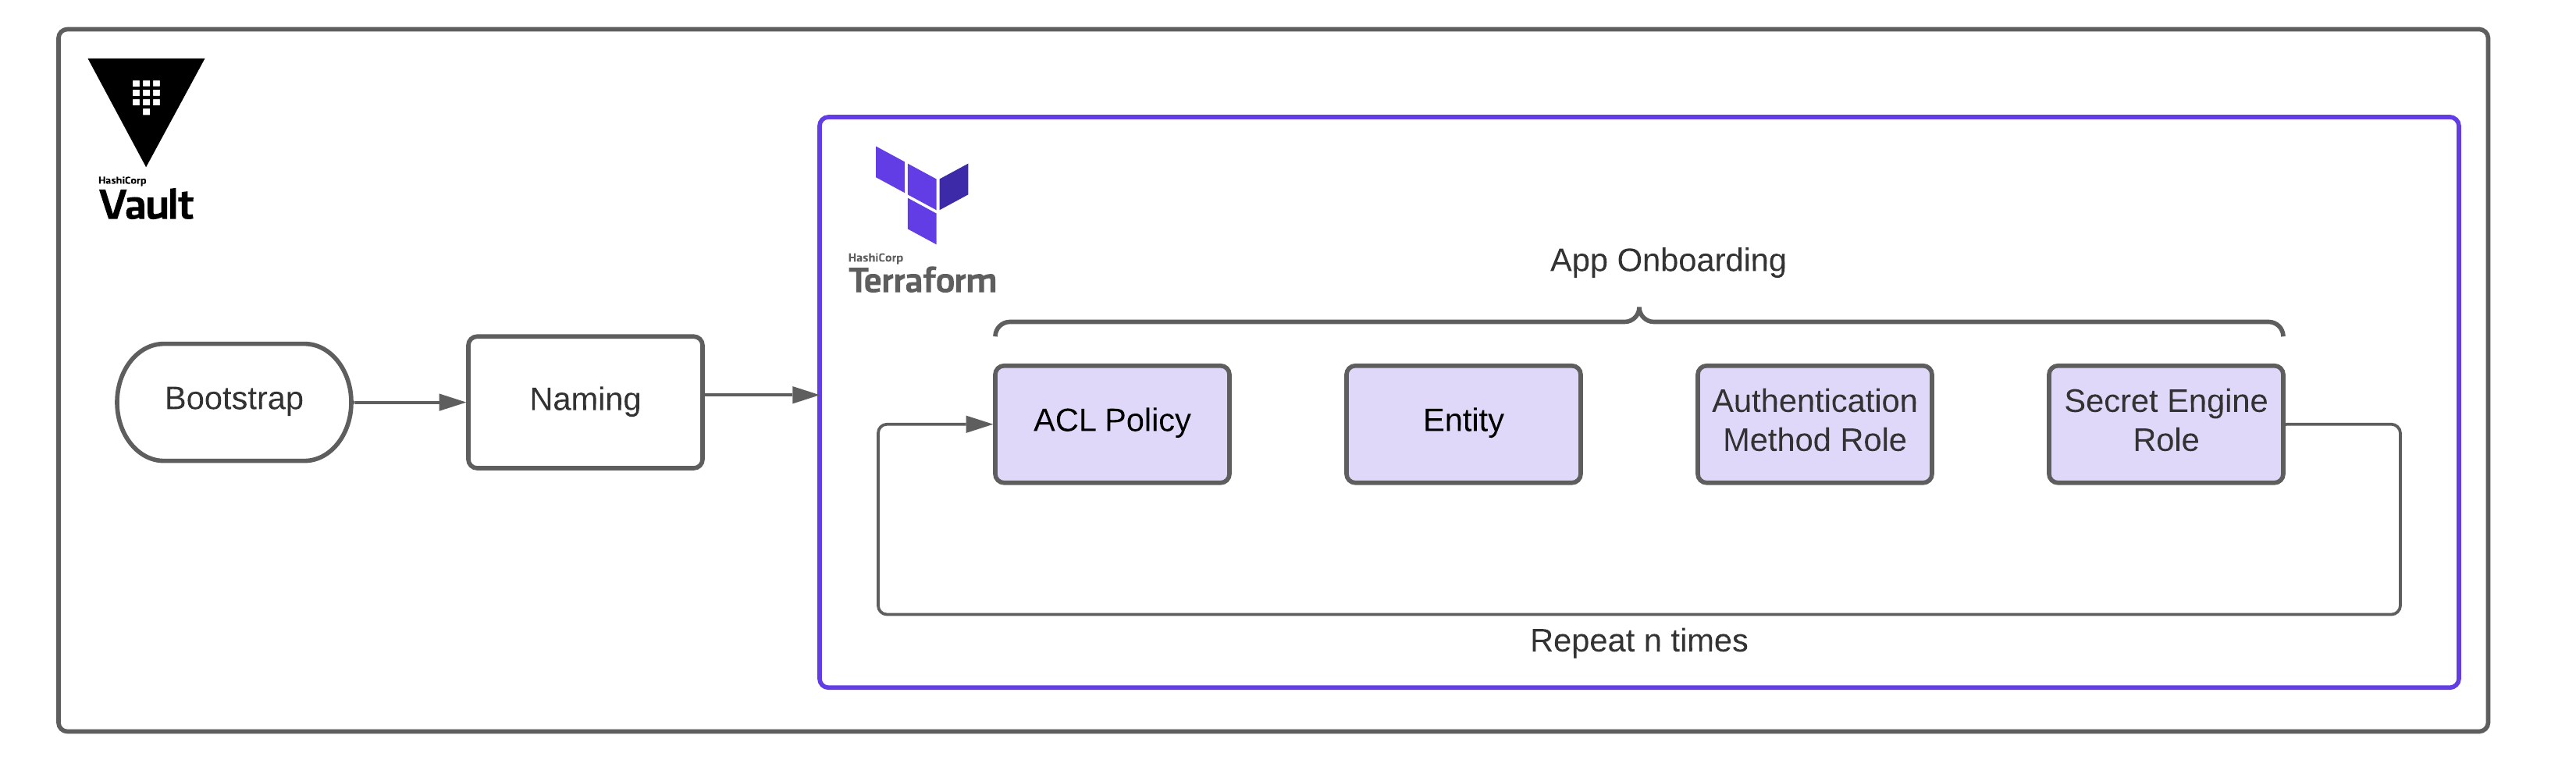
The key stages of app onboarding onto Vault.
To follow along with the demo, please install the following prerequisites if you haven’t already:
»Set Up the Repository
Clone the repository as shown below and cd into the project directory.
git clone git@github.com:hashicorp/vault-guides.git
cd vault-guides/operations/onboarding
Next, cd into the docker-compose directory and run docker compose up as shown below. The remaining terminal snippets in this post will assume that you are in the project directory vault-guides/operations/onboarding.
cd docker-compose/ && docker compose up
Optionally, if you prefer using the tool make, there is a Makefile included in the project directory root. Run make info to see the available targets.
»Bootstrap Vault
This step involves initializing and unsealing Vault, creating Vault namespaces (for Vault Enterprise), and creating one or more administrators. In another terminal, use the following commands to initialize and unseal the Docker compose demo Vault instance.
# Assuming you are in the project root directory
cd docker-compose/scripts
00-init.sh
export VAULT_ADDR=http://localhost:8200
export VAULT_TOKEN=If you need to look up the root token again, it is stored in the file: docker-compose/scripts/vault.txt. If you are using an existing Vault cluster, please skip running 00-init.sh and instead run export VAULT_ADDR=<Vault-server-domain> to point to your Vault server.
Admin token (optional): You may prefer using an admin token instead of root (for example if you’re using an existing cluster). If so, create an admin token using the vault-admin.hcl policy file shown below. This admin policy is authored based on the Vault Policies guide.
# Assuming that VAULT_TOKEN is set with root or higher Admin token
vault policy write learn-admin admin-policy.hcl
vault token create -policy=learn-admin
export VAULT_TOKEN=»Establish a Naming Convention
Naming standards allow applications to login and read secrets from consistent and predictable paths. Each application should have a unique identifier and be part of a logical group such as a line of business (LOB), project, etc. Below are some typical paths to plan for, along with example values:
Auth method mount path — e.g.
approle,k8s-us-east1Auth method role name — e.g.
LOB1-app100,nginxSecret engine mount path — e.g.
kv/LOB1,db/postgres-us-east1-prodSecret access path — e.g.
kv/LOB1/app100,kv/nginxEntity name — e.g.
LOB1-app100,nginx
We recommend that you build this out for a representative use case in your organization. If using Vault Enterprise Namespaces, the paths listed above will be prepended by the Namespace name. For example, the secret access path for namespace ns1 will be ns1/kv/LOB1/app100 for the Key/Value (KV) Secrets Engine (/kv) version 1. For the KV Secrets Engine version 2 (HashiCorp offers two versions of the KV secrets engine), the secrets are versioned and stored under /data, therefore the effective secret access path will be ns1/kv/LOB1/data/app100.
»Terraform Configurations
We will use HashiCorp Terraform to onboard an application named nginx. In the file variables.tf, we have declared an entities variable that will hold a list of applications. To onboard more applications, we just need to append them to this list. Run the following commands to create all of the configurations:
# Please ensure you have VAULT_ADDR and VAULT_TOKEN set
cd terraform
terraform init
terraform plan
terraform apply --auto-approve
# Restart vault-agent container to render secrets immediately
docker restart vault-agent
Access http://localhost:8080 on your browser, and you should be able to see the nginx application display a dynamic PostgreSQL database credential provided by Vault as shown below. Also try accessing http://localhost:8080/kv.html to see example static secret values.
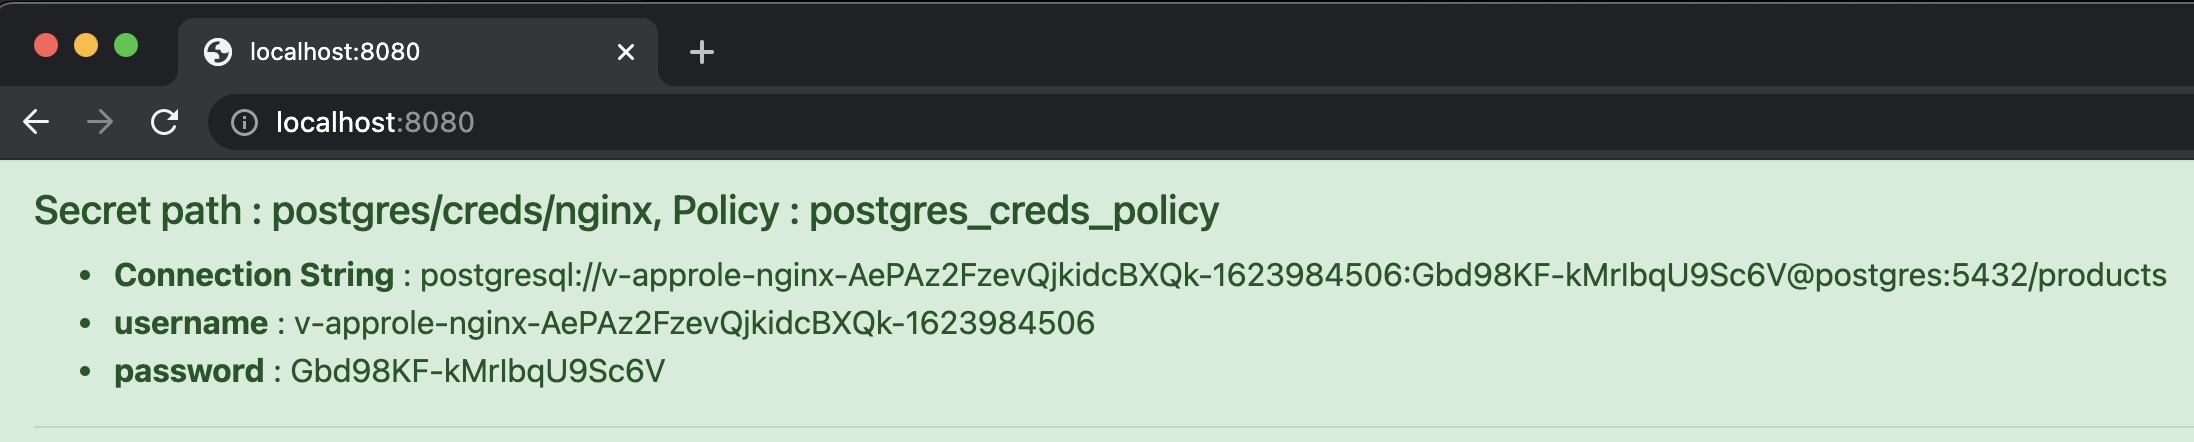
Example dynamic credential read.
The Terraform configurations for this demo are described in more detail below along with the corresponding source file names:
Application entity — entity.tf: Pre-creating the application entity is optional but encouraged. It allows easier auditing and more flexibility in attaching ACL policies. Please log in to the Vault UI on http://localhost:8200 with the root token, then click Access > Entities to see two pre-created entities: nginx and app100. Clicking into these entities will display an alias for the AppRole authentication method and the mapped entity ACL policies.
Authentication method — auth.tf: This demo uses the AppRole auth method, which is a type of “trusted orchestrator” secure introduction pattern. An authentication method alias links the entity to the AppRole role.
ACL policy — entity.tf: We recommend using templated policies to reduce the overhead of policy management. This demo uses two templated policies: kv_rw_policy for accessing key-value secrets, and postgres_creds_policy for accessing dynamic Postgres credentials. These elements are represented as a Terraform graph diagram snippet, shown below:
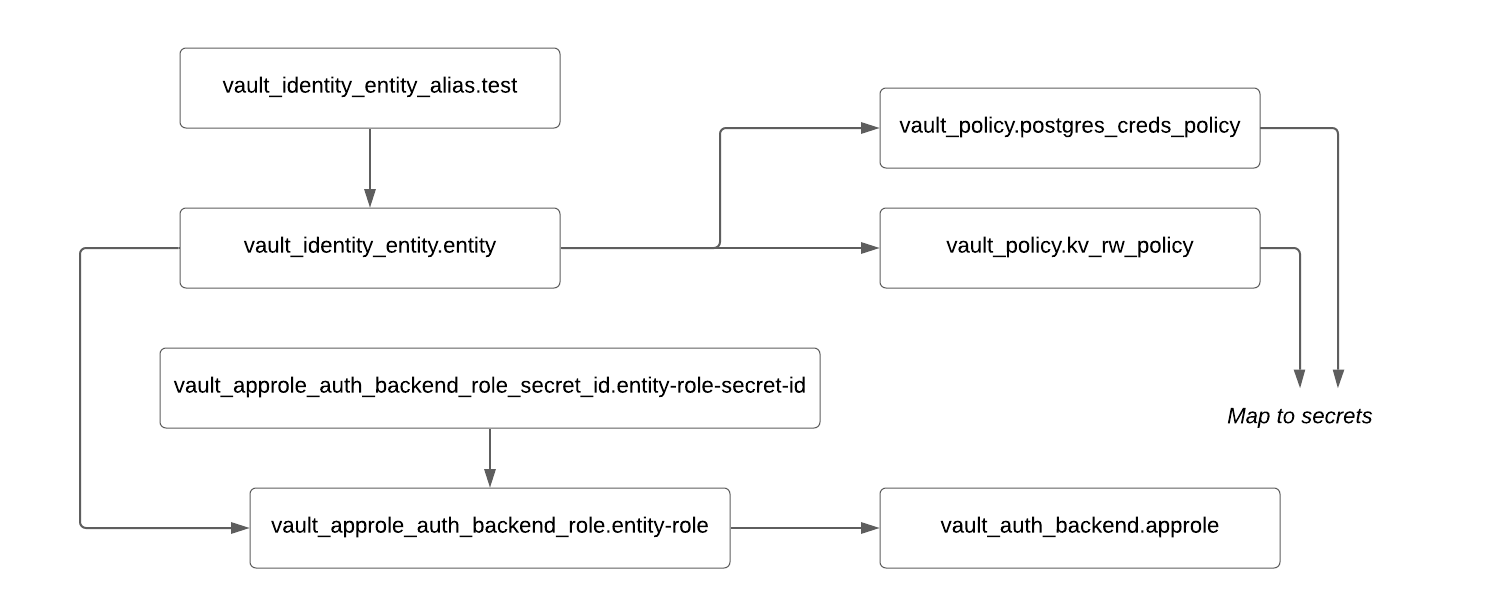
Terraform graph snippet for authentication, entity, and ACL policy.
Both ACL policies above have rules based on the {{identity.entity.name}} parameter. For example, if the entity name is nginx, during runtime, the effective path will be: kv/data/nginx/* for the KV secrets engine, and postgres/creds/nginx for the database secrets engine (see Templating Parameters for more details).
Secrets Engine — kv-v2.tf and database.tf: The relevant secrets engine should be mounted and application specific roles should be created as part of onboarding. These are shown in a similar graph diagram as before:
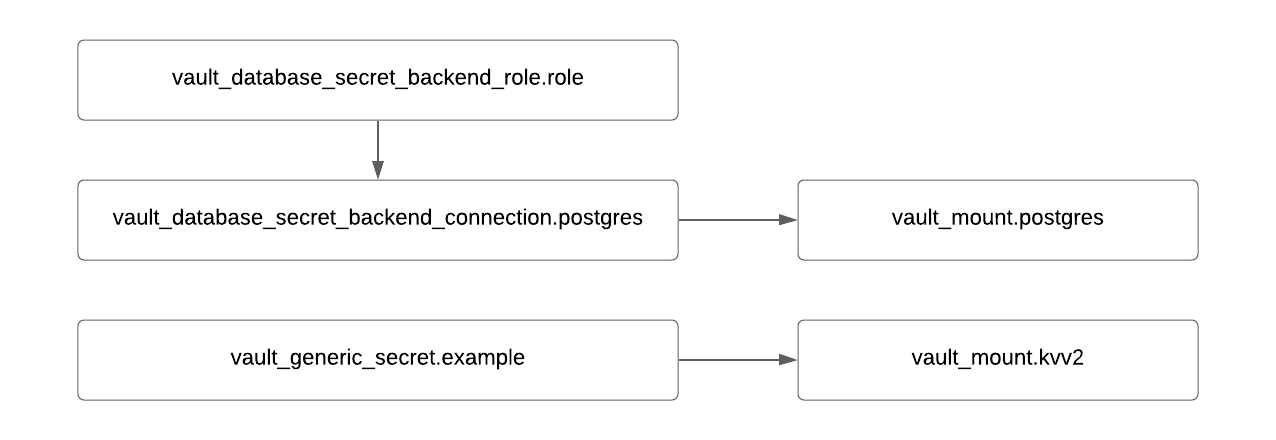
Terraform graph snippet for secret engine mount and roles.
»Application Integration with Vault
Now that the Vault configurations are built, we need the application to log in to Vault using AppRole credentials and fetch a secret. The demo uses Vault Agent to achieve this (see App Integration for more patterns).
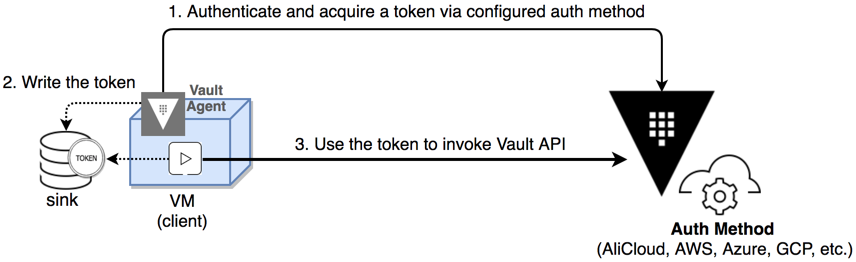
Vault Agent workflow.
The file nginx-vault-agent.hcl specifies how to authenticate the nginx container using AppRole. It also links two template files, kv.hcl and postgres.hcl, that tell Vault Agent how to render secrets from a KV and Database Secrets Engine respectively.
»Onboarding the Next Application
To onboard another application, simply add its name to the default value of the entities variable in variables.tf as shown below for app200.
# Snippet from variables.tf after adding app200
variable "entities" {
    description = "A set of vault clients to create"
    default = [
        "nginx",
        "app100",
        "app200"
    ]
}
Then run terraform apply to create the additional Vault configurations for this application:
# Ensure that VAULT_TOKEN was set from before
cd terraform
terraform apply --auto-approve
Verify from the Vault UI that there is a new entity called app200 with an alias to the AppRole auth method:
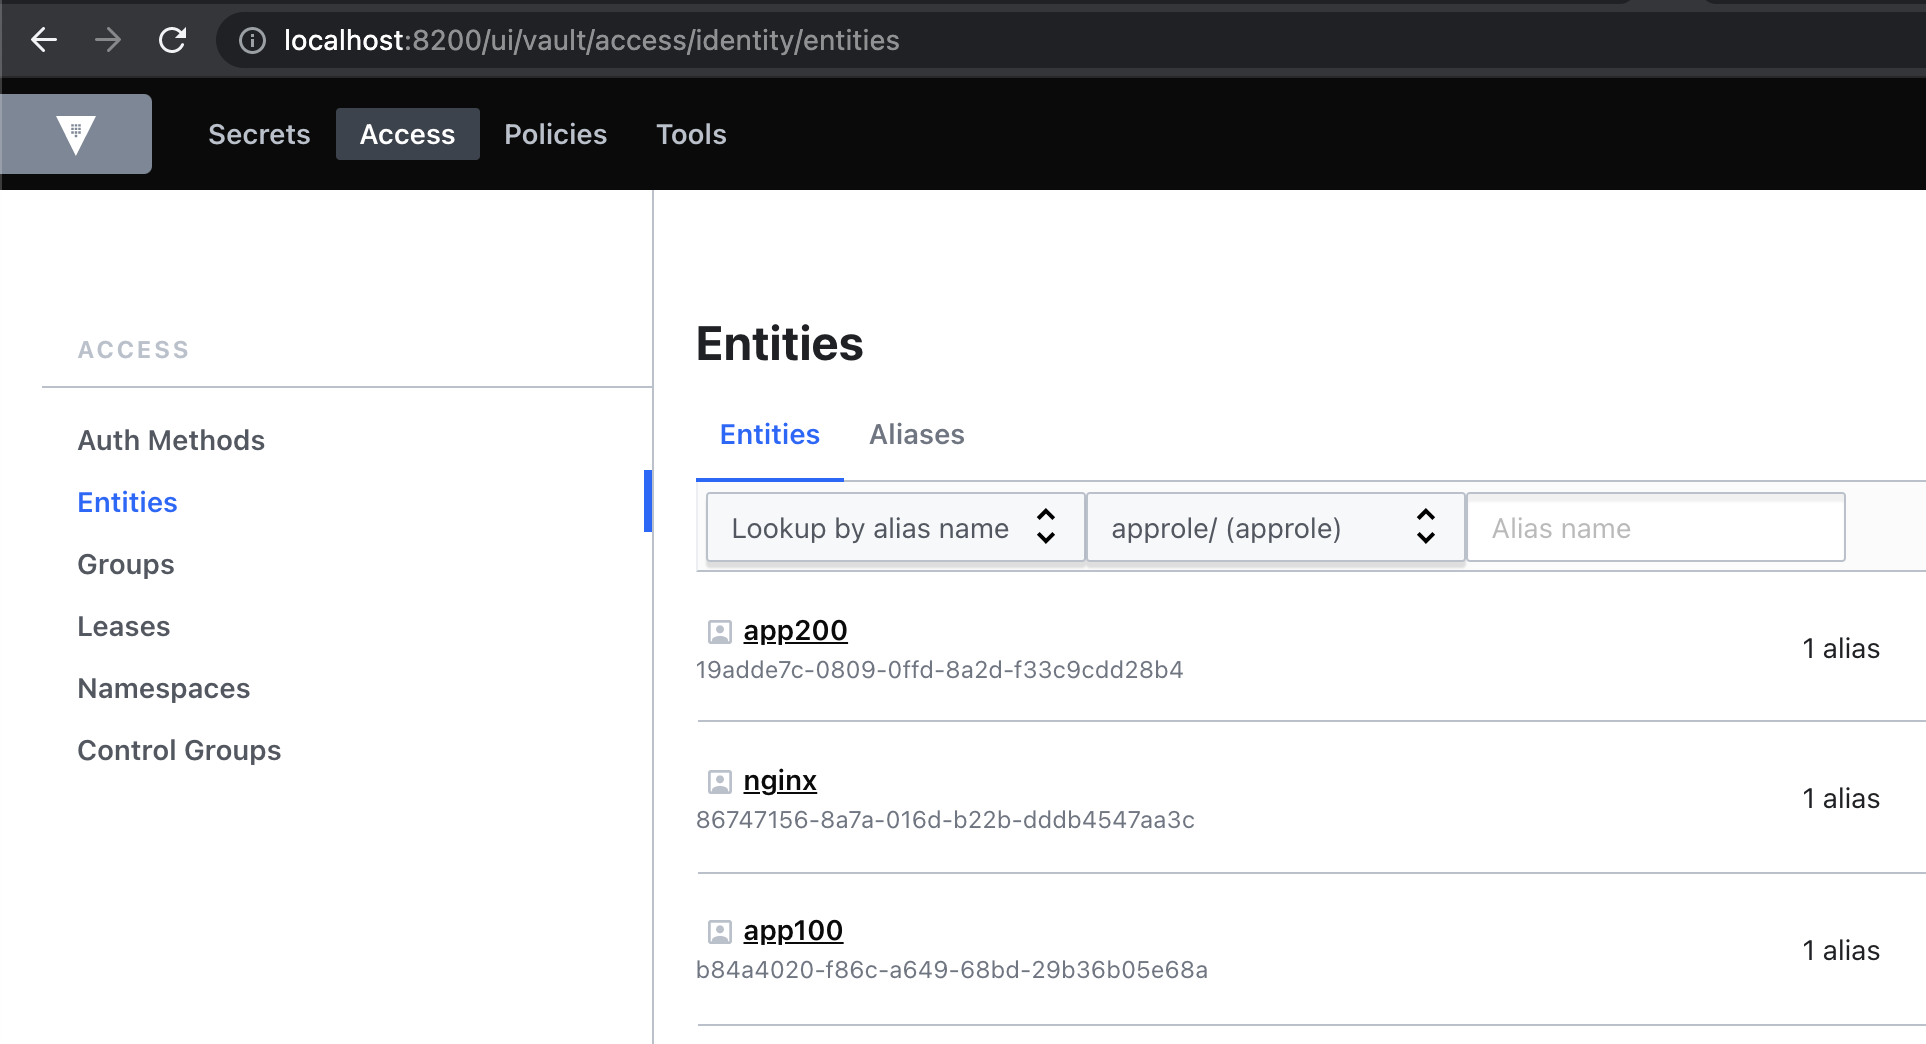
Vault screenshot showing a new app200 entity being added.
A new Role ID and Secret ID have also been created, which you can find by running the terraform output command. We can use this to test authentication and secret access as shown below. Note that the Role ID, Secret ID, and Vault token will be unique in your case.
# Get Approle creds
terraform output role_ids | grep app200
  "app200" = "ff2795c9-7f42-4233-eace-075c28869199"
terraform output secret_ids | grep app200
  "app200" = "e76ed3e5-e2c5-fd9e-14f1-554b40674d54"

# Login using AppRole
vault write auth/approle/login \
  role_id=ff2795c9-7f42-4233-eace-075c28869199 \
  secret_id=e76ed3e5-e2c5-fd9e-14f1-554b40674d54

Key                     Value
---                     -----
token                   s.JGHR7HEc0I51kOvYSfR1SfGj
token_accessor          RgOTOtM2InSfF8oz62tvOOZF
token_duration          768h
token_renewable         true
token_policies          ["default" "kv_rw_policy" "postgres_creds_policy"]
identity_policies       ["kv_rw_policy" "postgres_creds_policy"]
policies                ["default" "kv_rw_policy" "postgres_creds_policy"]
token_meta_role_name    app200

# Read KV secret
export VAULT_TOKEN=s.JGHR7HEc0I51kOvYSfR1SfGj
vault kv get kv/app200/static

====== Metadata ======
Key              Value
---              -----
created_time     2021-06-05T13:44:18.9141257Z
deletion_time    n/a
destroyed        false
version          1

====== Data ======
Key         Value
---         -----
app         app200
password    cheese
username    app200
To de-board an application, simply remove the entity from the same variable and re-rerun terraform apply.
»Automating the Workflow Using Terraform Cloud/Enterprise
Although we used Terraform CLI commands for this demo, the overall approach should be automated via a CI/CD pipeline or GitOps workflow. Terraform Cloud and Terraform Enterprise support different types of runs that can be used for automation. Below is an example screenshot showing app200 being added through a VCS-driven run.
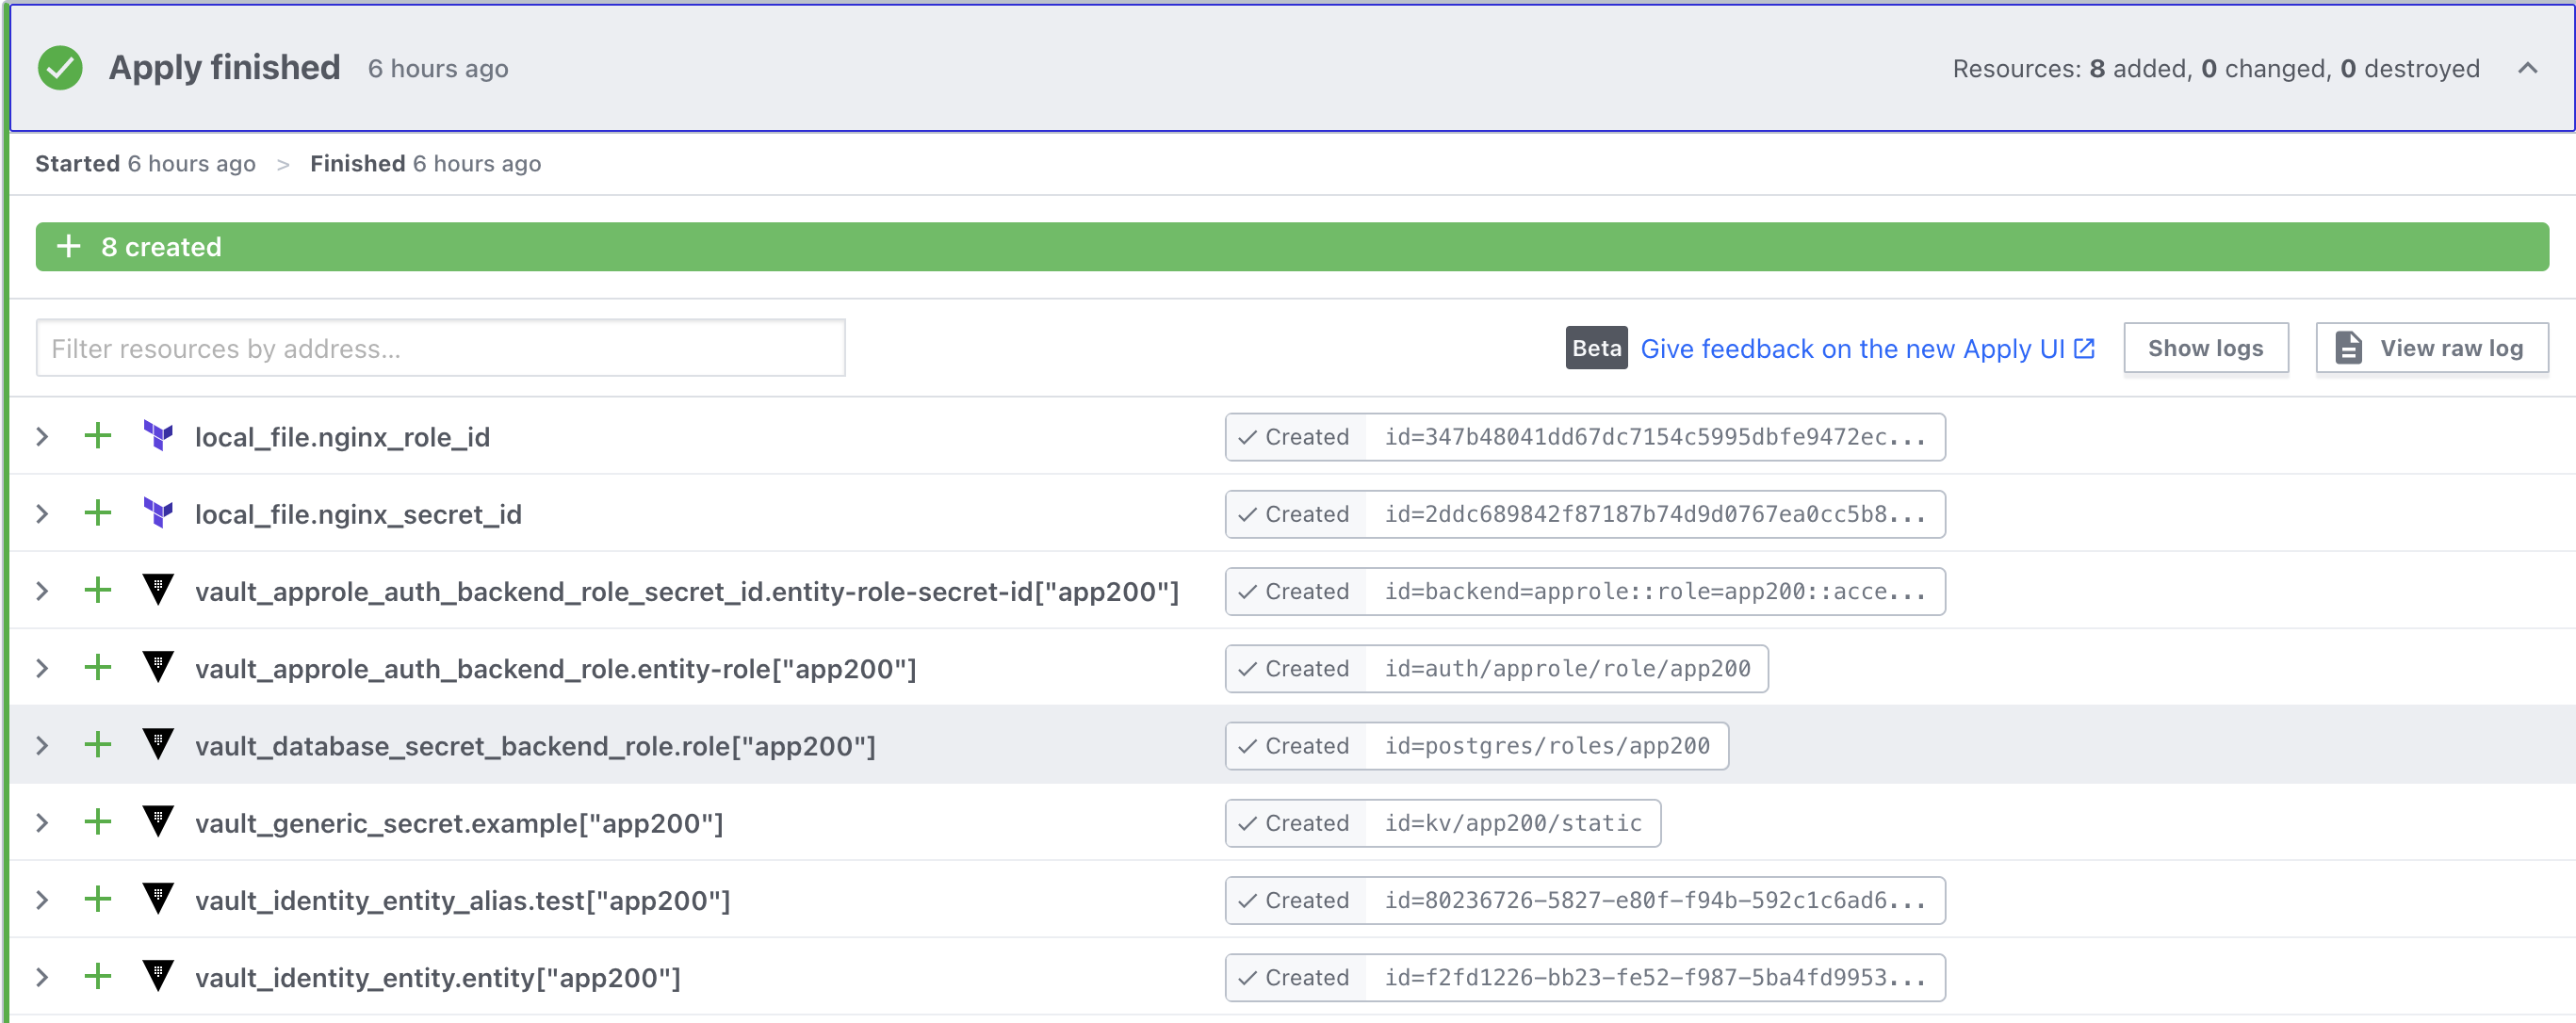
Terraform Cloud UI showing app200 related resources being created.
Using Terraform Cloud or Terraform Enterprise provides more than just a push-button way to automate Vault onboarding in your delivery pipeline, they also allow us to securely maintain all Terraform state file versions, along with many other benefits.
»Testing and Promotion Using Terraform Modules
Using an IaC approach allows us to apply configurations in non-production, perform testing, and then promote them to higher environments. This process can be simplified by encapsulating Vault configuration as modules for Terraform and publishing them in the private module registry (PMR).
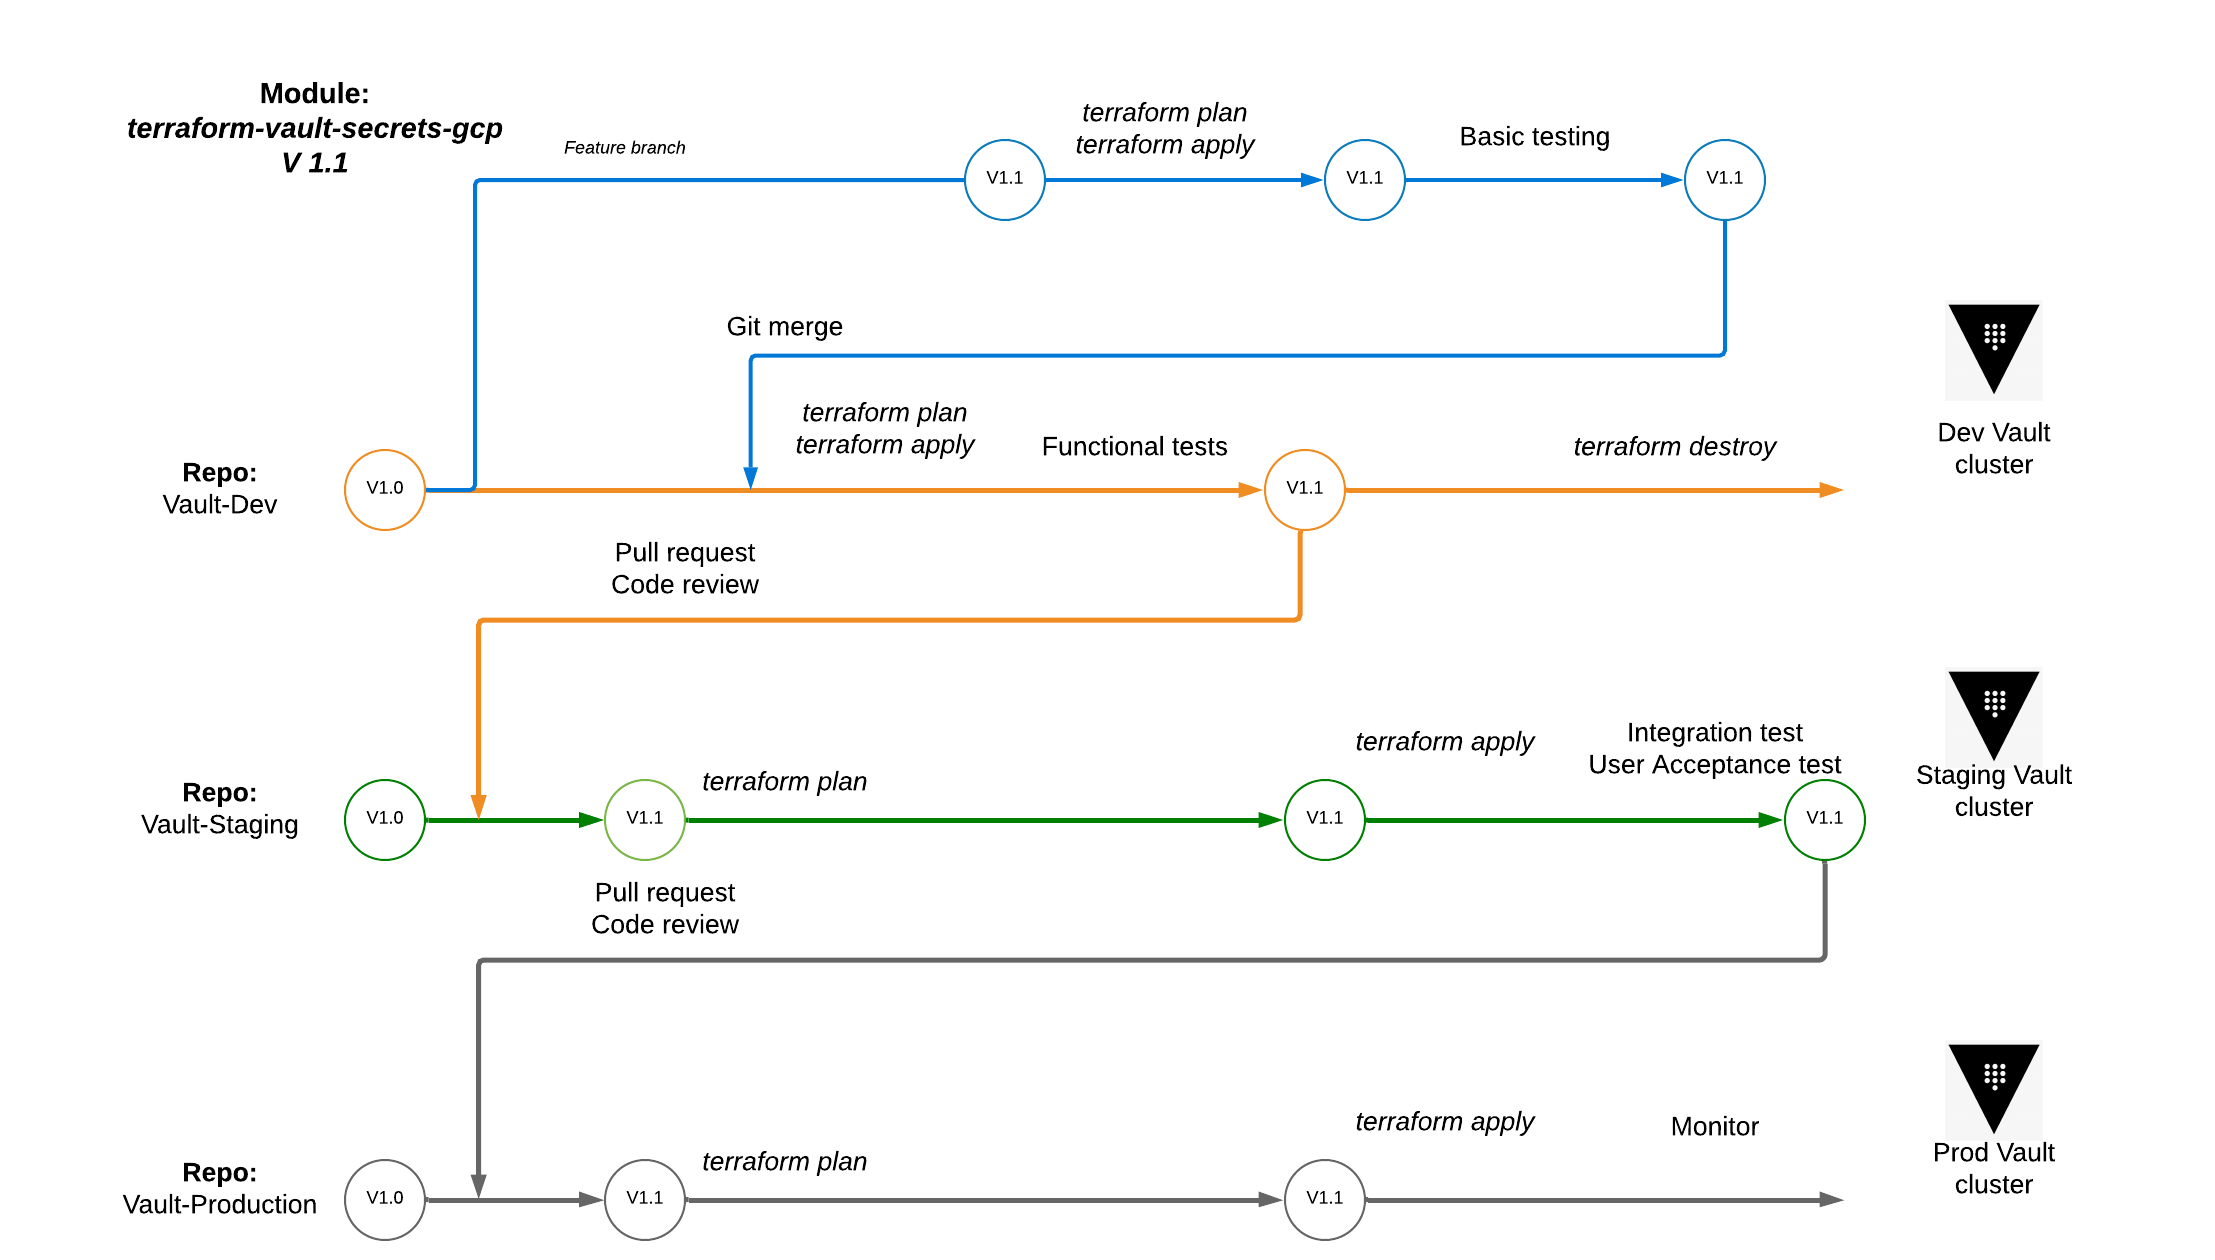
The workflow for testing and promoting a Terraform module for Vault.
In the diagram above, we are onboarding the dynamic Google Cloud (GCP) credentials Secrets Engine use-case by expressing it in a terraform-vault-secrets-gcp module and testing it in staging first. This approach allows supported use cases to be developed, tested, and versioned independently — resulting in greater velocity and cleaner separation of concerns.
»Recap and More Resources
In this walkthrough, I reviewed how to create Vault configurations using a codified approach that is repeatable and can be easily automated. Using IaC as the source of truth also makes it easier to audit how Vault is being used. Additional best practices referenced in this article included using ACL Policy templates and pre-creating application entities.
Please see the links below for more details on the best practices I covered. You can run make clean, terraform destroy, and docker-compose down to clean up demo configurations.


