

It seems that containers are everywhere. They should be. They make it easier to deploy applications into environments for development, testing and in production. However, what about when containers just don’t work? To take full advantage of the container orchestration platforms currently available there has to be considerable changes made to the applications and the deployment processes. For green field applications this is not a problem as they are usually built with containers in mind. What do you do if you want to have the advantages of a container-like scheduler but for your legacy applications?
Enter HashiCorp Nomad.
Nomad is a clustered scheduling engine that has several driver types that allow you to schedule application workloads across a distributed network of workload nodes. These drivers allow for the scheduling of containers, virtual machines, or any other executable that run workloads.
A workload may consists of a single application process or a group of processes that we want to run on a Nomad node. Nomad handles dynamic configuration injection, at runtime, to setup different service dependencies like database connections, http ports, service credentials and registration with a service discovery tool like HashiCorp Consul. All of these workload configuration elements can be defined by a single Nomad job file.
A Nomad job file is what the Nomad cluster uses to schedule, configure, and execute the desired job within the Nomad cluster. Using this job file you can define how a workload is scheduled across the cluster based on several factors that include:
- Operating system and version
- Hardware configuration
- Tag definition
- Datacenter location
- Resource consumption factors
Nomad then figures out where to place the workload and how to configure it to run.
»Nomad for running legacy applications
For some legacy applications the only way they can be run is using a binary or group of binaries to execute the workload. For these types of applications you can use Nomad’s exec driver. The Nomad exec driver allows for a job to be scheduled and linked against an executable that is either already present on the machine or dynamically installed at runtime. Let’s look at one example.
»Legacy Tomcat Application
For this example we will look at a Tomcat application. While this is a simple example that could be containerized the concepts covered in this article can easily be applied to other executable types.
»Prerequisites
To get this example to work you first need a running Nomad cluster. In this example I have a cluster made up of three Nomad server nodes and six Nomad client nodes. On each of the client nodes I have installed Apache Tomcat in the /opt/tomcat directory. A best practice is to not use the package manager to install your dependencies in your Nomad cluster, but to install them separately using a local install script or configuration tool like Chef or Puppet.
There is good reason for this. First installations vary between distro and version and you want to maintain interoperability across your Nomad cluster. Second is quite a few installations register your binaries as a service that is already running. Nomad wants to maintain a level of isolation between jobs and locally installed services usually have one configuration per machine. This makes it difficult to run different job configurations with the same service.
Once you have your cluster up and running and Tomcat configured we can look at deploying the job into the cluster with our LegacyApp.nomad job file.
»Composing LegacyApp.nomad job file
Lets step through the Nomad job file so that you can understand how it is formatted and works. Nomad, like all HashiCorp tools, follows the HCL format. This allows for a declarative format with the ability for interpolation just like HashiCorp Terraform.
The first thing every Nomad file needs to have is a job name. For this job we are going to call it “LegacyWebApp”:
job “LegacyWebApp” {
Under the job you can define certain attributes about where the job can run. For our application example we want it to run across all of our node but you can use this to ensure things like locality, anti-affinity, blue/green, or a host of others.
  region      = “global”
  datacenters = [“dc1”]
The next definition that we need is what type of application is going to be running. There are three types of workloads that you can define for Nomad; batch, system, and service. Batch processes are just that, workloads that you queue up to run at a given interval. You can then use Nomad as a distributed batch processor. System jobs tell Nomad that whatever job you are defining you want it to run across every node in the cluster. The one that we will be using will be the service. This is for long running process that should always be running based on the job specification outlined in the following stanzas.
type = “service”
The next thing we want to define is a group. A group in Nomad is a collection of tasks that all need to running together for a workload to function properly. You can have a single task in a group or you can have multiple tasks in a group. Any task that is located in the group stanza will all be started together on the same Nomad node.
group “tomcat” {
Under the group stanza is where you will define all the attributes for your workload. The first thing we want to establish is how many of the same workload do we want running. This is defined by the count attribute.
count = 3
The second thing to define is how will you update your workload tasks. This is done with the update stanza. In this stanza you can define precisely how you want your upgrade to be rolled out. For this example we want to mimic a blue/green deployment so we will have the same number of canary deployments as our current count with a minimum healthy status of 30s before starting to terminate the older version. The healthy deadline states that if all the canary deployments do not start in ten minutes destroy the canary deployments and keep the stable version up.
    update {
        canary = 3
	   min_healthy_time = “30s”
	   healthy_deadline = “10m”
	   auto_revert      = true
	   max_parallel     = “1”
    }
»Task stanza
The real trick to running legacy binaries comes in the task stanza. The first part is using the artifact stanza. This declaration lets you specify what components you want to download to the ephemeral storage provided by the node and where to put them. You can pull files from a HTTP endpoint or from your VCS system like GitHub or GitLab. You even have the ability to download compressed files and decompress them onto the disk. This comes in handy if you need to download a package of binaries that all get started by a wrapper script. You can also download different config files and populate them either through environment variables or using a template to populate them through Nomad’s native interpolation.
For our Tomcat example we need to download two files. The first one is the war file we want to deploy on it. The second is a custom server.xml that we will populate with environment variables provided by the Nomad node itself. In the artifact stanza you must have a source location. The destination is optional and if left undeclared will default to the local/ directory on the node.
        task “WebApp” {
        artifact {
	     source = “http://location.of.my.file/myfile.war"
	           destination = “/local/webapps”
	   }
	   artifact {
	     source = “http://location.of.my.file/server.xml”
	     destination = “/local/tomcat/conf”
	   }
»ENV stanza
The next stanza we want to use is the env call. This allows you to set environment variables that will be populated at runtime. For our application example, we are going to populate things needed to run Tomcat from the command like JAVA_HOME, CATALINA_HOME as well as things specific to our application like database credentials, and what http port to map to the Tomcat process. This allows you to run multiple Tomcat instances on the same host using different ports. You will use this in conjunction with the resources stanza where the http port will be assigned dynamically by the node.
	      env {
		DBHOST = “your.db.host”
		DBUSER = “dbuser”
		DBPASS = “password”
		DATABASE = “demodb”
		CATALINA_OPTS = -Dport.http=$NOMAD_PORT_http -Ddefault.context=$NOMAD_TASK_DIR”
		JAVA_HOME = “/location/to/java”
		CATALINA_HOME = “/opt/tomcat”
	   }
Notice that I am using the populated Nomad environment variables for the http port and the location of the Nomad task directory to populate java command line arguments to be injected into the startup of the Tomcat service. These two parameter located in the CATALINA_OPTS environment variable are passed to the server.xml to establish the http port to listen on as well as where the root directory to where the war file location is.
<?xml version='1.0' encoding='utf-8'?>
<Server port="-1" shutdown="SHUTDOWN">

  <Service name="Catalina">

    <Connector port="${port.http}" protocol="HTTP/1.1"
               connectionTimeout="20000" />
    <Engine name="Catalina" defaultHost="localhost">

      <Host name="localhost"  appBase="${default.context}/webapps/"
            unpackWARs="true" autoDeploy="true"
            xmlValidation="false" xmlNamespaceAware="false">

      </Host>
    </Engine>
  </Service>
»EXEC Driver
The driver declaration is for the type of driver used to run this workload. For this workload, we are using the exec driver. This allows for any arbitrary command to be executed as the user that the nomad process is running under. Again we are injecting an environment variable, to tell tomcat where the server.xml configuration file is located, to use when starting up. The catalina.sh is a wrapper script that is used to build and run the java command to start tomcat. You could use the java driver to do this but building all the options can be tricky and tomcat already has a good way of running tomcat.
Most commands have a way of passing runtime arguments. The config stanza allows you to specify what those arguments are. For this example, we want to pass the -config option along with the location of the server.xml to use.
One thing to note is the exec cannot execute a command that runs a process as a daemon. It must be run in the foreground to be able to terminate the process when it finishes. To do this with tomcat, we pass the “run” argument which will keep this process in the foreground.
       driver = “exec”
     config {
          command = “/opt/tomcat/bin/catalina.sh”
   	   args = [“run”, “-config”, “$NOMAD_TASK_DIR/tomcat/conf/server.xml”]
     }
Since we need to use dynamic http ports a service discovery tool like Consul is needed to announce the location of this application. Consul registration will allow for our dynamic load balancer, Fabio, to automatically pick up the running service and map it to an external port of 9999. To do this we use the service stanza and register it with Consul.
         service {
           tags = ["urlprefix-/LegacyApp"]
       	 port = "http"

       	 check {
         		name     = "version_check"
         		type     = "http"
         		path     = "/LegacyApp/version/version.jsp"
        		interval = "10s"
         		timeout  = "2s"
       	 }
       }
The last thing we want to do is supply the resource constraints. This will tell the scheduler what the resource requirements are for our job. It will also define what ports to map http to. If you look at the http attribute, I have put curly braces next to it. This tells Nomad to use a port range of 20000-40000 to assign the http port to. This is then interpolated in the environment variable, that is used to pass to tomcat, on what to bind it to.
      resources {
           cpu    = 500 # MHz
           memory = 128 # MB

           network {
              mbits = 1
             port "http" {}
         }
      }
»Putting it all together
Once this job file has been created all that is left to do is submit it to Nomad for scheduling. You do this by invoking the nomad run <job_file> at the command line.
(master) $: nomad run LegacyWebapp.nomad
==> Monitoring evaluation "c0dde6be"
   Evaluation triggered by job "LegacyWebApp"
   Evaluation within deployment: "a3e63ddd"
   Allocation "af427171" modified: node "c8288d23", group "tomcat"
   Allocation "d7af2ec8" modified: node "33cd403c", group "tomcat"
   Allocation "ea1c2194" modified: node "c56b21d7", group "tomcat"
   Evaluation status changed: "pending" -> "complete"
==> Evaluation "c0dde6be" finished with status “complete"
Once this is run you can see the status of your job by running the job status command.
(master) $: nomad job status LegacyWebApp
ID            = LegacyWebApp
Name          = LegacyWebApp
Submit Date   = 04/02/18 19:50:27 EDT
Type          = service
Priority      = 50
Datacenters   = dc1
Status        = running
Periodic      = false
Parameterized = false

Summary
Task Group  Queued  Starting  Running  Failed  Complete  Lost
tomcat      0       0         3        2       55        0

Latest Deployment
ID          = a3e63ddd
Status      = successful
Description = Deployment completed successfully

Deployed
Task Group  Desired  Placed  Healthy  Unhealthy
tomcat      3        3       3        0

Allocations
ID        Node ID   Task Group  Version  Desired  Status   Created    Modified
af427171  c8288d23  tomcat      40       run      running  4h31m ago  4h28m ago
d7af2ec8  33cd403c  tomcat      40       run      running  4h31m ago  4h28m ago
ea1c2194  c56b21d7  tomcat      40       run      running  4h31m ago  4h28m ago
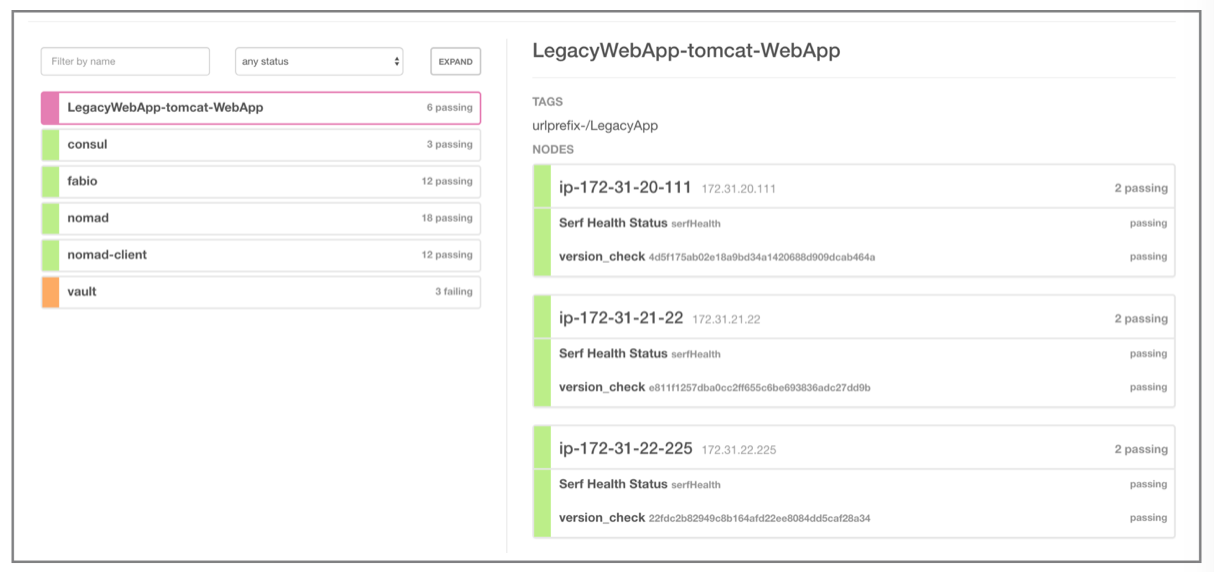
Consul will show that your service is up and running and registered with it and passing all the health checks.
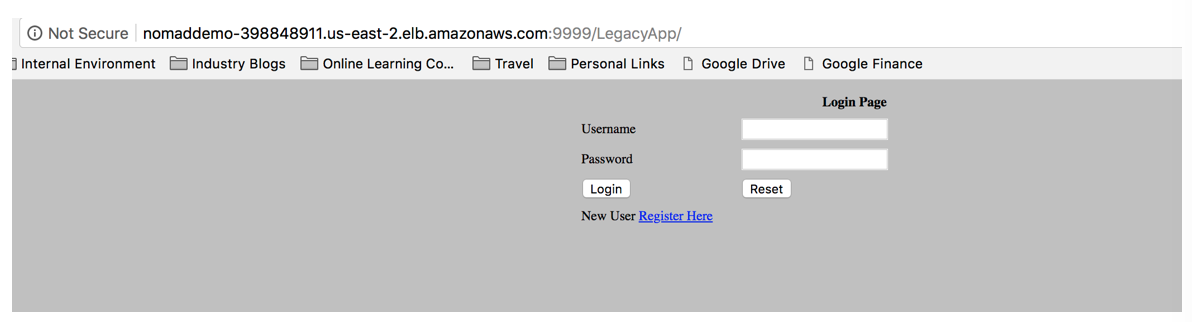
Now if you point your browser to the URL you should get your application.
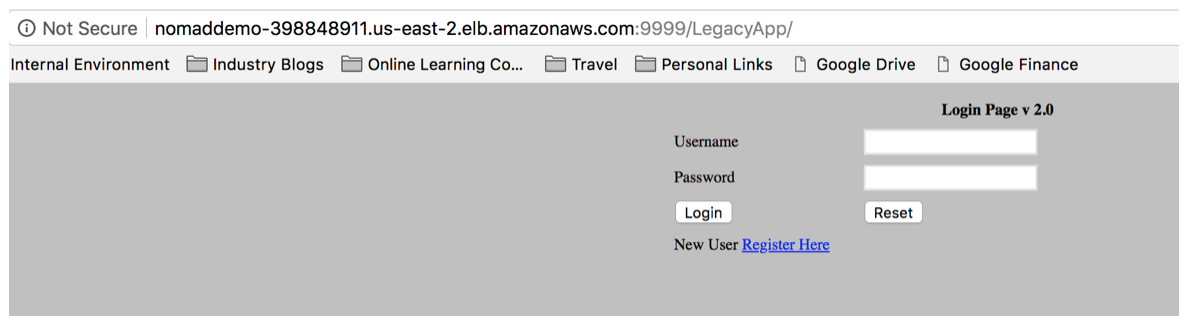
In the event that you want to upgrade from version 1.0 to version 2.0, it is as easy as making a change to your file. In this case it will be the artifact location from v.1 to v.2. Resubmit the job and Nomad will figure out what has changed. You can do this by first issuing the plan command and see what Nomad is going to do with your updated job.
(master) $: nomad plan LegacyWebapp.nomad
+/- Job: "LegacyWebApp"
+/- Task Group: "tomcat" (3 canary, 3 ignore)
 +/- Update {
   +/- AutoRevert:      "false" => "true"
   +/- Canary:          "0" => "3"
       HealthCheck:     "checks"
   +/- HealthyDeadline: "300000000000" => "600000000000"
       MaxParallel:     "2"
   +/- MinHealthyTime:  "10000000000" => "30000000000"
     }
 +/- Task: "WebApp" (forces create/destroy update)
   + Artifact {
     + GetterMode:   "any"
     + GetterSource: "https://s3.us-east-2.amazonaws.com/nomad-demo-legacyapp/v.2/LegacyApp.war"
     + RelativeDest: "/local/webapps/"
     }
   - Artifact {
     - GetterMode:   "any"
     - GetterSource: "https://s3.us-east-2.amazonaws.com/nomad-demo-legacyapp/v.1/LegacyApp.war"
     - RelativeDest: "/local/webapps/"
     }
Resubmit the job and see Nomad spin up three new instances of the application as a canary deployment.
(master) $: nomad job status LegacyWebApp
ID            = LegacyWebApp
Name          = LegacyWebApp
Submit Date   = 04/03/18 00:26:38 EDT
Type          = service
Priority      = 50
Datacenters   = dc1
Status        = running
Periodic      = false
Parameterized = false

Summary
Task Group  Queued  Starting  Running  Failed  Complete  Lost
tomcat      0       0         6        2       55        0

Latest Deployment
ID          = ea1564a0
Status      = running
Description = Deployment is running but requires promotion

Deployed
Task Group  Auto Revert  Promoted  Desired  Canaries  Placed  Healthy  Unhealthy
tomcat      true         false     3        3         3       0        0

Allocations
ID        Node ID   Task Group  Version  Desired  Status   Created    Modified
0b0ef2a4  206bfc4f  tomcat      41       run      running  9s ago     8s ago
916307f1  46102c23  tomcat      41       run      running  9s ago     8s ago
ca82eb52  89797ed9  tomcat      41       run      running  9s ago     9s ago
af427171  c8288d23  tomcat      40       run      running  4h39m ago  4h35m ago
d7af2ec8  33cd403c  tomcat      40       run      running  4h39m ago  4h36m ago
ea1c2194  c56b21d7  tomcat      40       run      running  4h39m ago  4h36m ago
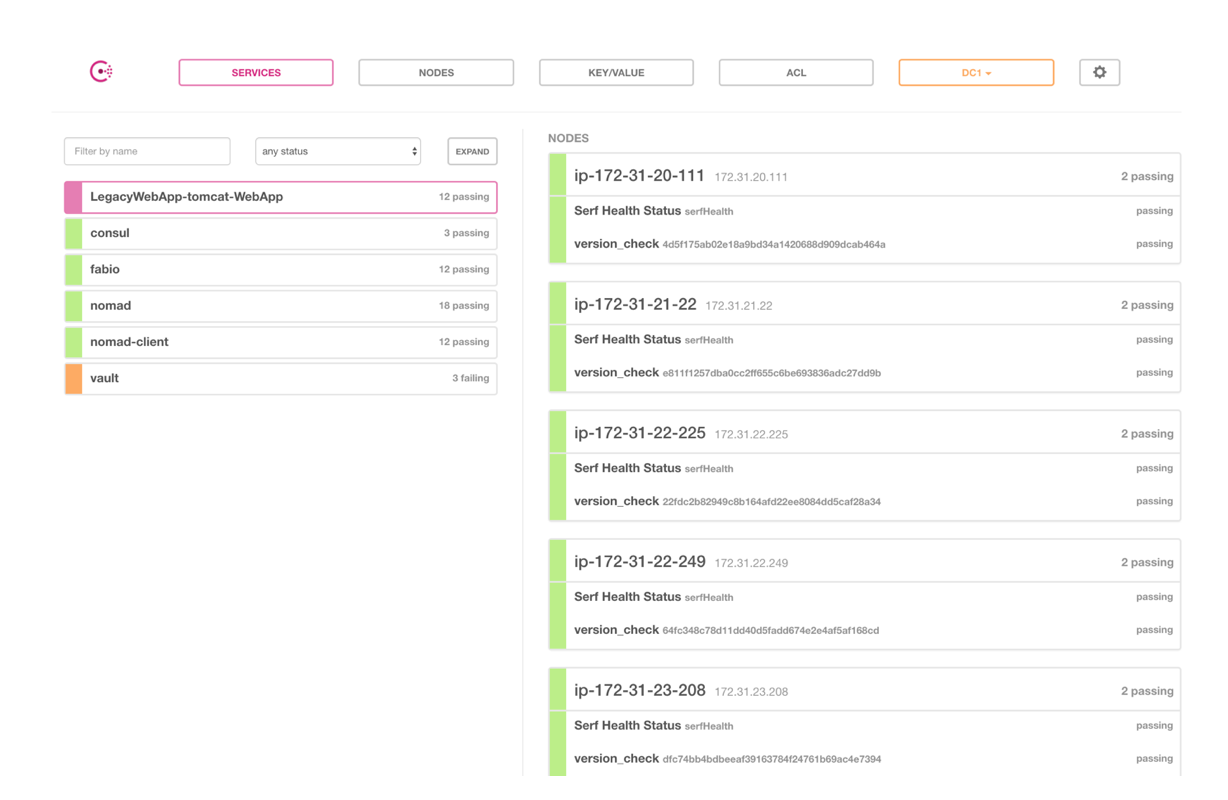
As you can see Nomad has spun up three new canary instances of our application to make sure everything comes up and is working.
After we test to make sure the deployment is working, we can now promote the new code and sunset the old code. You do this by issuing the deployment promote command.
(master) $: nomad deployment promote ea1564a0
==> Monitoring evaluation "58e44443"
   Evaluation triggered by job "LegacyWebApp"
   Evaluation within deployment: "ea1564a0"
   Evaluation status changed: "pending" -> "complete"
==> Evaluation "58e44443" finished with status “complete"
Now when you do a job status you can see that our three older versions have ended and now only the new version is running.
(master) $: nomad job status LegacyWebApp
ID            = LegacyWebApp
Name          = LegacyWebApp
Submit Date   = 04/03/18 00:26:38 EDT
Type          = service
Priority      = 50
Datacenters   = dc1
Status        = running
Periodic      = false
Parameterized = false

Summary
Task Group  Queued  Starting  Running  Failed  Complete  Lost
tomcat      0       0         3        2       58        0

Latest Deployment
ID          = ea1564a0
Status      = successful
Description = Deployment completed successfully

Deployed
Task Group  Auto Revert  Promoted  Desired  Canaries  Placed  Healthy  Unhealthy
tomcat      true         true      3        3         3       3        0

Allocations
ID        Node ID   Task Group  Version  Desired  Status    Created    Modified
0b0ef2a4  206bfc4f  tomcat      41       run      running   5m44s ago  5m9s ago
916307f1  46102c23  tomcat      41       run      running   5m44s ago  5m7s ago
ca82eb52  89797ed9  tomcat      41       run      running   5m44s ago  5m8s ago
af427171  c8288d23  tomcat      40       stop     complete  4h45m ago  1m55s ago
d7af2ec8  33cd403c  tomcat      40       stop     complete  4h45m ago  1m55s ago
ea1c2194  c56b21d7  tomcat      40       stop     complete  4h45m ago  1m55s ago
»Conclusion
For those legacy application that are not ready to be containerized Nomad is a great option to allow the flexibility of dynamic job scheduling for types of workload that are not ready to move into that new deployment framework.
To learn more about Nomad, visit https://www.hashicorp.com/products/nomad.


