Creating Infrastructure Pipelines With Terraform Cloud Run Triggers
HashiCorp Terraform provides practitioners with a simple way to define and manage their infrastructure as code, as part of a broader application pipeline, or via automated processes. However, there have always been differences in how an application pipeline and an infrastructure pipeline are expected to behave. Today we’re pleased to release the beta version of run triggers: a feature that embraces these differences, and puts Terraform Cloud on its way to creating full-fledged infrastructure pipelines.
It’s important to note that since this is a beta feature, it’s not currently recommended for production use, but we hope you’ll take the opportunity to test it out and give us feedback.
»What is a Run Trigger?
Terraform Cloud run triggers provide a simple, programmable way to link workspaces together. This lets you automate runs across workspaces, allowing a new level of flexibility when defining and managing your infrastructure.
Run triggers are configured by setting a source workspace on a workspace of which you’re an administrator. By doing this, you’re saying that any time that source workspace has a successfully applied run, you want to automatically start a run of your own. This requires you to have administrative access on your own workspace, as well as read-only access, at a minimum, on the source workspace.
You can also use the terraform_remote_state data source within your configuration files to retrieve outputs from those other workspaces, ensuring that you always have the most up-to-date values from run to run. We’ll go into more detail on that in a bit.
»Why Would I Use Them?
Great question. Terraform is all about composable infrastructure as code—where modules, configurations, and providers can all be built collaboratively and be consumed by anyone. Run triggers bring this same approach to workspaces and are useful anywhere you’d like to have distinct pieces of infrastructure automatically queue a run when a dependent piece of infrastructure is changed. This could be for many reasons. Some examples might include:
- Enabling cross-team collaboration — Think of the way a database and web team might work together when changing infrastructure.
- Security purposes — Where a central security team needs to make changes across many resource types.
- Alignment with the application pipeline — Breaking down your Terraform Cloud workspaces to be smaller, more reusable components of a larger application delivery story.
»How Can I Build My Own Run Triggers?
Getting started with run triggers is really easy! For the purposes of this guide, we’ll assume you already have a Terraform Cloud account configured, and a couple of workspaces. In this example, we’ll use 3 workspaces, each backed by a GitHub VCS repository. For more information about linking workspaces to a VCS repository, see this previous blog post.
The repositories we’ll use for these workspaces are linked below if you’d like to follow along. I’ll also provide these links at the end, and we’ll review the repository contents and functions in just a moment.
terraform-random-integer: https://github.com/vaficionado/terraform-random-integer terraform-random-separator: https://github.com/vaficionado/terraform-random-separator terraform-random-pet: https://github.com/vaficionado/terraform-random-pet
First, log in to Terraform Cloud. You’ll see your workspaces listed.
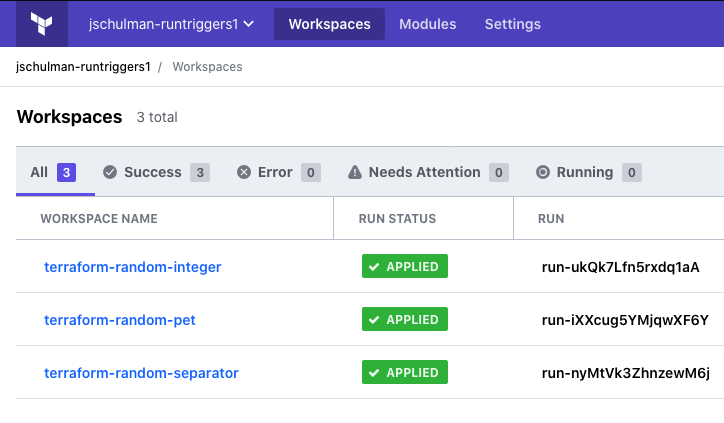
These workspace names need a little bit of explaining. In this example, we’ll be using the random pet resource type, which generates a string of random pet names. But as a twist, we’ll start by generating a random integer that determines the length of the separator between the individual words in that pet’s name, as well as how long the name itself is.
Before we go further, let’s take a look at the code for the terraform-random-integer workspace.
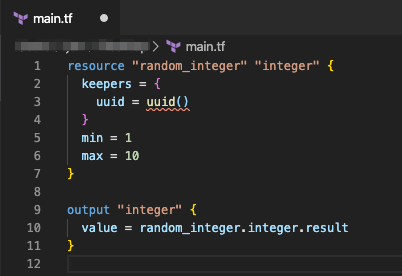
It’s quite simple. It just generates a single integer between 1-10 digits long and outputs it as integer. Because this will be the base of our run triggers chain, we don’t need to look at this workspace right now.
Next, let’s look at what the terraform-random-separator configuration does.
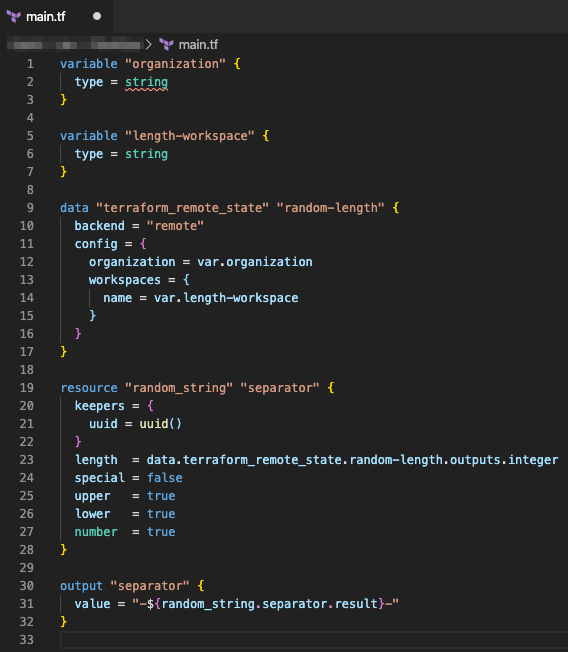
This is another simple configuration. It configures two variables called organization and length-workspace and uses those to connect to a remote backend using the terraform_remote_state datasource type. Then it generates a random string using values from that datasource and outputs that string as separator.
Finally, we’ll look at terraform-random-pet itself.
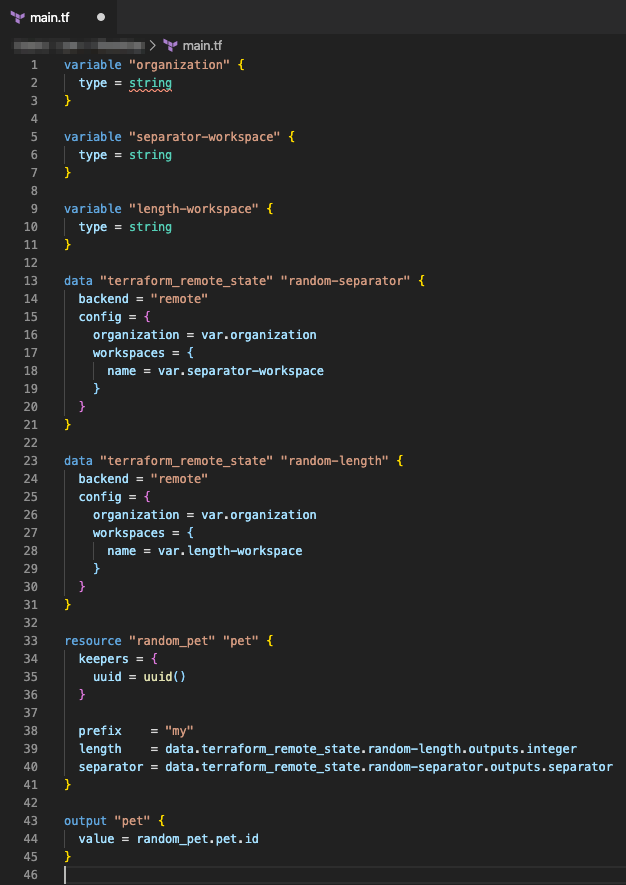
This is just building on the previous example, where we’re now creating the same two variables as before and adding separator-workspace as well. The configuration then creates two instances of the terraform_remote_state datasource, one for each of the previous workspaces. It then generates the actual random_pet name as output pet, using the integer and separator values from the previous workspaces as part of the name.
Now that we understand how the configurations are designed, let’s go back to the run trigger configuration.

Open up the terraform-random-separator workspace and check out the Variables for it.
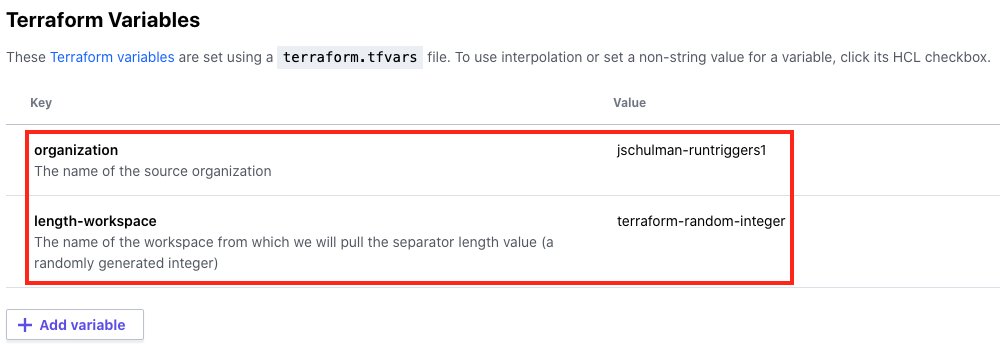
Here, you can define the values for those variables in your configuration. In this case, I’ve set the organization to jschulman-runtriggers1, and the length-workspace to terraform-random-integer.
Next, click on the Settings > Run Triggers option to open the run trigger configuration view. Choose a source workspace from the dropdown list. In this case we’ll pick terraform-random-integer and click Add workspace. Note that you’ll only see workspaces in this list that you have at least read access to, and the picker won’t allow you to create any infinite loops: where workspace 1 triggers runs in workspace 2 which triggers runs in workspace 1, for example. You also won’t see any workspaces which are already added as sources.
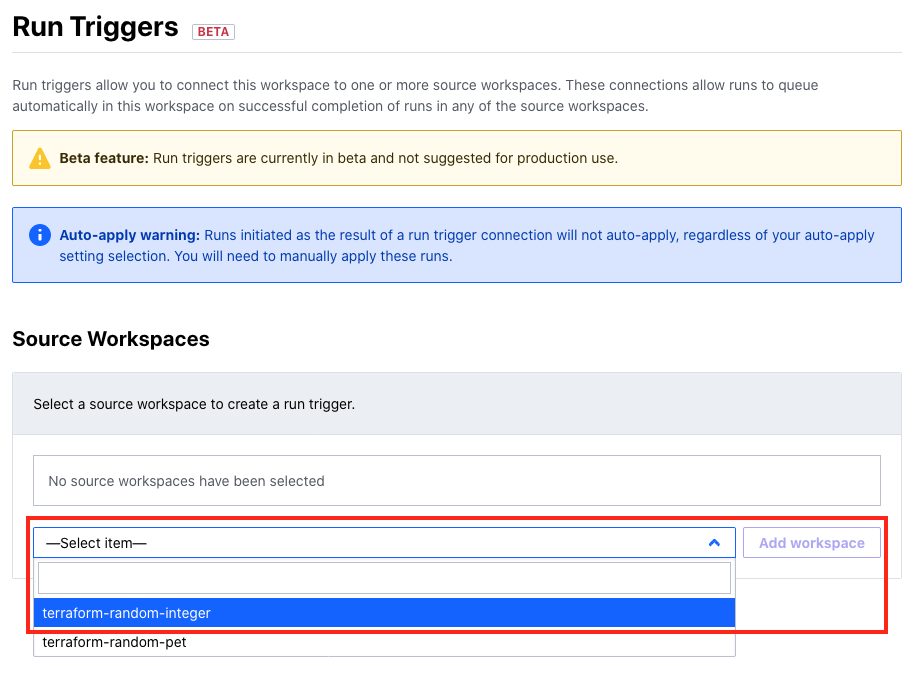
Making this selection means any successfully applied runs in terraform-random-integer will automatically start a run in terraform-random-separator. It’s also important to note the yellow and blue boxes here—remember that this feature is currently in beta, and we don’t suggest you use it in production just yet. Also, if you have auto-apply set up in your workspaces, manual intervention will be required regardless of your auto-apply settings when a run is started by a run trigger. This ensures that workspace owners still have control over whether a change from outside impacts them.
Once you’ve saved this configuration, click into the variables for your terraform-random-pet workspace and configure those values as shown here. They’re the same as in the previous workspace, with the addition of a value for the separator-workspace.
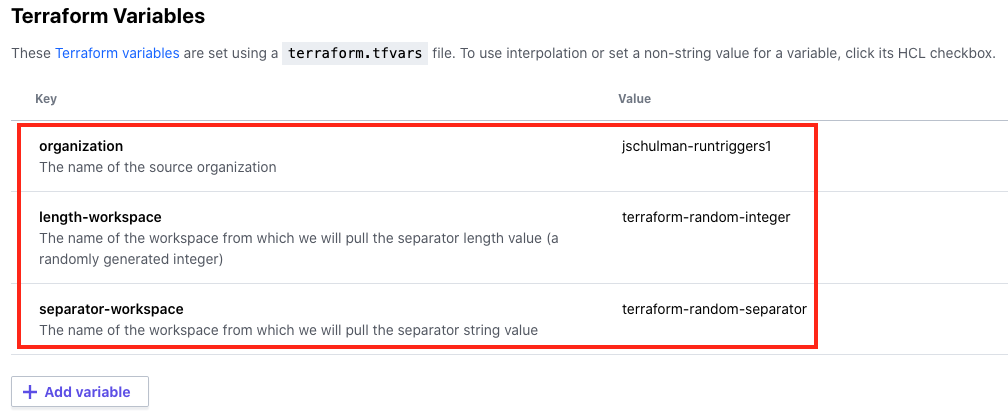
Now, build another run trigger in this workspace, only this time choosing the terraform-random-separator workspace as your source. You’ll notice that we don’t connect this workspace to terraform-random-integer, even though it uses outputs from that workspace. That’s because we’re establishing a chain of events here where the output required is already present, and we’ll query it directly using terraform_remote_state.

That’s it! Your three-stage run trigger chain is now complete and ready to test. Go back to your terraform-random-integer workspace and click Queue plan, enter a reason, and click the purple Queue plan button to start the run.

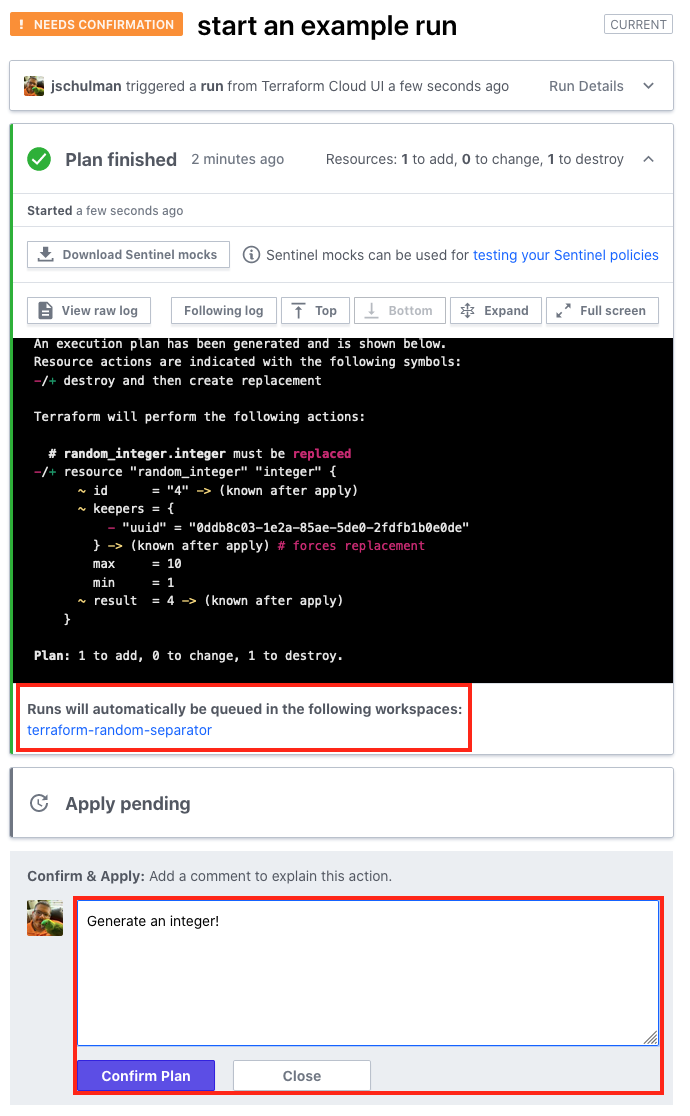
Once the plan completes, you’ll see something like this. Your plan output may vary depending on whether you’ve got existing resources, but the important thing is under the plan itself—you can see a list of the other workspaces that will have automatic runs queued in them. In this case, terraform-random-separator will automatically start. Clicking on those workspace name(s) will bring you to the list of runs for that workspace.
Once you’re satisfied with the plan, click Confirm & Apply, enter a reason, then Confirm Plan.
Once the run finishes, return to your Workspaces view. By now, you should see that the next workspace is in the planning phase, or may already be awaiting confirmation to apply the run.
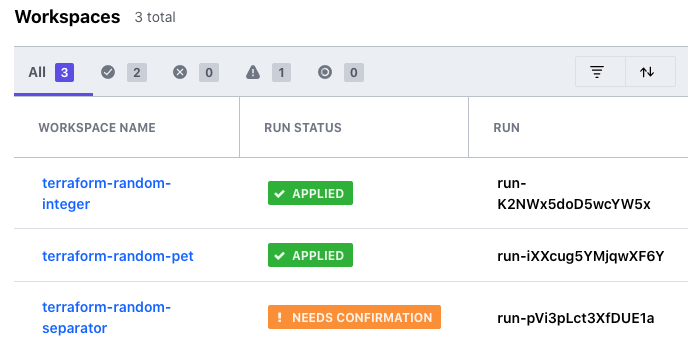
In this case, the linked terraform-random-separator workspace is already pending our confirmation to apply the new plan. Click into the workspace and confirm this plan as well. When it finishes, the same thing should happen for your terraform-random-pet workspace, so let’s open that workspace and the pending run as well.
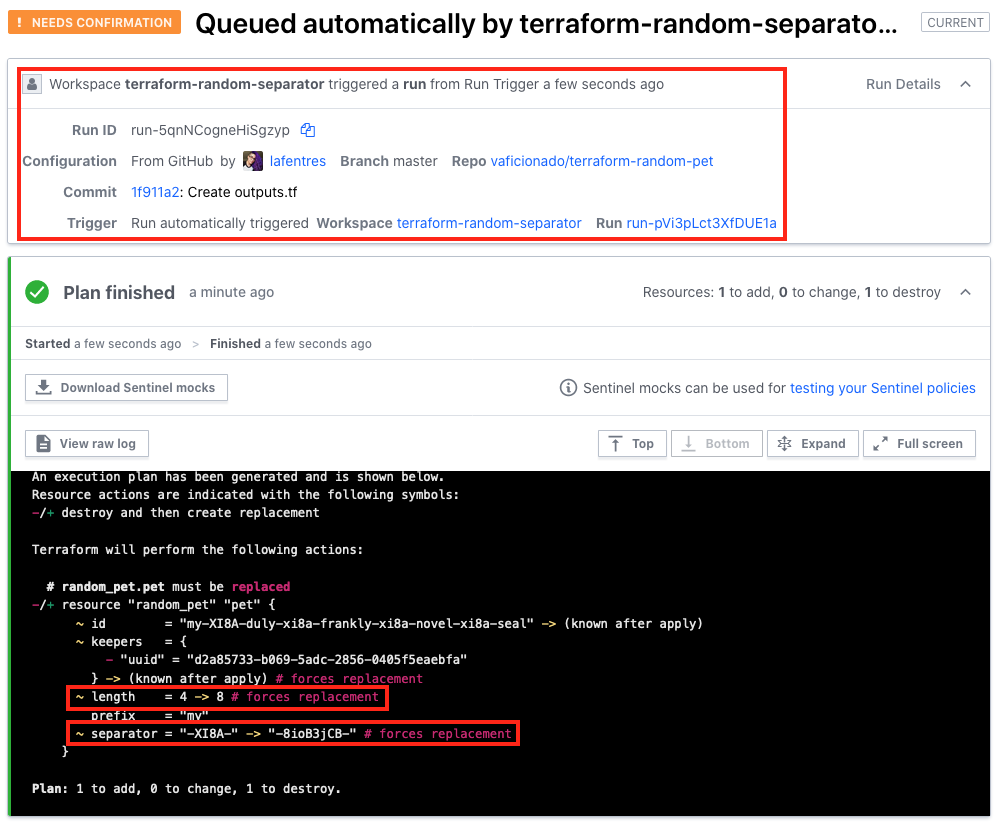
This time, let’s look at some of the additional details provided here in the run itself. You can see which workspace triggered the automatic run, the details of the GitHub configuration commit, and the usual array of run details.
Looking deeper at the plan phase, you can also see that in this case, the length was updated as a result of the run within terraform-random-integer. Similarly, the separator was updated as a result of the run within terraform-random-separator.
Confirm and apply this last run, and wait for the outputs.

Ah, who can forget their beloved childhood pet… my supposedly actually terminally usefully repeatedly strictly boss silkworm?
Well, what’s in a name, anyway? The point is that by now, you should see how to link your Terraform Cloud workspaces together using the new run triggers beta.
»Resources
If you’re looking for the repositories we used for this guide, you can access them at the following links:
terraform-random-integer: https://github.com/vaficionado/terraform-random-integer terraform-random-separator: https://github.com/vaficionado/terraform-random-separator terraform-random-pet: https://github.com/vaficionado/terraform-random-pet
Huge thanks to Krista for the base repositories here and all of her great work on this feature.
If you’d like to provide feedback to the Terraform Pipelines team directly on this capability, you can reach us via email at tf-pipeline@hashicorp.com We’d love to hear from you!
»Getting Started
To get started, sign up for a free Terraform Cloud account. Or to learn more, head over to our documentation for details on how to link your specific VCS provider, or visit the HashiCorp Learn platform and see Terraform in action today.
Sign up for the latest HashiCorp news
More blog posts like this one

A blueprint for cloud success with HashiCorp at Google Cloud Next
A recap of HashiCorp infrastructure and security news and developments from Google Cloud Next, from scaling infrastructure as code to fighting secrets sprawl and more.

Terraform 1.8 improves extensibility with provider-defined functions
New in Terraform 1.8: Provider-defined functions let users extend Terraform with custom capabilities. Plus, refactoring can now be done across resource types.

Terraform 1.8 provider functions for AWS, Google Cloud, and Kubernetes
See usage examples of Terraform 1.8's new launch-day provider-defined functions for AWS, Google Cloud, and Kubernetes.