

HashiCorp Vault, like many comprehensive solutions, has a learning curve. It’s opinionated about the right way to do things securely, and sometimes that opinionated complexity leads people to take shortcuts. Those shortcuts may open holes in the security around secrets or the credentials used to authenticate to Vault. Let’s walk through some best practices for using the AppRole authentication method and learn why you shouldn’t take shortcuts.
Note: This is not a guide to hardening of Vault clusters; for that see our Vault production hardening guide — and for a glimpse of trying to compromise Vault from an attacker’s point of view, I recommend my longtime colleague John Boero’s blog post from that perspective:
»When You Need AppRole: Secret Zero
Before applications can retrieve secrets from Vault, they need to be given a secret from which they can authenticate — this is a bit of a chicken-and-egg conundrum we refer to as the “secure introduction” or “secret zero” problem. Apps can resolve the dilemma, authenticate to Vault, and retrieve a token in one of three basic ways:
By using underlying platform identity (cloud provider IAM roles, Kubernetes service accounts, etc.)
By using operator-provided non-platform authentication (usernames/passwords)
By bypassing authentication entirely and using a token provided directly to the application — what I call “tokens from the sky”.
Giving apps a token from the sky is least-preferred — you have to guarantee secure delivery of that token yourself, and you also don’t get application identity association unless you establish it yourself via entity aliases for every app token you create. Giving apps non-platform credentials is better (it associates identity with the application) but you still have secure-handling challenges.
Applications authenticating through the platform is best, but not every platform has Vault auth integration. You might be in a cloud without any authentication plugin for Vault, or you might be using bare metal. Fortunately, Vault has an auth method that can give you many of the advantages of platform-based authentication even without native platform integration: AppRole lets you build a trusted broker for your applications easily and effectively.
»What Makes AppRole Better?
The most essential feature of AppRole that makes it better than direct token assignment is that the credential is split into a Role ID and a Secret ID, delivered through different channels. Further, the Secret ID is delivered to the application only at the expected time of use (usually at application startup).
This pattern of authorization by using knowledge delivered just in time, in parts, through independent delivery paths should be familiar from standard multi-factor authentication methods: to log in to a service, you have an already-known identity, but you need a one-time-use token generated and delivered at the time you log in as well.
The Role ID is not sensitive and can be used for any number of instances of a given application; you can hardcode it into things like VM or container images (though as a best practice, you should not provide it to processes that don’t need it, e.g. processes that manage roles rather than using them to authenticate).
The Secret ID, by contrast, is:
Intended to be access-limited so it can be used only by authorized applications; it may be usable by only a single application or even a single app instance.
Intended to be short-lived to reduce the window for compromise; it may be valid for only seconds.
Many of the steps we’ll cover in the full AppRole procedure are intended to preserve one or the other of these attributes.
»How to Use AppRole Correctly
For the process we’ll be walking through, refer to the diagram below taken from the Response Wrap the SecretID section of the AppRole Pull Authentication tutorial (we’ll cover what response wrapping is later):
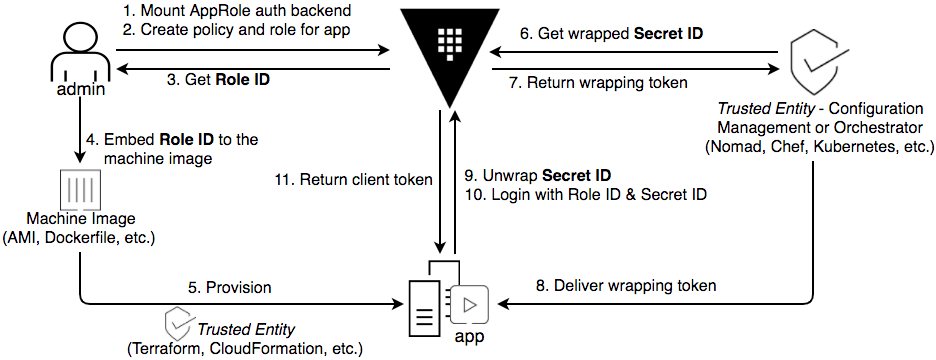
There are 11 steps shown here, varying from simple operations to those with multiple options or alternatives.
Important note: “your application”
Throughout this process I’ll talk about “your application” doing things to authenticate with AppRole. But what if you have an application that expects a Vault token to be provided directly and you can’t change it to perform the necessary steps for this? In this case, the Vault binary has an Agent mode that can authenticate to Vault using AppRole auth components provided in separate files and save the resulting token in a sink file that your application can read it from. It will even renew renewable tokens by default. In either case, the same workflow applies, it will just be handled by the agent rather than directly by your application — effectively, the agent becomes a plugin of your app.
»AppRole: Step-by-Step
A “step zero” for this tutorial is to use TLS to secure communications to Vault. Without that step, every other security measure Vault has is compromised from the start. Seriously, if you haven’t secured your Vault deployment with TLS, do that before you even read the rest of this.
»Step 1
Enable the AppRole auth method. This is the time to think about things like managing roles. If you will be delegating management of roles to someone, will they need to manage every role? If not, you may want to enable AppRole at multiple paths so you can easily grant permissions to manage sets of roles.
If you’re using Vault Enterprise, you may also wish to set up namespaces and enable this auth method under them. This will allow you to more easily grant the ability to manage secrets in concert with the role(s) you’re about to create.
»Step 2
Create the role and policies for the app. The role is a reusable unit containing a set of Vault policies that determine which secrets an app has access to: If two apps use the same role, they will have access to the same secrets, so make sure that you create the right number of roles to provide the level of distinction you need between apps. Consider the principle of least privilege for each app.
Remember that a role can have multiple policies attached, so if you have apps that share some secrets but not all, you can create one policy that grants access to the common secrets for a set of applications, and app-specific policies that cover each application’s unique needs.
When creating the role, there are a number of features you should use whenever possible:
TTL (time to live), number of uses, and source CIDR limits on the Secret ID. These control the use of the Secret ID to authenticate to Vault: where it can be used from, and how many times.
The same limits are available separately for the token created by authenticating.
»Step 3 and 4
Request and receive the role’s Role ID.
You will usually insert this into some artifact related to the application — the VM image it runs on, its configuration file template, etc.
»Step 5
At some future time, provision your application. Once provisioned, the running application has access to half of the information it needs to authenticate to Vault. Beginning with the next step, we provide it with the other half.
Important note: Secure process order
Steps 6–8, which generate and deliver the Secret ID, are sometimes done before step 5, but the most secure way is to do them in the order laid out here, with the application fully started prior to delivery, ready to use the Secret ID the instant it appears. This way the Secret ID is not left unconsumed (and therefore vulnerable to interception, no matter how minimally) any longer than necessary.
Ideally, application instances should either wait for the Secret ID to be present and then consume it immediately, or cleanly terminate and be restarted (e.g. by a supervising orchestrator) until the Secret ID is available. However, in some cases, you may have to pre-deliver the Secret ID if your application cannot cleanly handle starting up before the Secret ID is present.
»Step 6 and 7
Your runtime platform now will need to request and receive a Secret ID to provide to the application. Use a Vault identity for this that is associated with policies that allow only this operation.
You could have your platform retrieve a plaintext Secret ID and provide it to your app in that form, but this reintroduces an issue that you were trying to avoid: now you have to ensure the secure handling of this sensitive credential component.
To mitigate this, Vault supports response-wrapping the Secret ID — instead of the literal Secret ID, it returns a single-use token that can be used for an “unwrap” operation in the Vault API. When unwrapping, Vault then returns the underlying secret — in this case an AppRole Secret ID.
Secret ID response wrapping provides three basic benefits:
Concealment: As the wrapping token is handed off through your platform to the final running app, any services that handle it do not need to know the underlying Secret ID to pass that Secret ID on.
Exposure limitation: The wrapping token is associated with a TTL of its own, ensuring that unused wrapping tokens are automatically expired if not renewed, instead of remaining active and available for an attacker to exploit.
Tamper-evidence: If a compromised app or malicious process does intercept and unwrap the token, then when the authorized application tries to do the same, it will instead get an error response from Vault. A further layer of protection is provided against an attacker evading unwrap detection by storing an unwrapped Secret ID at a new path and passing on a new wrapping token from that new secret — wrapping tokens always include an attribute giving the path of the secret they wrap. Your applications should know and validate this path to detect malicious Secret ID rewrapping. If you are using the Vault Agent and you provide it with the source path, it will handle this validation automatically.
If either a wrapping token unwrap fails or the creation path is not what was expected, your system should generate an alert and you should investigate immediately. You should also alert and investigate anytime you see unexpected activity around a role’s Secret IDs, e.g. if you are using this pattern for CI/CD pipelines and a Secret ID is generated for a pipeline role but no pipelines are running.
You can ensure response wrapping by applying a policy enforcing the application of TTLs on Secret ID creation — there’s an example policy that does exactly this in the Vault policy documentation. (Note that the Role ID is not required for this, only the role path.)
»Step 8
Provide the retrieved Secret ID wrapping token to the authorized application.
How you do this is up to you — you could push it via a call to an API in your application, you could have the application pull it via reading from a file, or you could do a number of other things. Whichever method you use, remember to make sure it’s not delivered through the same channel you delivered the Role ID.
Another good practice is to remove the wrapping token from the location you retrieved it from once you’ve used it to authenticate. You could do this, for example, by deleting the file it was read from. (If you’re using the agent, it will attempt to delete that file by default.)
Below is an example workflow animation for delivering a wrapped Secret ID to an application inside a container:

»Step 9–11
The application unwraps the wrapped Secret ID, authenticates to Vault using the provided Role ID and Secret ID, and receives a Vault token.
Conveniently, if you’re using the agent, it will automatically recognize a wrapping token and unwrap the Secret ID using it before trying to authenticate.
A key principle is that the application should unwrap and consume the Secret ID as soon as it can — remember, if the Secret ID remains unused for a long time, then one or more of the following will be true:
You’ll be leaving an exploitable credential exposed
The wrapping token or underlying Secret ID will eventually expire, meaning your app can no longer use it
If your credential has already been intercepted and exploited, you’ll be leaving the compromise undetected until you try to authenticate
»Step 12
There isn’t a step 12 on the earlier diagram, but the underlying point of doing all the previous steps is this one: use the returned token to access secrets in Vault. (The specific method of doing this will of course vary depending on the type of secret.)
The agent can help here too: if your application is not Vault-aware at all, the agent can not only authenticate to Vault on its behalf, but also retrieve the actual secrets your app needs and write them to a file in a format your application expects them in.
At this point your application has a Vault token, it’s retrieved its secrets, credential artifacts have been cleaned up, and it’s (presumably) operating normally. A good next step is to brush up on best practices for Vault policy, leases on secrets in Vault, and token expiration and renewal.
»AppRole Best Practices
In the real world, the details of how you implement AppRole may vary, but make sure to keep these basic principles in mind:
Use identities tied to minimal-permission policies to manage roles. Monitor role management operations with alerts on unexpected operations that might indicate malicious activity.
Provide credential components (Role ID and Secret ID) just-in-time by separate paths, and provide them only where the applications using them to authenticate will retrieve them.
Make sure credentials are used immediately, and use the available options to limit their exposure to interception and unauthorized use (response wrapping, TTLs, use limits, and source CIDR limits). Monitor and alert on any errors in unwrapping or authentication that might indicate interception of credentials in flight.
Lastly, follow general Vault best practices for using policy to control permissions to secrets, just as you would for any other client identity.
If you’re looking to remove much of the complexity in operationalizing Vault for scaling use cases, consider a managed on-demand deployment with HCP Vault.


