

The CDK for Terraform is a tool used to define infrastructure using programming languages including TypeScript, Python, Java, and C#. It’s very useful for developers who want to provision with Terraform using a programming language that they’re more familiar with.
For this post, we'll be working with a client side app in TypeScript, with the goal of deploying the app to Microsoft Azure. If you're not experienced with HCL, or just want to manage your entire coding workflow in one language, can be useful to define that infrastructure in TypeScript as well with Terraform.
»Why the CDK for Terraform Matters
HashiCorp Terraform was built around a domain-specific language called the HashiCorp Configuration Language (HCL), so typically, new Terraform users will need to start by learning HCL. There’s also 1:1 mapping between HCL and JSON.
As software professionals, we have to learn new things constantly, but sometimes we also just want to get started and become productive more quickly with new tools. When I was first exposed to Terraform, I initially wanted to write infrastructure code using a programming language I was already familiar with. HCL was worth learning, but it did take a small amount of time.
Even though I now realize that there’s a lot of power in having one language (HCL) for expressing all of your organization’s infrastructure, I know that the developers who wear an ops hat as well could really make good use of the CDK for Terraform as they begin their adoption and try to switch context as little as possible.
»Tutorial Prerequisites
»Install the CDK
The first thing we have to do is install cdktf using npm. You can do this by typing…
npm install -g cdktf-cliNOTE: You may have to use sudo if on Mac or Linux.
Next let’s set up our folder structure so we can get started.
mkdir cdk
cd cdk
Now that we are in our directory we can use the cdktf command to initialize our project.
cdktf init --template="TypeScript" --localNOTE: The local flag tells cdktf to use Terraform local storage for our state file.
Once the command has been initialized you can list the files in that directory and see we have a good amount going on. If you are familiar with Node.js it will look pretty familiar.
»Configure Needed Providers
Before we start writing code we will download the specific Terraform providers we need.
In order to do that, we want to open our cdktf.json file and add a provider to the terraformProviders field. Since we are deploying resources to Azure, we will be using the azurerm provider.
{
 "language": "TypeScript",
 "app": "npm run --silent compile && node main.js",
 "terraformProviders": ["azurerm@~> 2.46.0"],
 "terraformModules": [],
 "context": {
   "excludeStackIdFromLogicalIds": "true",
"allowSepCharsInLogicalIds": "true"
 }
}
Next we run the following to fetch our Terraform provider. This will need to be run any time you update this file.
npm run getYou will notice a new directory in your folder structure .gen. This is where your provider code is located and we will import it into our main.ts.
Now that we have things set up, let's write some infrastructure code using TypeScript. We will be making these changes in the main.ts file. This snippet provisions a Linux VM and the required supporting infrastructure.
import { Construct } from 'constructs';
import { App, TerraformStack } from 'cdktf';
import {AzurermProvider, VirtualNetwork, ResourceGroup, LinuxVirtualMachine, Subnet, NetworkInterface} from "./.gen/providers/azurerm"
class AzureAppInfra extends TerraformStack {
 constructor(scope: Construct, name: string) {
   super(scope, name);
new AzurermProvider(this, "AzureRm", {
     features: [{}]
   })
let rg = new ResourceGroup(this, "rg-example", {
     name: "example-resource-group",
     location: "eastus"
   })
let vnet = new VirtualNetwork(this, "vnet-example", {
     name: "example-network",
     location: rg.location,
     addressSpace: ["10.0.0.0/16"],
     resourceGroupName: rg.name
})
let subnet = new Subnet(this, "subnet-example", {
     name: "example-subnet",
     resourceGroupName: rg.name,
     virtualNetworkName: vnet.name ,
     addressPrefixes: ["10.0.2.0/24"]
   })
let network_interface = new NetworkInterface(this, "ni-example", {
     name: "example-nic",
     resourceGroupName: rg.name,
     location: rg.location,
     ipConfiguration: [{
       name: "internal",
       subnetId: subnet.id,
       privateIpAddressAllocation: "Dynamic"
     }]
   })
new LinuxVirtualMachine(this, 'Web-Server', {
     name: "Web-App-1",
     resourceGroupName: rg.name,
     adminUsername: "devhulk",
     size: "Standard_F2",
     location: rg.location,
     networkInterfaceIds: [
       network_interface.id
     ],
     osDisk: [{
       caching: "ReadWrite",
       storageAccountType: "Standard_LRS"
     }],
     sourceImageReference: [{
       publisher: "Canonical",
       offer: "UbuntuServer",
       sku: "16.04-LTS",
       version: "latest"
     }],
     adminSshKey: [{username: "", publicKey: ""}]
})
}
}
const app = new App();
new AzureAppInfra(app, 'cdk');
app.synth();
Next, we’ll run this code to provision the infrastructure.
NOTE: In order to do this successfully you will need to have your Azure credentials configured. I set mine using ENV Variables. If you haven’t done this yet, go here for instructions.
»Running the CDK for Terraform
There are two ways to run your terraform cdk code. You can run it directly with the cdktf command or use the terraform cli command to plan and apply the JSON output file under the cdktf.out directory. In this article we will be using the cdktf command directly.
First we need to run:
cdktf synthThis will sync any changes made in our main.ts file and update our Terraform config to match.
Next we run:
cdktf deployAnd here’s my output:
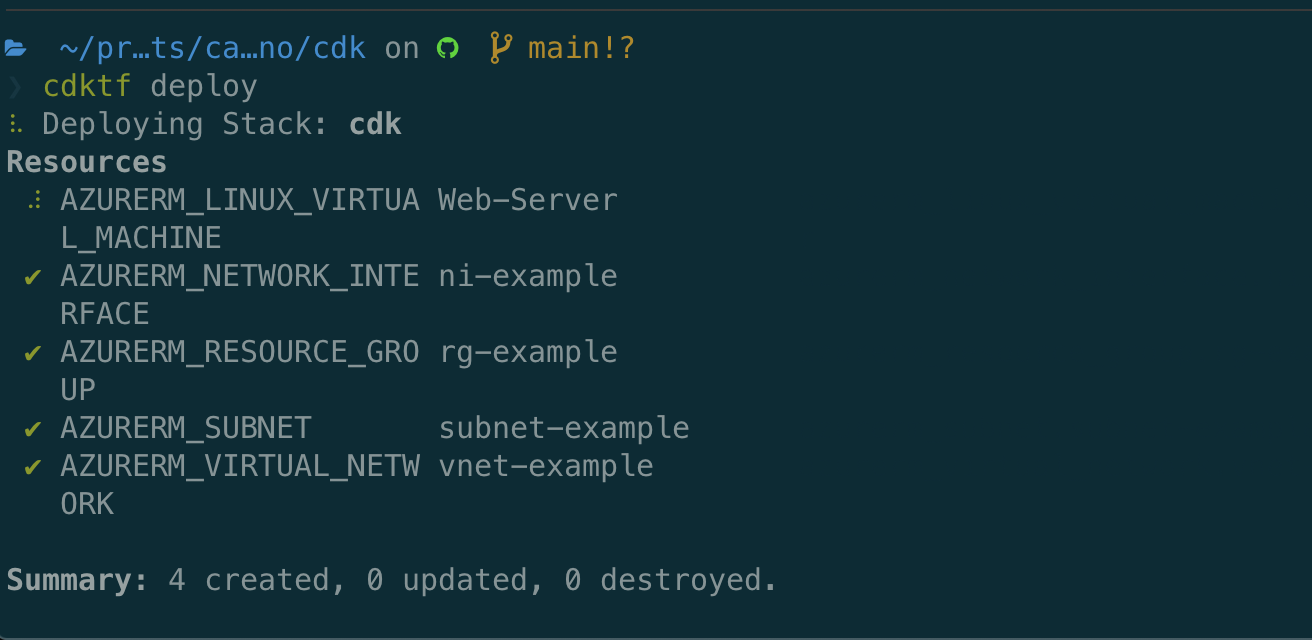
And that's it. Afterward you should see your infrastructure provisioned in your environment. In order to clean up your environment you can destroy your infrastructure by running:
cdktf destroy»Additional Resources
Here are some links that should help you learn more about the CDK for Terraform, get help if you need it, and make more sophisticated deployments with it.
Helpful Links:


