

The Vault Provider for Secrets Store CSI Driver project started as a humble thread on GitHub seeking to gauge the level of interest in using CSI to expose secrets on a volume within a Kubernetes pod. Since then the project has now reached GA status.
In this article, I’ll give some background on CSI drivers, compare the sidecar and Vault CSI provider methods for Vault secrets retrieval in Kubernetes, and then walk through the process of implementing the Vault CSI provider.
»Kubernetes and the Secrets Store CSI Driver
To give some background, the Container Storage Interface, or CSI, is a standard specification for exposing storage systems to containerized workloads. This specification enables storage providers to write standard plugins to integrate their storage systems into container orchestration systems, like Kubernetes. CSI was added to Kubernetes v1.13, which supports CSI spec v0.3.0 and v1.0.0.
The Kubernetes project maintains a list of supported CSI drivers. The one that you will be using here is the Secrets Store CSI Driver. The Secrets Store CSI driver is different from most other drivers. Instead of integrating directly with the defined backend storage, the Secrets Store CSI driver is pluggable and depends on an additional provider to be defined.
There are supported providers for Microsoft Azure, Google Cloud, and HashiCorp Vault. Each of these supported providers work in conjunction with the Secret Store CSI Driver and are configured with their own parameters.
»Vault CSI Provider vs. Sidecar Injection
Using Kubernetes CSI and the Vault CSI provider is an alternative to our sidecar injector method, which is one popular way to allow Kubernetes applications to retrieve secrets from Vault with no native Vault logic built-in. Both are excellent methods for retrieving sensitive information from Vault and presenting it to your application pods without the need for additional application changes, and they both help you practice the principle of least privilege.
The sidecar method requires init and/or sidecar containers to retrieve secrets. This is done either by adding pod annotations or using configuration maps defining the Vault role and the path to the secret. This increases the total number of containers running in your cluster but provides a Vault Agent to template secrets into configuration files and easily enables rotation of those secrets. An important difference is that the sidecar injector method cannot facilitate syncing of secrets to environment variables.
The CSI method simplifies this architecture since it does not require any sidecar containers. The Vault provider is deployed as a DaemonSet and renders secrets before the pod starts. It also provides a method to sync secrets into environment variables and Kubernetes secrets. If your security requirements require you to disable hostPath volumes, you should be aware that this method uses hostPath volumes to communicate with the CSI driver. Some Kubernetes distributions may disable this due to the level of access it gives to the node’s filesystem.
The remainder of this post focuses on the CSI method. I recommend understanding both the injector and CSI methods before determining which will best fit your architecture. To learn more about the sidecar injection method, visit our Learn site, documentation, and Medium articles by our solutions engineering community.
»CSI Method Updates and Caveats
The Vault CSI Provider received a number of improvements around stability, support for all secret engines, and the ability to authenticate with a requesting pod’s service account. The ability to use the pod’s service account provides more granular flexibility with access controls and grants the ability to practice principles of least privilege between applications. You can see the complete list of changes in the Vault CSI provider v0.1.0 release notes.
Although both the Vault provider and the core functionality of the Secrets Store CSI Driver are GA, there are functions of the Secrets Store CSI Driver that are still in their alpha phases. It’s recommended to review the release notes prior to deploying in your environment.
»The Vault CSI Provider End-to-End Process
The Secrets Store CSI driver communicates with the Vault CSI provider using gRPC to retrieve secret content. This driver enables us to mount multiple secrets, keys, and certs from Vault and present those into our pods as a volume. It uses a custom resource definition (CRD) called SecretProviderClass to specify Vault as the provider along with the configuration parameters for Vault and your secret paths.
When the pod is started it will authenticate with the Kubernetes Auth Method using the service account identity provided in your pod manifest. After a successful authentication, the secret paths defined in your SecretProviderClass will be retrieved and written to a tmpfs volume and mounted to your pod. Now your applications can read those secrets from the mounted volume and use them as necessary.
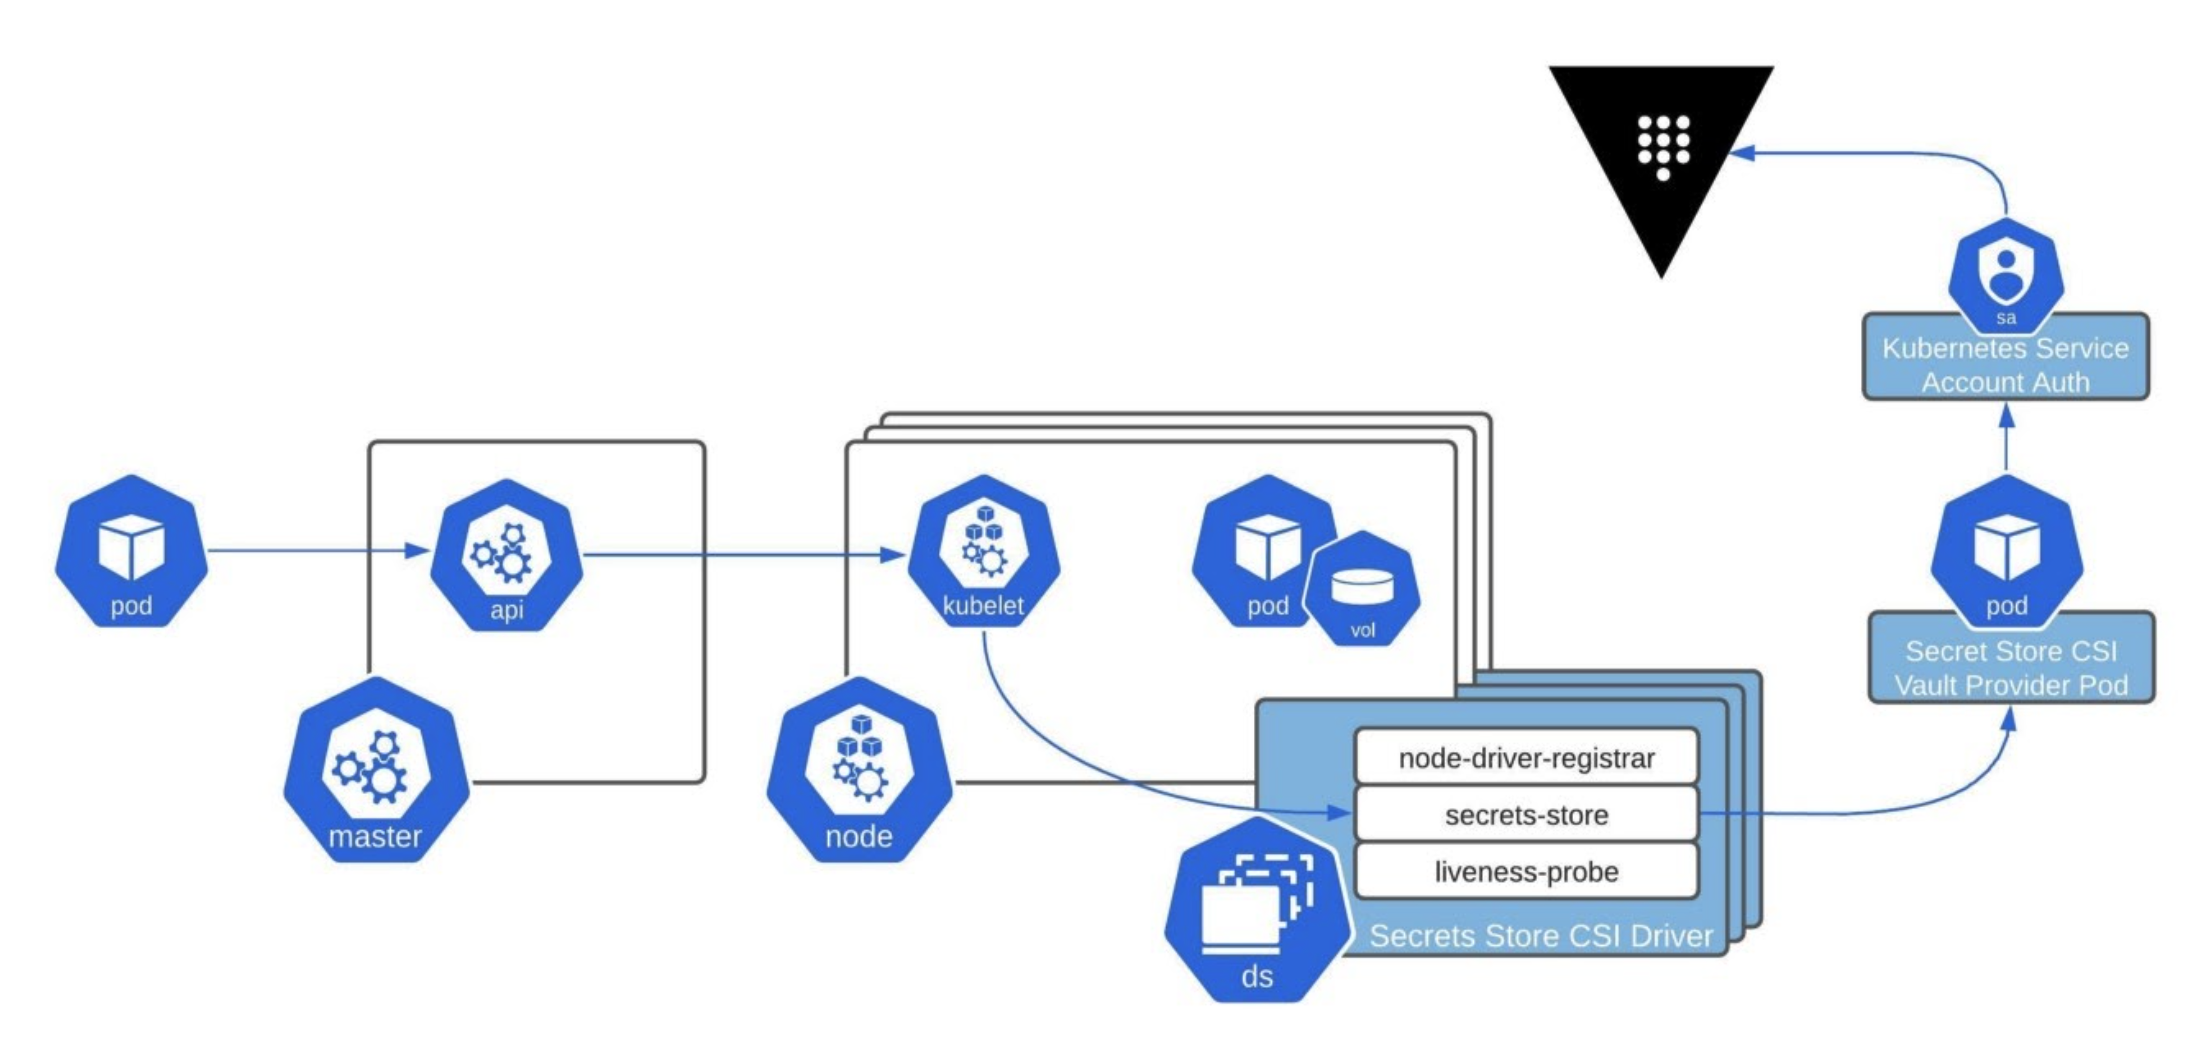
This diagram illustrates the end-to-end process of an application pod using the CSI Secrets Store Driver and Vault CSI provider to mount a volume with secrets from Vault.
»Vault CSI Provider Tutorial
The goal of this post is to keep things as basic as possible while still allowing you to apply what you have learned to your own architecture. You will go through a development setup in which you run Vault, in dev mode, in Kubernetes. Running Vault in dev mode is NOT intended for production and is ONLY for development and experimentation.
Not every organization runs Vault in Kubernetes, but they still leverage Vault as the central source of truth for sensitive material. You can run Vault on virtual machines, cloud marketplace images, or the HashiCorp Cloud Platform. Having the flexibility to run Vault in the architecture that best fits your needs is what makes it such a powerful tool. If you prefer to run an external Vault, you can skip the Vault install and configuration steps and jump ahead to our HashiCorp Learn material for that part of the setup.
»Prerequisites
For the example configuration, you will be using minikube. You will be able to follow the same steps using your favorite flavor of Kubernetes. You can follow the Get Started docs to install minikube or just make sure you have the required prerequisites:
$ brew install minikubeYou will also need to install Kubernetes CLI (kubectl) and Helm:
$ brew install kubernetes-cli
$ brew install helm
Now start your minikube cluster:
$ minikube start
$ minikube status
This may take a few minutes to start. Just be patient and confirm everything is “Running”.
»Run Vault in Kubernetes
Getting Vault up and running in Kubernetes is extremely easy when using the provided Helm chart. This is our recommended way to install and configure Vault in Kubernetes. We have published tutorials for various Vault integrations with Kubernetes, including one for CSI that could be helpful to reference.
You will start by adding the Vault Helm chart repository and running the Helm chart. You can enable the CSI provider via the Helm chart with the added csi.enabled=true parameter. If you prefer to install the Vault CSI provider via the manifests, a section below has details.
$ kubectl create ns vault
namespace/vault created
$ helm repo add hashicorp https://helm.releases.hashicorp.com
$ help repo update # You may need to update
$ helm install vault hashicorp/vault --namespace=vault \
 --set "server.dev.enabled=true" \
 --set "injector.enabled=false" \
 --set "csi.enabled=true"
Make sure the Vault container is running and reports “Ready 1/1":
$ kubectl get pods --namespace=vault
NAME               READY  STATUS   RESTARTS  AGE
vault-0            1/1    Running  0         35m
vault-csi-provider 1/1    Running  0         35m # If installed via Helm
Since you are running Vault in dev mode, it will automatically enable the KV-V2 secrets engine at the path /secret. In a production cluster, this would need to be enabled and you could specify an optional path.
»Configure Vault
Now that you have your Vault cluster pod running, you are going to add a test secret that you will retrieve later. The following Vault commands will be run from the container's shell:
$ # Get a shell in the vault container
$ kubectl exec -it vault-0 --namespace=vault -- /bin/sh
$ # Create the KV pair
$ vault kv put secret/db-pass password="db-secret-password"
Key              Value
---              -----
created_time     2021-03-29T21:06:29.46397907Z
deletion_time    n/a
destroyed        false
version          1
Test that you can retrieve the KV pair you just created:
$ vault kv get secret/db-pass
====== Metadata ======
Key              Value
---              -----
created_time     2021-03-29T21:06:29.46397907Z
deletion_time    n/a
destroyed        false
version          1
====== Data ======
Key         Value
---         -----
password    db-secret-password
Now you need to enable the authentication method that will be used to verify the identity of the service. This is done by using the Kubernetes auth method:
$ vault auth enable kubernetes

Success! Enabled kubernetes auth method at: kubernetes/
Next you need to configure the Kubernetes auth method. With the recent updates, you will need to make sure to add the issuer parameter. If you miss this step, you will get a claim "iss" is invalid error when attempting to start your pod. Since you are using the pod’s service account for authentication, it creates a short-lived bound service account token. Due to this change, the issuer is different from the kubernetes/serviceaccount issuer that default tokens are created with, so validation with Kubenetes’ default issuer will fail. The following parameters will use the Kubernetes service token from the Vault pod for authentication:
$ vault write auth/kubernetes/config \
issuer="https://kubernetes.default.svc.cluster.local" \
token_reviewer_jwt="$(cat /var/run/secrets/kubernetes.io/serviceaccount/token)" \
kubernetes_host="https://$KUBERNETES_PORT_443_TCP_ADDR:443" \
kubernetes_ca_cert=@/var/run/secrets/kubernetes.io/serviceaccount/ca.crt

Success! Data written to: auth/kubernetes/config
Next, you create the Vault policy that you will use to allow your Kubernetes services access to your created secrets paths. This would be the KV pair you created a few steps back:
$ vault policy write csi - <<EOF
path "secret/data/db-pass" {
 capabilities = ["read"]
}
EOF

Success! Uploaded policy: csi
The last step for the Vault configuration is to create the authentication role. This defines the authentication endpoint path, the Kubernetes service account, the Kubernetes namespace, the access policy you created, and a Vault token TTL (time-to-live):
$ vault write auth/kubernetes/role/csi \
   bound_service_account_names=myapp1-sa \
   bound_service_account_namespaces=myapp1 \
   policies=csi \
   ttl=20m
Success! Data written to: auth/kubernetes/role/database
Now you can exit the Vault container shell:
$ exit»Install the Secrets Store CSI Driver in Kubernetes
There are two ways to set up the Secrets Store CSI driver in Kubernetes. The documentation goes into detail on both the Helm install and using the deploy manifests. This example uses the provided Helm chart and you define the namespace. The default install namespace could vary depending on the install method. Defining the namespace will guarantee all Vault components are in the same namespace. For additional Helm install parameters, refer to the project documentation:
$ helm install csi secrets-store-csi-driver/secrets-store-csi-driver --namespace=vault
NAME: csi
...
You can describe the DaemonSet to get more details on the versions of the images used. At the time of writing, I was using driver version v0.0.21.
$ kubectl describe ds csi-secrets-store --namespace=vault|grep csi-secrets-store/driver
   Image:      k8s.gcr.io/csi-secrets-store/driver:v0.0.21
Now that you have the CSI driver setup in your Kubernetes cluster, you have a new custom resource for defining the SecretProviderClass. You can see the new custom resources by listing the custom resource definitions:
$ kubectl get crd
NAME                                                        CREATED AT
secretproviderclasses.secrets-store.csi.x-k8s.io            2021-03-29T22:29:24Z
secretproviderclasspodstatuses.secrets-store.csi.x-k8s.io   2021-03-29T22:29:24Z
You should also have a DaemonSet and a three-container pod running:
$ kubectl get ds --namespace=vault
NAME                           DESIRED   CURRENT   READY   UP-TO-DATE   AVAILABLE   NODE SELECTOR            AGE
csi-secrets-store-csi-driver   1         1         1       1            1           kubernetes.io/os=linux   57s
vault-csi-provider             1         1         1       1            1                              4m44s

$ kubectl get pods --namespace=vault
NAME                                 READY   STATUS    RESTARTS   AGE
csi-secrets-store-csi-driver-b7rjj   3/3     Running   0          81s
vault-0                              1/1     Running   0          5m8s
vault-csi-provider-bcj4q             1/1     Running   0          5m8s
»Application Namespace Setup
The last thing to do is set up your application namespaces with a ServiceAccount and SecretProviderClass. Each unique Kubernetes namespace will require both. This will allow segmentation of sensitive Vault data between your Kubernetes namespaces via Vault roles and policies. You will define Vault as your provider and point to the Vault pod that you previously set up. You will also define your secret that you created earlier.
Create the application namespace:
$ kubectl create ns myapp1
namespace/myapp1 created
Then create the CSI service account for your application namespace:
$ cat <<EOF | kubectl apply --namespace=myapp1 -f -
apiVersion: v1
kind: ServiceAccount
metadata:
 name: myapp1-sa
 namespace: myapp1
EOF

serviceaccount/myapp1-sa created
Now you will create the SecretProviderClass. The vault-database metadata name is how you will reference this resource in your pod spec in a later step. You can see your provider is set to Vault, your role name matches the role you created previously, and the Vault address is defined.
In this example, you are not using Vault namespaces or TLS. I included these additional parameters in this example below but commented them out for reference. Since you are running Vault in dev mode, TLS is not enabled. This is another reason I wouldn’t recommend dev mode for production.
The array of objects will be the secret paths you want to mount in your pod.
objectName: The secret will be written to a filename in your pod with this alias.secretPath: The path in Vault where the secret should be retrieved.secretKey: Optional key to read from.Data. The entire JSON payload will be retrieved if this is omitted.
$ cat <<EOF | kubectl apply --namespace=myapp1 -f -
apiVersion: secrets-store.csi.x-k8s.io/v1
kind: SecretProviderClass
metadata:
 name: vault-database
spec:
 provider: vault
 parameters:
   roleName: "csi"
   vaultAddress: "http://vault.vault:8200"
   # vaultNamespace: <name of Vault Namespace>
   # vaultCACertPath: <path to CA file for validation>
   # vaultTLSClientCertPath: <path to client cert>
   # vaultTLSClientKeyPath: <path to client key>
   objects: |
     - objectName: "password"
       secretPath: "secret/data/db-pass"
       secretKey: "password"
EOF»Testing
Finally, you can define a basic NGINX pod and have it use the CSI driver and the SecretProviderClass you created. Then you just need to mount the volume at a defined path:
$ cat <<EOF | kubectl apply --namespace=myapp1 -f -
kind: Pod
apiVersion: v1
metadata:
 name: nginx-secrets-store-inline
spec:
 containers:
 - image: nginx
   name: nginx
   volumeMounts:
   - name: secrets-store-inline
     mountPath: "/mnt/secrets-store"
     readOnly: true
 serviceAccountName: myapp1-sa
 volumes:
   - name: secrets-store-inline
     csi:
       driver: secrets-store.csi.k8s.io
       readOnly: true
       volumeAttributes:
         secretProviderClass: "vault-database"
EOF
You will want to make sure your NGINX pod is running. If it is not, this is a quick sign that something didn’t work. If you don’t already have the NGINX image downloaded, it will take a few minutes longer.
$ kubectl get pods -n myapp1
NAME                         READY   STATUS    RESTARTS   AGE
nginx-secrets-store-inline   1/1     Running   0          22m
If your pod is stuck with a ContainerCreating status, check the events of the pod to begin troubleshooting what went wrong. If you copied and pasted the commands in this post, you should be good to go.
A successful startup would look like this:
$ kubectl describe pod -n myapp1 nginx-secrets-store-inline
...
Events:
Type    Reason     Age   From               Message
----    ------     ----  ----               -------
Normal  Scheduled  34m   default-scheduler  Successfully assigned myapp1/nginx-secrets-store-inline to minikube
Normal  Pulling    33m   kubelet            Pulling image "nginx"
Normal  Pulled     33m   kubelet            Successfully pulled image "nginx" in 6.469146131s
Normal  Created    33m   kubelet            Created container nginx
Normal  Started    33m   kubelet            Started container nginx
Now that the test pod is up and running, you can read the contents of your mounted volume:
$ kubectl exec -n=myapp1 nginx-secrets-store-inline -- cat /mnt/secrets-store/password
db-secret-password
»Conclusion and Looking Ahead
We are excited to offer the CSI method alongside our sidecar injection option to help secure your Kubernetes application secrets with Vault. In this post, you learned how both options use different approaches to accomplish this goal.
The sidecar injection method requires additional sidecar containers and is set up via pod annotations. With this method the secret stays within the context of the pod. The CSI method does not require sidecar containers and is set up via a CRD. This method requires writeable Kubernetes hostPath volumes so that the CSI driver can write secrets directly into the pod’s filesystem. Understanding these differences and how they impact your architecture can help you choose the best approach to fit both your security and automation requirements.
You can download, test, and keep up with the Vault CSI Provider project on GitHub.


