

Running HashiCorp Boundary workers as dynamic workloads in autoscaling groups, Nomad jobs, or Kubernetes deployments is an efficient way to connect engineers with workloads, but how can you manage the lifecycle of the worker authentication token? How can you prevent worker sprawl and manage the worker in a stateless way without requiring persistent storage?
This two-part blog series will show you how to use a custom Boundary secrets engine for HashiCorp Vault to deploy dynamic ephemeral workers as Nomad jobs.
»Why Boundary?
Boundary provides engineers with secure session access to their workloads on private networks. In the past, access to these workloads on private networks has been facilitated using jump boxes and bastion hosts, but there are some challenges and risks with these approaches.
Both jump boxes and bastion hosts typically live inside a private subnet but expose an IP address and port to the public internet. This allows users to connect to them, then jump to their intended target within the private subnet. Some of the challenges with this approach are:
The jump box will need to manage user identities. It is often the case that identity comes in the form of SSH keys. In many cases, as these systems are not directly connected to HR systems, the lifecycle of these identities is not tied to the lifecycle of employment, thus creating management overhead.
Once a user is authenticated within the jump box, they are already inside your network and likely have unrestricted access to workloads they may not be authorized to access. The premise of zero trust security is that it should be assumed that the network is already breached, and as such, all actions should be verified to ensure they are authorized.
A host in a private network with a publically accessible endpoint represents an attack surface for many organizations.
Boundary takes a much more secure approach. It is made up of two architectural components:
Controller - This is the brain of Boundary, which manages authentication, authorization, and handles requests. The controller is managed by HashiCorp if you choose to use the HashiCorp Cloud Platform (HCP) offering of Boundary.
Workers - They do the heavy lifting of proxying sessions between the target workloads and the authorized end users.
»Workers
There are two flavors of workers for Boundary, ingress workers and egress workers. Ingress workers live in your private networks but expose a public endpoint for the controller to contact it. As a user, you don't actually connect directly to the worker to access your workloads. Instead the worker provides a proxy to your workload when a session is created by the controller.
Egress workers operate differently and use a feature in Boundary called multi-hop workers, which allow the chaining of multiple workers together. HCP Boundary includes three managed public workers that can be chained to self-hosted workers in your private network. In the case of egress workers, they make outbound connections to the HCP-managed worker, which then talks to the controller. This allows the same level of proxy access to workloads without exposing public endpoints.
The process of registering a worker with the controller can be conducted in two ways, worker-led, or controller-led. Worker-led is a manual process in which the worker is started and an auth token is printed out in the logs. Then a worker entry needs to be created in the controller and the auth token output from the previous step is entered here to authenticate the worker. The worker will persist its authentication in storage, making this a stateful workload.
The controller-led process is much more automation friendly. In this workflow, a worker entry is created on the controller. This can be done using the CLI, API, web interface, or SDK. This will return an auth token, which is then included in the configuration file for the worker. When the worker is started, it uses this token to authenticate to the controller and the process is complete.
»A custom Boundary secrets engine
In order to invalidate a worker, its entry must be deleted from the controller. This presents the risk of worker sprawl when workers are run as dynamic workloads. To counteract this, I came up with the concept of ephemeral workers, in which the lifecycle of the authenticated worker entry in the controller can be tied to the lifecycle of its workload.
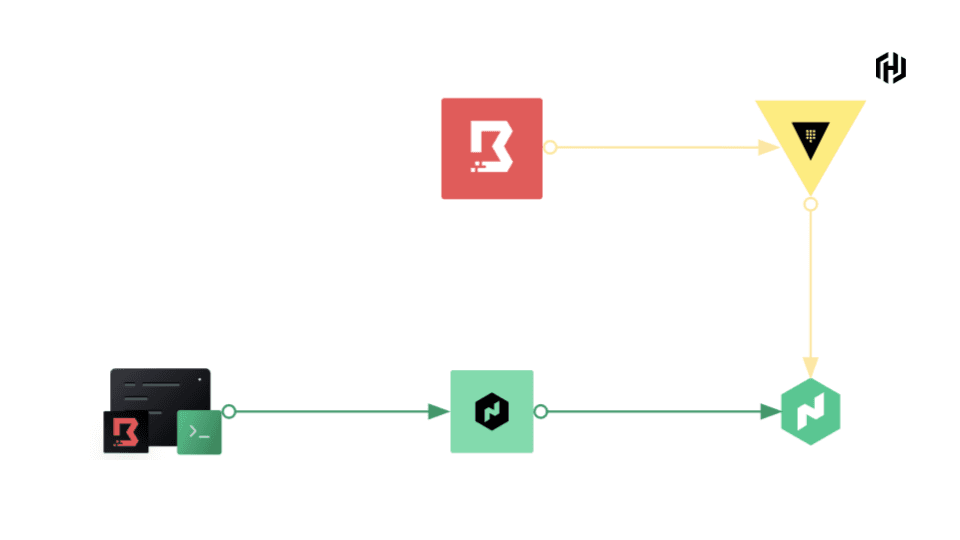
I expanded the capabilities of a custom Vault plugin for Boundary I wrote to facilitate this workflow. The plugin is a secrets engine, which can generate on-demand, short-lived controller-led worker entries. The diagram below shows the workflow using Nomad to schedule a job for the Boundary worker and the Vault integration in the Nomad client to create the entry and build a config file for the worker to start:
»Setting up Vault
As this workflow uses a custom plugin, you need to use a self-managed Vault instance to load the plugin.
The first step is to download the plugin from the releases page. Be sure to select the correct binary for your operating system. Once the plugin is downloaded, move it to a folder that will house all of your custom plugins, and rename the file to boundary. The code example below shows the downloading, moving, and renaming of the binary for Linux operating systems:
curl -L -o boundary.zip https://github.com/hashicorp-dev-advocates/vault-plugin-boundary-secrets-engine/releases/download/v1.0.0/vault-plugin-boundary-secrets-engine_v1.0.0_linux_amd64.zip

  unzip boundary.zip -d .

  sudo mv vault-plugin-boundary-secrets-engine_v1.0.0 /etc/vault.d/plugins/boundary
This demonstration uses Vault in dev mode. Start Vault using the following command:
vault server -dev -dev-root-token-id=root -dev-plugin-dir=./etc/vault.d/pluginsThis starts Vault in dev mode, tells it where to look to load the custom plugins, and sets a default root token with the value root.
Note: This is not safe for production use. Dev mode is only for local testing and development.
Now that Vault is started and the plugin is loaded, the next step is to enable the secrets engine with the following command:
vault secrets enable boundaryNext, configure the secrets backend to communicate with the Boundary controller. To do this, you need to provide connectivity information and authentication details for Boundary to Vault:
vault write boundary/config \
    addr="http://hcp-boundary-address:9200" \
    login_name=admin-username \
    password=admin-password \
    auth_method_id=auth-method-id
The command example above will need to be refactored with your HCP Boundary details.
The next step is to create a Vault role. There are two types of roles for this secrets engine: user and worker. For this demonstration, create a worker role that is specified with the role_type parameter:
vault write boundary/role/worker \
    ttl=180 \
    max_ttl=360 \
    role_type=worker \
    scope_id=global
Once you have configured the secrets engine, you can test it by running the following command:
vault read boundary/creds/worker worker_name="local worker"This creates a worker named local worker on the controller. You can also add an optional description when creating a worker by changing the command above to the following:
vault read boundary/creds/worker \
    worker_name="local worker" \
    description="my local worker for testing purposes"
That command will give you a response similar to the output shown below:
Key Value
--- -----
lease_id boundary/creds/worker/tQkj52HSIRpCQMJ70FRLicCU
lease_duration 768h
lease_renewable true
activation_token neslat_2Kr71G5hdKEqs3w6vRGH4vPRJGiGbwiz22MVAMS75KxWSTMj3HjtXfX6sg2wvMwuqrscXJrsBbdjfCY5gqiA9hVJc24GB
worker_id w_xIy3DtXJcq
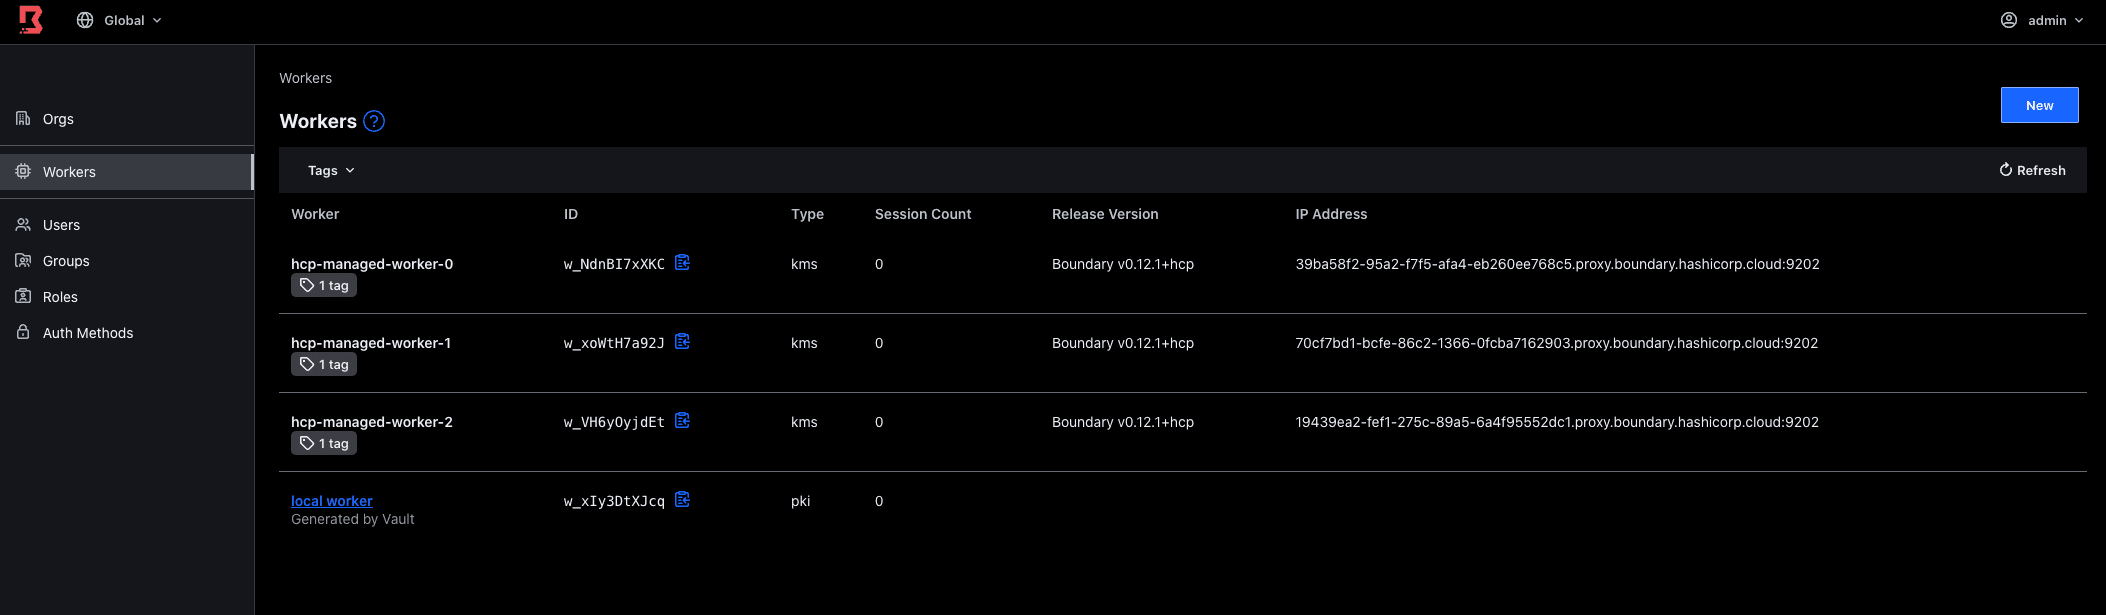
worker_name local workerThe auth token can then be used in the worker config file to authenticate it to Boundary. You can navigate to the web UI and see the Vault-generated worker there:
To revoke this before the TTL expires, copy the lease ID and run the following command replacing the lease ID with yours:
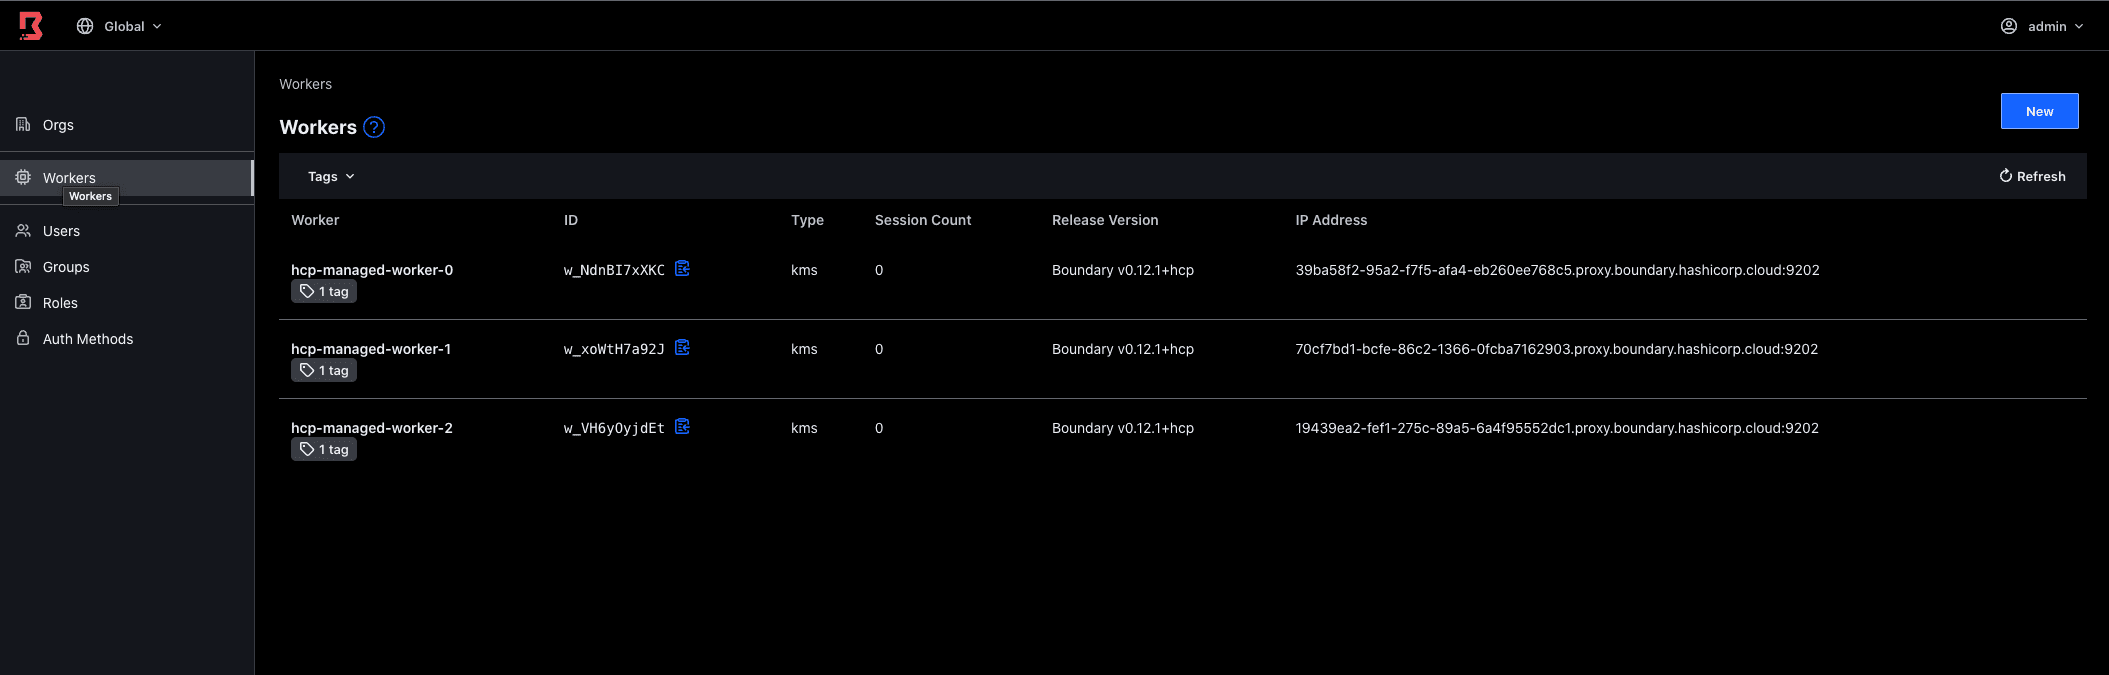
vault lease revoke boundary/creds/worker/ppOvYe6zQVmjO48TTvHMgZ0rNow, if you refresh the Boundary web UI, you will notice the worker that Vault created is no longer present:
»Summary
This blog post discussed the challenges of running self-managed Boundary workers as dynamic workloads and how you can use my custom Boundary secrets engine to provision ephemeral workers. Part two of this series will build on this and show you how to deploy Boundary workers as Nomad jobs using the custom Boundary secrets engine.
We recently launched Boundary on the HashiCorp Cloud Platform (HCP), now generally available. HCP Boundary provides a single, fully managed workflow to securely connect to hosts and critical systems across Kubernetes clusters, cloud service catalogs, and on-premises infrastructure. Try HCP Boundary today.


