Kubernetes ingress allows you to define and route traffic to services within a cluster — what is traditionally known as north-south traffic management. By combining a Kubernetes Ingress Controller with a service mesh, you can not only manage traffic to services but also between services in the cluster (called east-west traffic management). Ingress and service mesh resources can more effectively define and secure service-to-service communication.
In this post, you’ll learn how to use the Kong Ingress Controller for Kubernetes with the new transparent proxy feature in Consul service mesh. Our example deploys a Consul cluster and Kong Ingress Controller to a Kubernetes cluster on Google Kubernetes Engine. You can use any Kubernetes cluster as long as it supports the service type for LoadBalancer. The example uses a load balancer to expose the Consul UI and Kong proxy for external access. You will also need a Consul version (greater than 1.10) that supports transparent proxy.
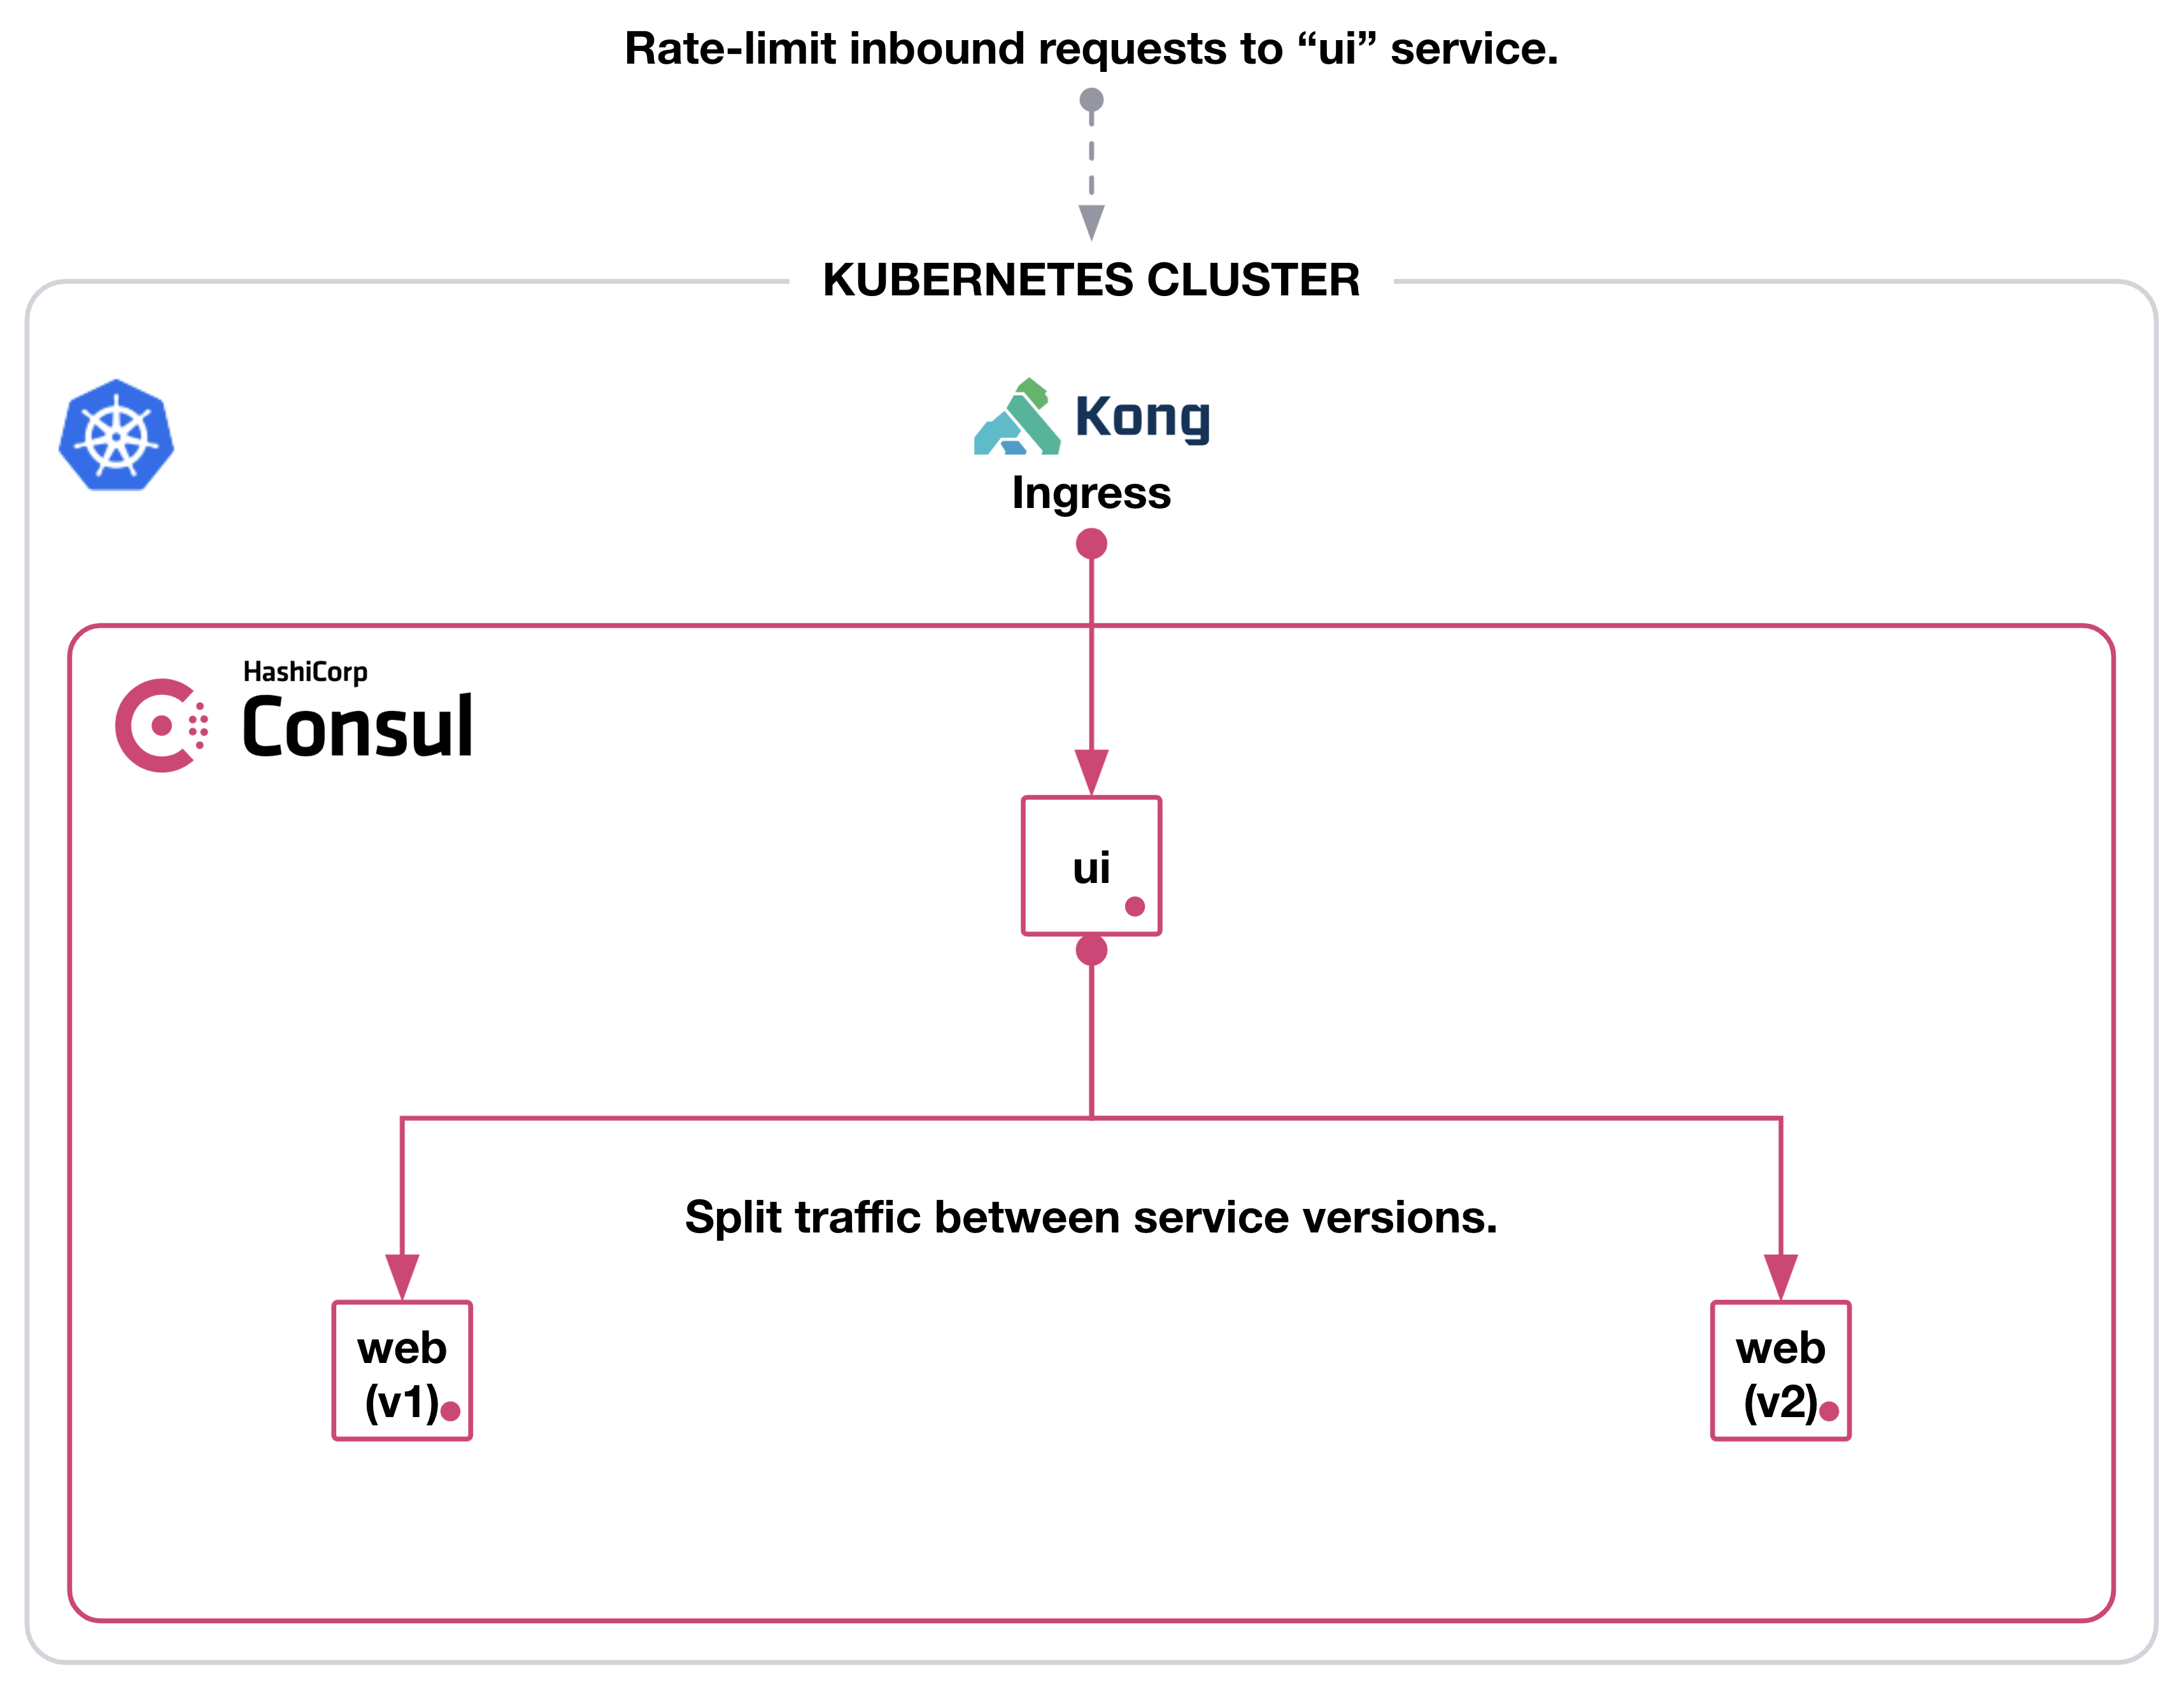
After deploying Kong ingress and a Consul cluster, you will define and control traffic to Kong Gateway, a ui service, and a web service using Consul intentions. Once you have properly configured this, you can use Kong’s rate-limiting plugin to limit the requests to the ui service and manage north-south traffic. In order to control internal traffic between ui and web, you can use Consul’s service splitter to manage east-west traffic as you split traffic between two versions of the web service.
»Deploy Consul to Kubernetes
To get started, you must deploy Consul to Kubernetes before creating the Kong Ingress Controller. This is because in order to add Kong ingress to a Consul service mesh, your Kubernetes cluster needs the Consul webhook to inject its sidecar proxies.
First, let’s add the HashiCorp Helm repository:
$ helm repo add hashicorp https://helm.releases.hashicorp.comUpdate the Consul Helm chart:
$ helm repo updateNext, we need to define the Consul values for the Helm chart. The values should configure one Consul server, enable access control lists (ACLs), enable Consul transparent proxy (by default), start the Consul controller, and set up the Consul UI with a load balancer:
$ cat < consul.yaml
global:
 name: consul
 datacenter: kubernetes
 acls:
   manageSystemACLs: true

server:
 replicas: 1

client:
 enabled: true

connectInject:
 enabled: true

ui:
 enabled: true
 service:
   type: LoadBalancer

controller:
 enabled: true
EOF
Then, we install Consul using its Helm chart to the default namespace. The command will use the chart version v0.34.1:
$ helm install consul hashicorp/consul --version v0.34.1 --values consul.yamlYou should have pods for the Consul server, controller, injector for sidecar proxies, and Consul clients for each Kubernetes node:
$ kubectl get pods -l='app=consul'

NAME                                                          READY   STATUS    RESTARTS   AGE
consul-2dk68                                                  1/1     Running   0          58s
consul-b2sv9                                                  1/1     Running   0          58s
consul-connect-injector-webhook-deployment-7864bb5f76-5kbdj   1/1     Running   0          58s
consul-connect-injector-webhook-deployment-7864bb5f76-psw9m   1/1     Running   0          58s
consul-controller-56657f6db6-lvxcg                            1/1     Running   0          58s
consul-server-0                                               1/1     Running   0          57s
consul-vzxn2                                                  1/1     Running   0          58s
consul-webhook-cert-manager-57bb5c668d-b8st6                  1/1     Running   0          58s
You can access the Consul UI at the IP address of the load balancer. Set the CONSUL_HTTP_ADDR environment variable to the load balancer’s IP address for additional debugging:
$ export CONSUL_HTTP_ADDR=$(kubectl get service consul-ui -o jsonpath='{.status.loadBalancer.ingress[0].ip}')
The example enables system ACLs, which means you need a Consul token to log into the UI and access its API. You can retrieve the token in a Kubernetes secret and set it to CONSUL_HTTP_TOKEN in your terminal:
$ export CONSUL_HTTP_TOKEN=$(kubectl get secrets consul-bootstrap-acl-token -o jsonpath='{.data.token}' | base64 -d)
This example uses Consul’s application-aware intentions and traffic shaping. Set the protocol for proxy defaults to http to ensure you can configure Consul:
$ cat <
apiVersion: consul.hashicorp.com/v1alpha1
kind: ProxyDefaults
metadata:
 name: global
spec:
 config:
   protocol: http
EOF
»Deploy Kong Ingress Controller for Kubernetes
Now that we have set up Consul, we can deploy the Kong Ingress Controller. You can define values for the Kong for Kubernetes Helm chart to inject a Consul sidecar proxy. The Kong Helm chart includes many components, but you only need the ingress controller and the API gateway (called proxy in the chart).
Add the Kong Helm repository:
$ helm repo add kong https://charts.konghq.comUpdate the Kong for Kubernetes Helm chart:
$ helm repo updateBe sure to set an environment variable with the name of your Helm release for Kong. You will need to set this before you deploy the chart because you have Consul ACLs enabled. Kong must have a service account name that matches its Helm release name in order to properly authenticate to Consul:
$ export KONG_RELEASE=externalDefine the Kong values in a file called kong.yaml. Kong’s service account must match its service name, which the Kong chart defines as ${KONG_RELEASE}-kong-proxy. You want to register the kong-proxy service instead of the ingress controller to allow Consul to manage traffic between the ingress and its upstream UI service:
$ cat < kong.yaml
ingressController:
 serviceAccount:
   name: ${KONG_RELEASE}-kong-proxy

podAnnotations:
 consul.hashicorp.com/connect-inject: "true"
 consul.hashicorp.com/transparent-proxy-exclude-inbound-ports: 8000,8443
EOF
The Kong values include two pod annotations. The annotation for consul.hashicorp.com/connect-inject injects the Consul sidecar proxy. consul.hashicorp.com/transparent-proxy-exclude-inbound-ports allows access from the Kong load balancer to its API gateway. Transparent proxy enforces that any traffic in the cluster reaches only its intended destination. As a result, you must add an exception to Consul’s transparent proxy for traffic from load balancers to specific service ports.
Install Kong for Kubernetes to the default namespace. The command will use the chart version 2.3.0:
$ helm install ${KONG_RELEASE} kong/kong --version 2.3.0 --values kong.yamlYou can check on the Kong pod in Kubernetes. Its containers include the Kong Ingress Controller, Kong gateway proxy, and Consul proxy:
$ kubectl get pods -l='app.kubernetes.io/name=kong'

NAME                             READY   STATUS    RESTARTS   AGE
external-kong-67cf5ffd69-9pt7r   3/3     Running   0          132m
When you check the Consul service catalog, you should have a service for external-kong-proxy and its sidecar, external-kong-proxy-sidecar-proxy. This means that you successfully injected a Consul sidecar proxy and added Kong’s API gateway to Consul service mesh:
$ consul catalog services

consul
external-kong-proxy
external-kong-proxy-sidecar-proxy
Set the Consul service default for Kong to http, which will allow you to configure application-aware intentions for HTTP request management:
$ cat <
apiVersion: consul.hashicorp.com/v1alpha1
kind: ServiceDefaults
metadata:
 name: ${KONG_RELEASE}-kong-proxy
spec:
 protocol: http
EOF
»Deploy an Example Workload
With Consul and Kong running, you can now deploy two example services, ui and web, and configure routing between them.
Deploy the web service to the default namespace. It should include version 1 of the web service, deployment, service account, and Consul service defaults:
$ cat <
apiVersion: consul.hashicorp.com/v1alpha1
kind: ServiceDefaults
metadata:
  name: web
spec:
  protocol: http
---
apiVersion: v1
kind: Service
metadata:
  name: web
  labels:
    app: web
spec:
  selector:
    app: web
  ports:
    - name: http
      protocol: TCP
      port: 80
      targetPort: 9090
---
apiVersion: v1
kind: ServiceAccount
metadata:
  name: web
---
apiVersion: apps/v1
kind: Deployment
metadata:
  name: web
  labels:
    app: web
    release: v1
spec:
  replicas: 1
  selector:
    matchLabels:
      app: web
      release: v1
  template:
    metadata:
      annotations:
        consul.hashicorp.com/connect-inject: "true"
        consul.hashicorp.com/service-meta-version: v1
      labels:
        app: web
        release: v1
    spec:
      serviceAccountName: web
      containers:
        - name: web
          image: "nicholasjackson/fake-service:v0.19.1"
          ports:
            - containerPort: 9090
          env:
            - name: NAME
              value: "Web (v1)"
            - name: MESSAGE
              value: "Web (v1)"
          livenessProbe:
            httpGet:
              path: /health
              port: 9090
            initialDelaySeconds: 3
            periodSeconds: 3
EOF
Next, deploy the ui service to the default namespace. It should include the ui service, deployment, service account, and Consul service defaults. The ui service connects to the web service for backend processing. In the deployment, you define this as an environment variable labeled UPSTREAM_URIS and direct it to the web service.
The ingress.kubernetes.io/service-upstream: "true" annotation on the Kubernetes Service communicates to the Kong ingress controller that it needs to use the cluster IP address of the service instead of the pod IP addresses. Add the annotation and deploy the service:
$ cat <
apiVersion: consul.hashicorp.com/v1alpha1
kind: ServiceDefaults
metadata:
  name: ui
spec:
  protocol: http
---
apiVersion: v1
kind: Service
metadata:
  name: ui
  labels:
    app: ui
  annotations:
    ingress.kubernetes.io/service-upstream: "true"
spec:
  selector:
    app: ui
  ports:
    - name: http
      protocol: TCP
      port: 80
      targetPort: 9090
---
apiVersion: v1
kind: ServiceAccount
metadata:
  name: ui
---
apiVersion: apps/v1
kind: Deployment
metadata:
  name: ui
  labels:
    app: ui
spec:
  replicas: 1
  selector:
    matchLabels:
      app: ui
  template:
    metadata:
      annotations:
        consul.hashicorp.com/connect-inject: "true"
      labels:
        app: ui
    spec:
      serviceAccountName: ui
      containers:
        - name: ui
          image: "nicholasjackson/fake-service:v0.19.1"
          ports:
            - containerPort: 9090
          env:
            - name: NAME
              value: "UI"
            - name: MESSAGE
              value: "UI"
            - name: UPSTREAM_URIS
              value: "http://web"
          livenessProbe:
            httpGet:
              path: /health
              port: 9090
            initialDelaySeconds: 3
            periodSeconds: 3
EOF
The Consul cluster uses transparent proxy by default to resolve any Kubernetes DNS names to services. As a result, it will automatically resolve to the web service. However, transparent proxy enforces traffic between services in the cluster. You need to authorize communication between the ui and web services.
Create an app-aware intention in Kubernetes. The intention should allow any GET requests from ui service to / or /favicon.ico endpoints on the web service. When you create it, Consul propagates the configuration to proxies for ui and web services and allows communication between them:
$ cat <
apiVersion: consul.hashicorp.com/v1alpha1
kind: ServiceIntentions
metadata:
  name: ui-to-web
spec:
  destination:
    name: web
  sources:
    - name: ui
      permissions:
        - action: allow
          http:
            pathExact: /
            methods: ["GET"]
        - action: allow
          http:
            pathExact: /favicon.ico
            methods: ["GET"]
EOF
You can verify this by forwarding the ui service to port 8080 on your machine:
$ kubectl port-forward svc/ui 8080:80In a separate shell, make an API request to the UI service. It should return a JSON object that identifies a successful upstream_call to the web service:
$ curl localhost:8080/

{
  "name": "UI",
  "uri": "/",
  "type": "HTTP",
  "ip_addresses": [
    "10.84.2.8"
  ],
  "start_time": "2021-07-14T20:41:45.417155",
  "end_time": "2021-07-14T20:41:45.426953",
  "duration": "9.797902ms",
  "body": "UI",
  "upstream_calls": {
    "http://web": {
      "name": "Web (v1)",
      "uri": "http://web",
      "type": "HTTP",
      "ip_addresses": [
        "10.84.1.17"
      ],
      "start_time": "2021-07-14T20:41:45.425330",
      "end_time": "2021-07-14T20:41:45.425618",
      "duration": "288.317µs",
      "headers": {
        "Content-Length": "254",
        "Content-Type": "text/plain; charset=utf-8",
        "Date": "Wed, 14 Jul 2021 20:41:45 GMT",
        "Server": "envoy",
        "X-Envoy-Upstream-Service-Time": "0"
      },
      "body": "Web (v1)",
      "code": 200
    }
  },
  "code": 200
}
Return to your original terminal and close the connection to Kubernetes port forwarding.
»Rate Limit Requests to a Kubernetes Service
You want to allow anyone to access the ui service through Kong’s ingress. By directing all requests through Kong, you can audit and control the number of requests to the ui service. Kong’s rate-limiting plugin sets a limit to how many HTTP requests an upstream service can serve in a given amount of time.
Imagine the ui service can handle only 30 requests per minute. You can install the rate-limiting plugin to Kong and configure the policy to limit the number of requests:
$ cat <
apiVersion: configuration.konghq.com/v1
kind: KongPlugin
metadata:
 name: rate-limit
plugin: rate-limiting
config:
 minute: 30
 policy: local
EOF
You need to define a Kubernetes Ingress resource with annotations for the Kong ingress class, the rate-limiting plugin, and to set konghq.com/preserve-host to false. Setting it to false discards the original header and enables the Consul proxy to forward the service correctly. The resource allows traffic to the ui service on port 80 but will apply the rate-limit if ui receives more than 30 requests per minute:
$ cat <
apiVersion: networking.k8s.io/v1
kind: Ingress
metadata:
  name: ui
  annotations:
    kubernetes.io/ingress.class: kong
    konghq.com/plugins: rate-limit
    konghq.com/preserve-host: "false"
spec:
  rules:
    - http:
        paths:
          - path: /
            pathType: Prefix
            backend:
              service:
                name: ui
                port:
                  number: 80
EOF
You need to configure Consul to allow communication between the Kong gateway and the ui service. Create an intention that allows the proxy to direct external requests to the / and /ui endpoints:
$ cat <
apiVersion: consul.hashicorp.com/v1alpha1
kind: ServiceIntentions
metadata:
 name: kong-to-ui
spec:
 destination:
   name: ui
 sources:
   - name: ${KONG_RELEASE}-kong-proxy
     permissions:
       - action: allow
         http:
           pathExact: /
           methods: ['GET']
       - action: allow
         http:
           pathPrefix: /ui
           methods: ['GET']
EOF
To verify that you rate-limited requests to the ui service, copy the Kong proxy IP address from Kubernetes. Open your browser and enter the Kong proxy’s IP address and go to the /ui path:
$ open http://$(kubectl get service ${KONG_RELEASE}-kong-proxy -o jsonpath='{.status.loadBalancer.ingress[*].ip}')/ui
If you quickly refresh the browser a few times, you may receive an error from Kong’s proxy that you have hit the API rate limit.
»Shape Traffic between Kubernetes Services
Besides shaping inbound requests to services with Kong API gateway, you can use Consul to shape requests between services in a Kubernetes cluster. For example, you may need to update the web service from version 1 to version 2. However, you do not want to deploy version 2 and send all requests from ui to a new version without testing it! You want to increase traffic to the new version gradually.
Apply a new deployment for version 2 of the web service to the default namespace. Consul will register the new version as a new instance under the web service:
$ cat <
apiVersion: apps/v1
kind: Deployment
metadata:
 name: web-v2
 labels:
   app: web
   release: v2
spec:
 replicas: 1
 selector:
   matchLabels:
     app: web
     release: v2
 template:
   metadata:
     annotations:
       consul.hashicorp.com/connect-inject: "true"
       consul.hashicorp.com/service-meta-version: v2
     labels:
       app: web
       release: v2
   spec:
     serviceAccountName: web
     containers:
       - name: web
         image: "nicholasjackson/fake-service:v0.19.1"
         ports:
           - containerPort: 9090
         env:
           - name: NAME
             value: "Web (v2)"
           - name: MESSAGE
             value: "Web (v2)"
         livenessProbe:
           httpGet:
             path: /health
             port: 9090
           initialDelaySeconds: 3
           periodSeconds: 3
EOF
Create a Consul service resolver to define the service subsets for version 1 and version 2. It references the service metadata you set as part of the consul.hashicorp.com/service-meta-version: v2 annotation in the deployment:
$ cat <
apiVersion: consul.hashicorp.com/v1alpha1
kind: ServiceResolver
metadata:
 name: web
spec:
 defaultSubset: v1
 subsets:
   v1:
     filter: "Service.Meta.version == v1"
   v2:
     filter: "Service.Meta.version == v2"
EOF
To start sending traffic to version 2 of the web service, create a Consul service splitter to send 50% of traffic to version 1 and 50% to version 2:
$ cat <
apiVersion: consul.hashicorp.com/v1alpha1
kind: ServiceSplitter
metadata:
  name: web
spec:
  splits:
    - weight: 50
      serviceSubset: v1
    - weight: 50
      serviceSubset: v2
EOF
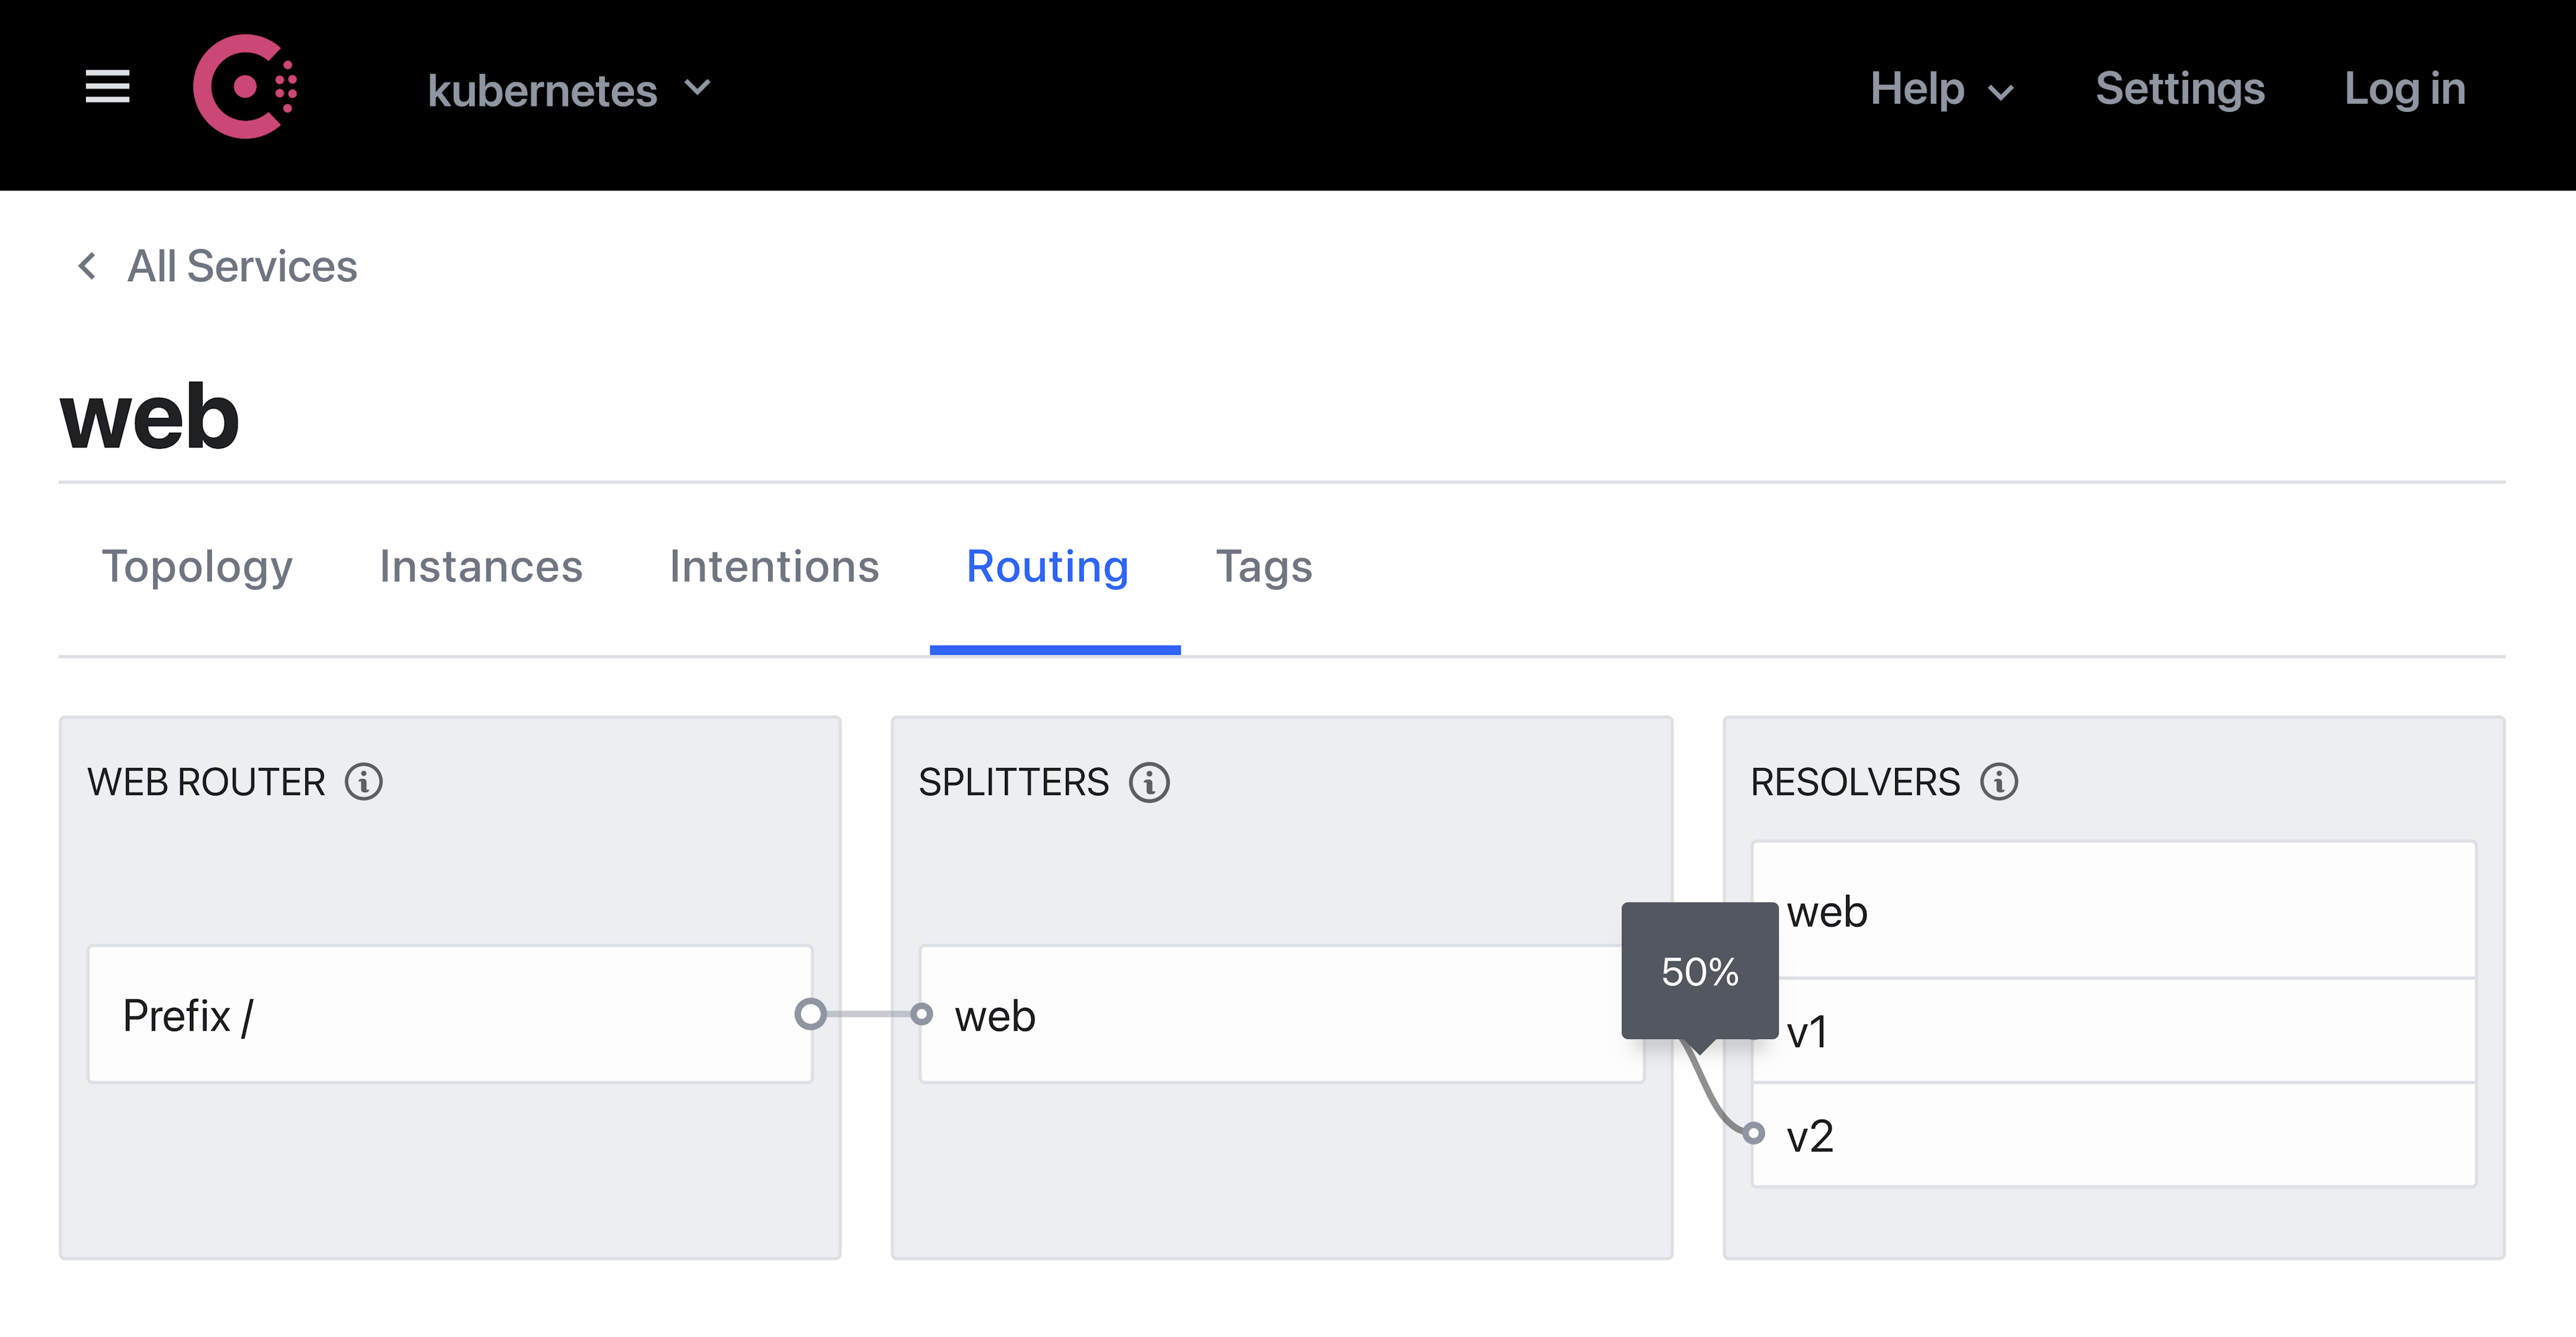
Consul will direct any requests from the ui service to each version of the web service. If you examine the routing for the web service in the Consul UI, you can verify the 50% traffic weight configured for the service splitter.
To verify that you correctly configured Consul to split traffic between the two versions, copy the Kong proxy IP address from Kubernetes. Open your browser and enter the Kong proxy’s IP address with a path to /ui:
$ open http://$(kubectl get service ${KONG_RELEASE}-kong-proxy -o jsonpath='{.status.loadBalancer.ingress[*].ip}')/ui
If you refresh the browser a few times, you’ll notice that some requests go to Web (v2) and others go to Web (v1) before your requests exceed Kong’s rate limit.

»Conclusion
This post covered how to add Kong for Kubernetes to Consul’s service mesh, configure rate-limiting for external requests to a service, enforce network policies with intentions, and split traffic between two versions of a service. By using Consul with Kong’s Ingress Controller, you can control, secure, and shape north-south and east-west traffic for Kubernetes services.
For additional information on transparent proxy for Consul, review its documentation. You can learn more about managing traffic with Consul service mesh in our Learn tutorials.
Questions about this post? Add them to the community forum.