


HashiCorp and Microsoft have partnered to create a number of Terraform modules that build an N-tier architecture following Microsoft's Azure Well-Architected Framework and security best practices. In this guide, we will walk you through using the modules to build this environment and add on security functionality and Terraform Cloud policies via Sentinel.
In part two of this series, we'll cover Deploying securely into Azure architecture with Terraform Cloud and HCP Vault
»Choosing a reference architecture
Microsoft has an excellent architecture library where you can find references for multiple environment types and scenarios. The example in this post uses an N-tier architecture, since it is a common starting point for traditional on-premises applications migrating to Azure infrastructure.
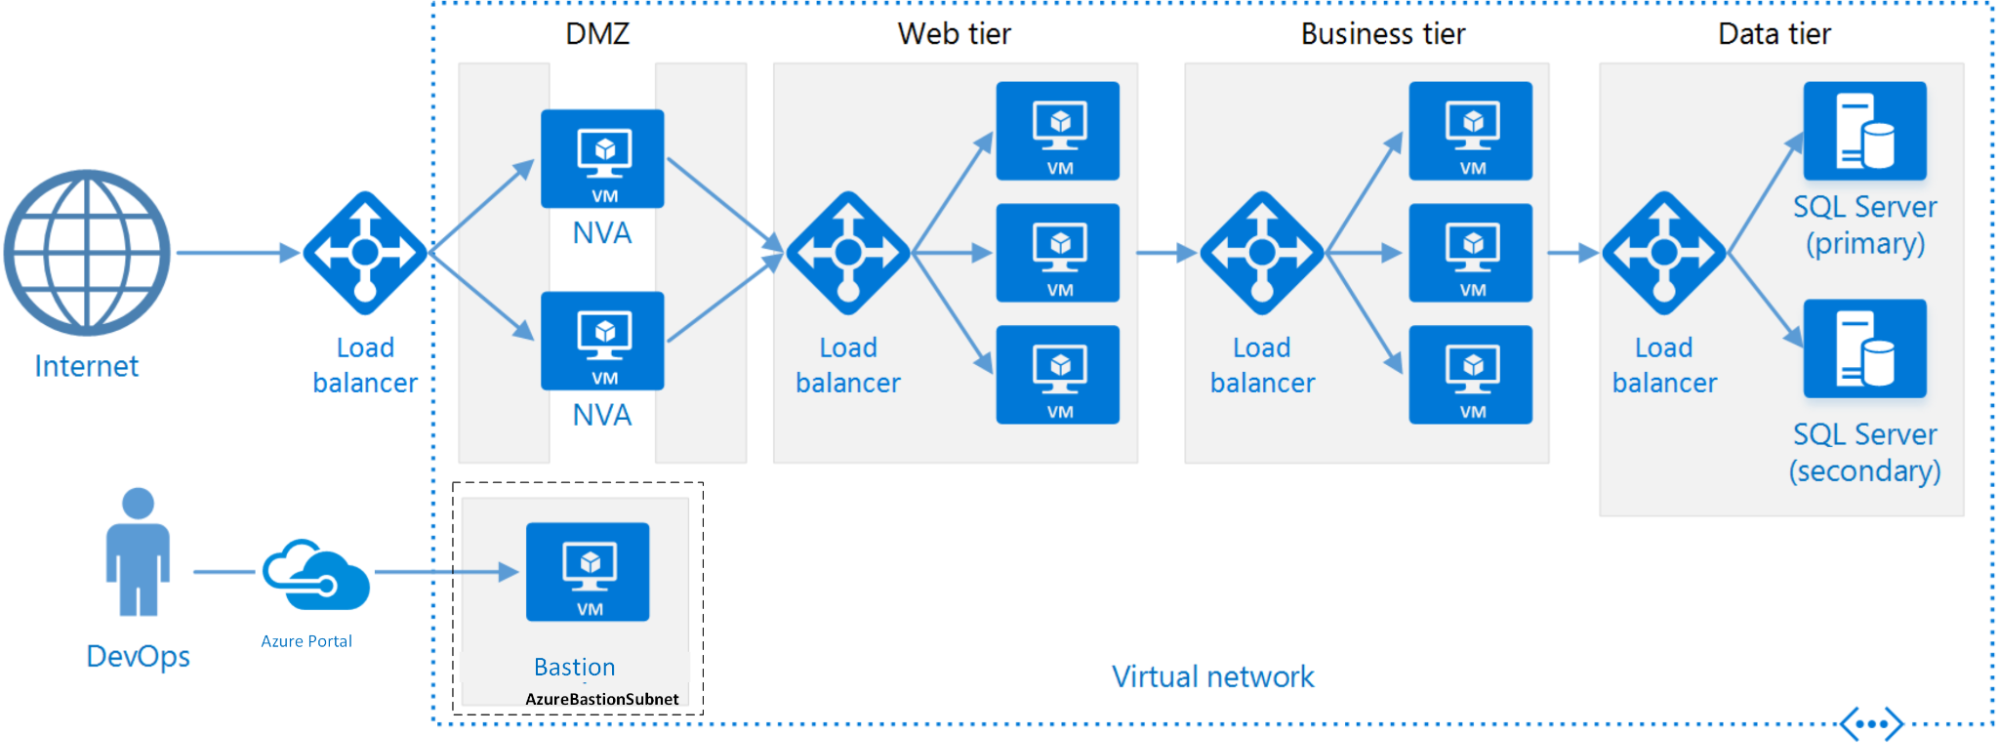
A standard N-tier architecture on Azure
An N-tier architecture divides an application into logical layers and physical tiers, and can be migrated to Azure with minimal refactoring.
»Modules and policies
Once the environment has been selected, infrastructure code is needed to build it. You can use Terraform modules to easily break down this task into separate deployable sections and create a manageable set of environments that are built together to form the overall architecture.
Using Terraform Cloud provides another layer of security to the environment with policy as code, which is available in the Terraform Cloud Team & Governance and Business tiers. Policies are rules that Terraform Cloud enforces on Terraform runs. You can define policies using either the HashiCorp Sentinel or Open Policy Agent (OPA). Example Sentinel policies are available in the policy library section of the Terraform Registry.
Note: To follow along in the “Applying Terraform Cloud policies” section of this post, you will need a Terraform Cloud account and organization set up with a workspace.
»Building the architecture
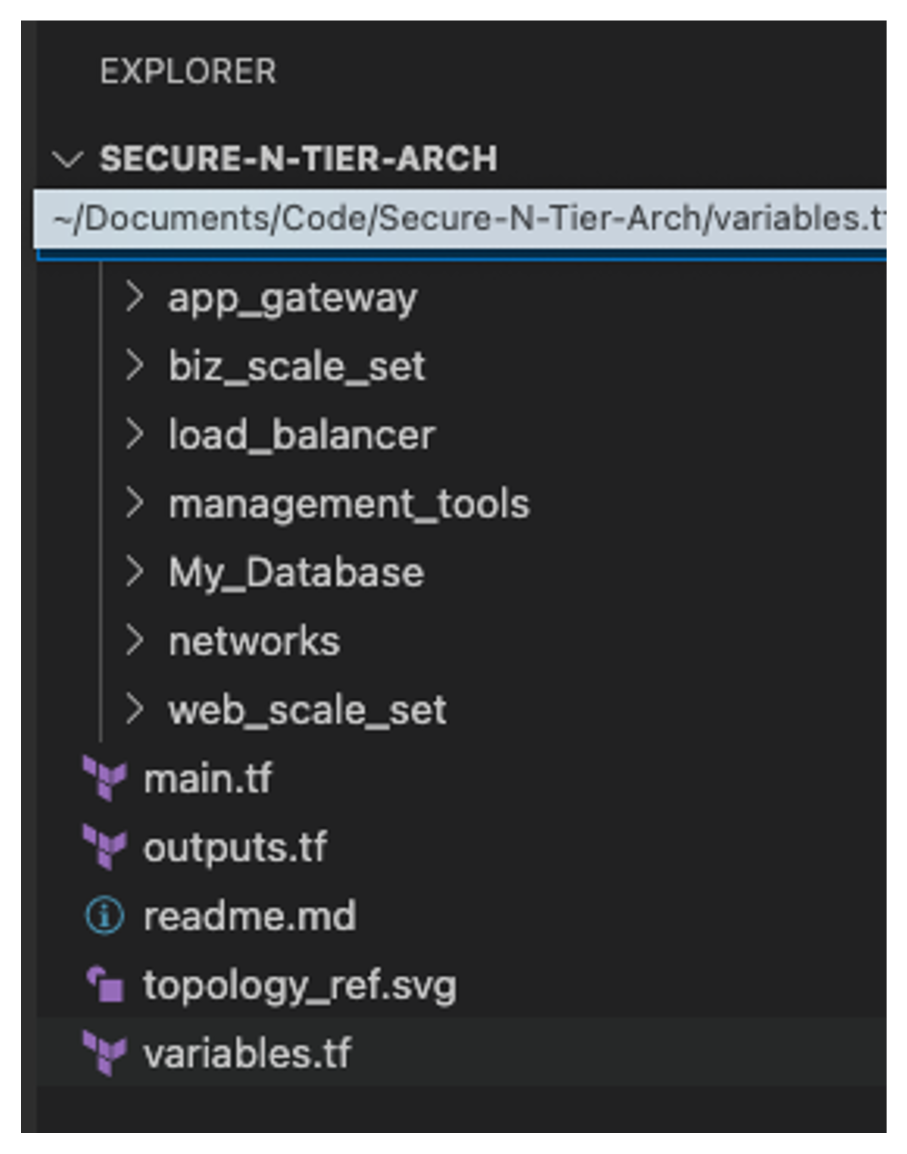
To get started, clone the N-tier architecture GitHub repository created for this guide. If you’re using Visual Studio Code, we recommend using the supported Terraform extension and cloning the N-tier repository using the built-in Git functionality. Once complete, the code tree will look like this:
»Establishing the basics
From the module tree layout you can see the process and logic behind each module. We created smaller modules that focused on specific functions, starting with the network module, which provides the home for any VNets and subnets along with any DNS and endpoint configuration.
We then created separate modules for the application gateway and the internal load balancers that become the choke points for traffic between the subnets. To create the virtual machine (VM) in a scalable way, we defined two separate modules: one for the web tier and one for the business tier (middleware). Finally, we have the database module creating the storage policies and array.
Note: For the purposes of this example we’re using local modules within the project directory. Terraform Cloud also offers a private registry where commonly used modules can be published and reused by others within your organization.
To deploy all of the components, we created the main.tf in the root module to house the code that links the modules together. Once you have put these modules together and tested them, you can start adding security into the code.
»Adding security best practices as code
Now we have a baseline environment. To improve the overall security posture of your architecture, there are established security best practices you can follow for the Azure platform.
»Password management
To get a standardized random password we added the random password provider and set a length and the use of special characters to create a strong password structure based on the Microsoft recommendation. The code we added to main.tf of our root module is shown here:
resource "random_password" "password" {
 length           = 16
 special          = true
 override_special = "!#$%&*()-_=+[]{}<>:?"
}
Once added to main.tf the provider, it can be used anywhere it's needed across the architecture. We simply assign the random_password.password.bcrypt_hash attribute to a module input. In this example, we assign it to the web scale set. This uses a bcrypt salt of the created password that is passed into the attribute:
######################################
# Create web scale set
######################################

module "web_scale_sets" {
  source                   = "./modules/web_scale_set"
  name                     = random_pet.name.id
  resource_group_location  = var.resource_group_location
  resource_group_name      = azurerm_resource_group.rg.name
  scale_set_sub            = module.networks.subnet3
  app_gty_backend_pool_ids = module.app-gateway.app_gateway.backend_address_pool[*].id
  admin_user               = var.admin_user
  admin_password           = random_password.password.bcrypt_hash
}
»Limiting access
To control traffic going into the newly created environment we want two classes: user and management. That is, the traffic that the customer/users of the application create by interacting with the application, and the traffic that manages devices and components of the environment itself. Taking this approach lets you separate the risk profiles of the traffic to create rules and access control based around those profiles.
»Management traffic control
To limit management access, we leverage an Azure bastion host. Azure Bastion is a service that lets you connect to a virtual machine using your browser and the Azure portal or via the native SSH or RDP client already installed on your local computer. The Azure Bastion service is a fully platform-managed PaaS service that you provision inside a specific host called AzureBastionSubnet when provisioned via AzureRM (see the azurerm_bastion_host documentation).
When you connect via Azure Bastion, your VMs don't need a public IP address, agent, or special client software (learn more about Azure Bastion Host here). This is deployed using the management tools module in the root module with these few lines of code:
######################################
# Create Bastion Host
######################################

module "bastion-host" {
  source                  = "./modules/management_tools"
  name                    = random_pet.name.id
  resource_group_location = var.resource_group_location
  resource_group_name     = azurerm_resource_group.rg.name

}
»User traffic control
To limit user traffic we leveraged security groups. You can use an Azure network security group to filter network traffic to and from Azure resources in an Azure virtual network. A network security group contains security rules that allow or deny inbound network traffic to, or outbound network traffic from, several types of Azure resources. For each rule, you can specify source, destination, port, and protocol:
######################################
# Create Security Groups and Rules
######################################
resource "azurerm_network_security_group" "SecurityGroup" {
  name                = "${var.name}-SecurityGroup"
  location            = var.resource_group_location
  resource_group_name = var.resource_group_name


  security_rule {
    name                       = var.name
    priority                   = 100
    direction                  = "Inbound"
    access                     = "Allow"
    protocol                   = "Tcp"
    source_port_range          = "*"
    destination_port_range     = "*"
    source_address_prefix      = "*"
    destination_address_prefix = "*"
  }

  tags = {
    environment = "Terraform"
  }
}
To allow the most flexibility in the rule sets, we created unique network security groups for each subnet and associated the rule to that specific subnet via this code:
resource "azurerm_subnet_network_security_group_association" "SGA" {
  subnet_id                 = azurerm_subnet.app_gateway_sub.id
  network_security_group_id = azurerm_network_security_group.SecurityGroup.id
}
To limit access even further, you could tighten the rules by editing the source, destination port, or address range.
»Tier isolation
To further limit the communication between tiers, the scale sets have also been configured to communicate only via the load balancer and application gateway. This limits the exposed services behind them and creates another obstacle for potential attackers. This is achieved by assigning the application gateway or load balancer IDs in the ip_configuration within the network section of the scale set:
network_interface {
   name    = "${var.name}-network-int"
   primary = true

   ip_configuration {
     name                                         = "internal"
     primary                                      = true
     subnet_id                                    = var.scale_set_sub
     application_gateway_backend_address_pool_ids = var.app_gty_backend_pool_ids
   }
 }
»Database access
Databases are the ultimate target for most bad actors. Taking measures to protect them is key to protecting your organization. For this environment we leverage the Azure Cosmos database, because all user data stored in Azure Cosmos DB is automatically encrypted at rest and in transit. Basically, encryption at rest is "on" by default.
We also leverage the built-in CosmosDB Firewall by including the following code: is_virtual_network_filter_enabled = "true".
The ip_range_filter value specifies the set of IP addresses or IP address ranges in CIDR form to be included as the allowed list of client IPs for a given database account. In this case, we have locked the address range down to the 10.0.4.0/24 range of the biz tier using the var.ip_range_filter variable in the virtual network range shown here:
resource "azurerm_cosmosdb_account" "Storacc" {
  name                              = "${var.name}-cosmosdb-acc"
  location                          = var.resource_group_location
  resource_group_name               = var.resource_group_name
  offer_type                        = "Standard"
  kind                              = "GlobalDocumentDB"
  enable_automatic_failover         = false
  enable_free_tier                  = true
  is_virtual_network_filter_enabled = "true"
  ip_range_filter                   = var.ip_range_filter
  virtual_network_rule {
    id                                   = var.data_tier_sub_id
    ignore_missing_vnet_service_endpoint = true
 }
 geo_location {
    location          = var.resource_group_location
    failover_priority = 0
 }
 consistency_policy {
    consistency_level       = "BoundedStaleness"
    max_interval_in_seconds = 300
    max_staleness_prefix    = 100000
 }
 depends_on = [
   var.resource_group_name,
   var.data_tier_sub_id
 ]

}
With these basic inclusions we have started to create a secure environment in which to build an application.
»Applying Terraform Cloud policies
Within the Terraform policy library you find Azure-specific policies based on CIS benchmarks and apply them to your environment. To take advantage of policies, you group individual policies into policy sets and apply those policy sets to one or more workspaces in your organization. For each run in those workspaces, Terraform Cloud checks the Terraform plan against the policy set.
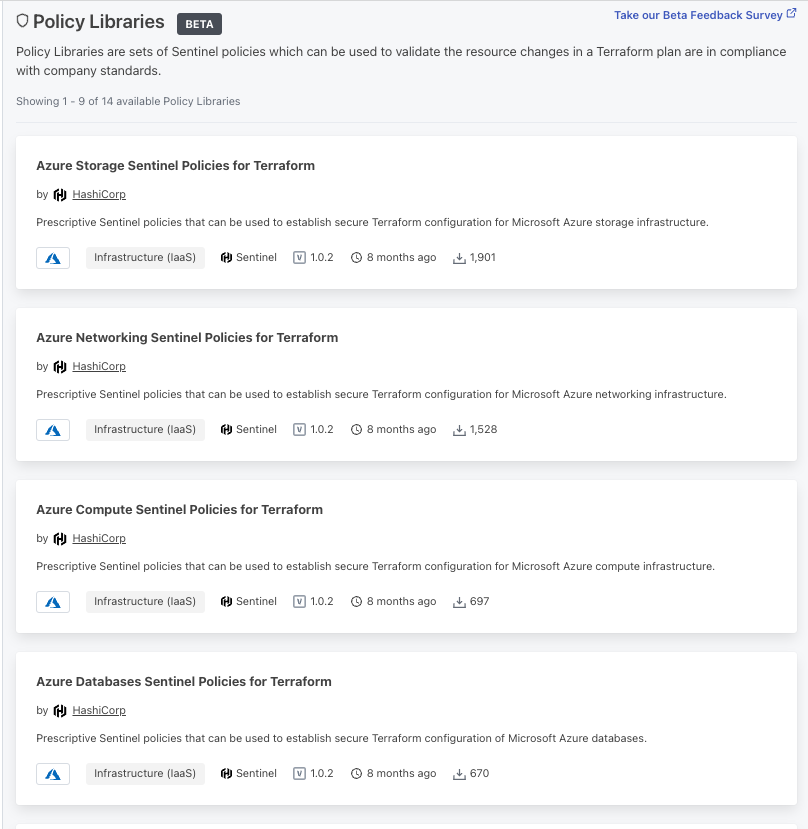
From the above list of available HashiCorp policies, select Azure Networking Sentinel Policies for Terraform from the list, as this provides additional security checks to the platform code highlighted above.
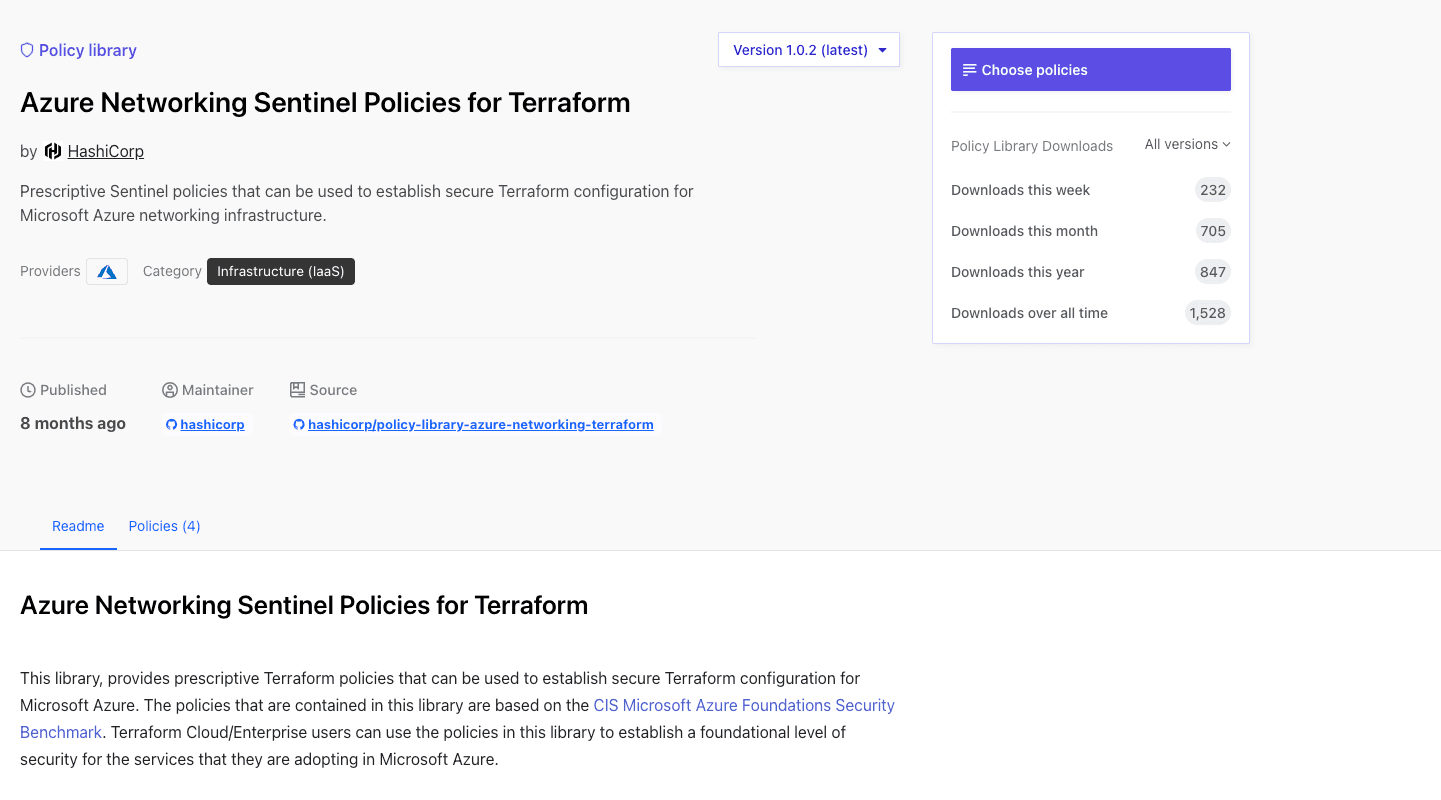
From here, click the “Choose policies” button, which takes you to the policies tab. On the sidebar, you can select the specific policies you want to enforce and the code is generated for use as shown in the example below:
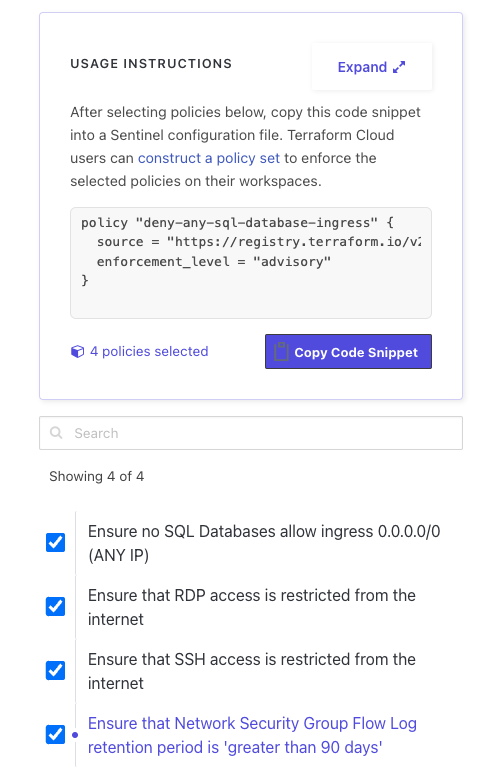
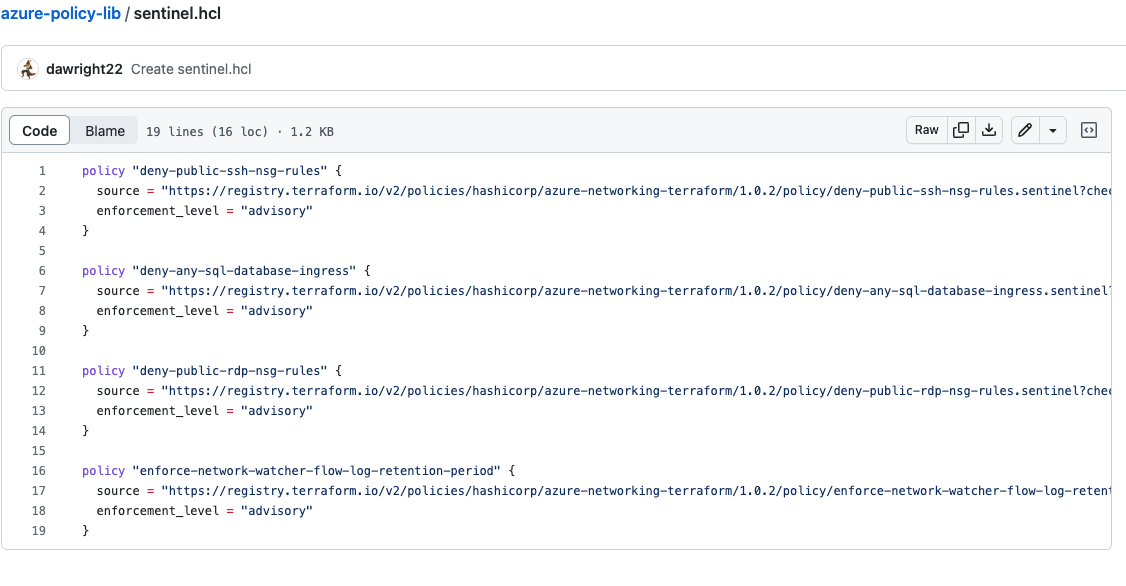
Next, click “Copy Code Snippet” and go to your version control system, in this example its GitHub, and create a new repository called azure-policy-lib with a file called sentinel.hcl, where you’ll paste the code snippet:
Now go to the Terraform Cloud organization, and from the Settings page, select the policy set to open, as shown here:

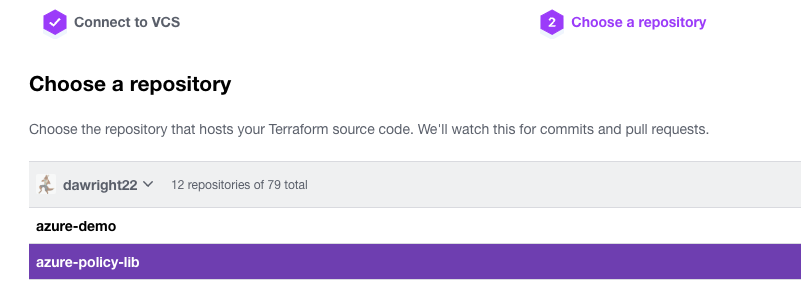
Then click the “Create a new policy” button and connect the engine to your VCS, selecting GitHub (in this case) and your repository:
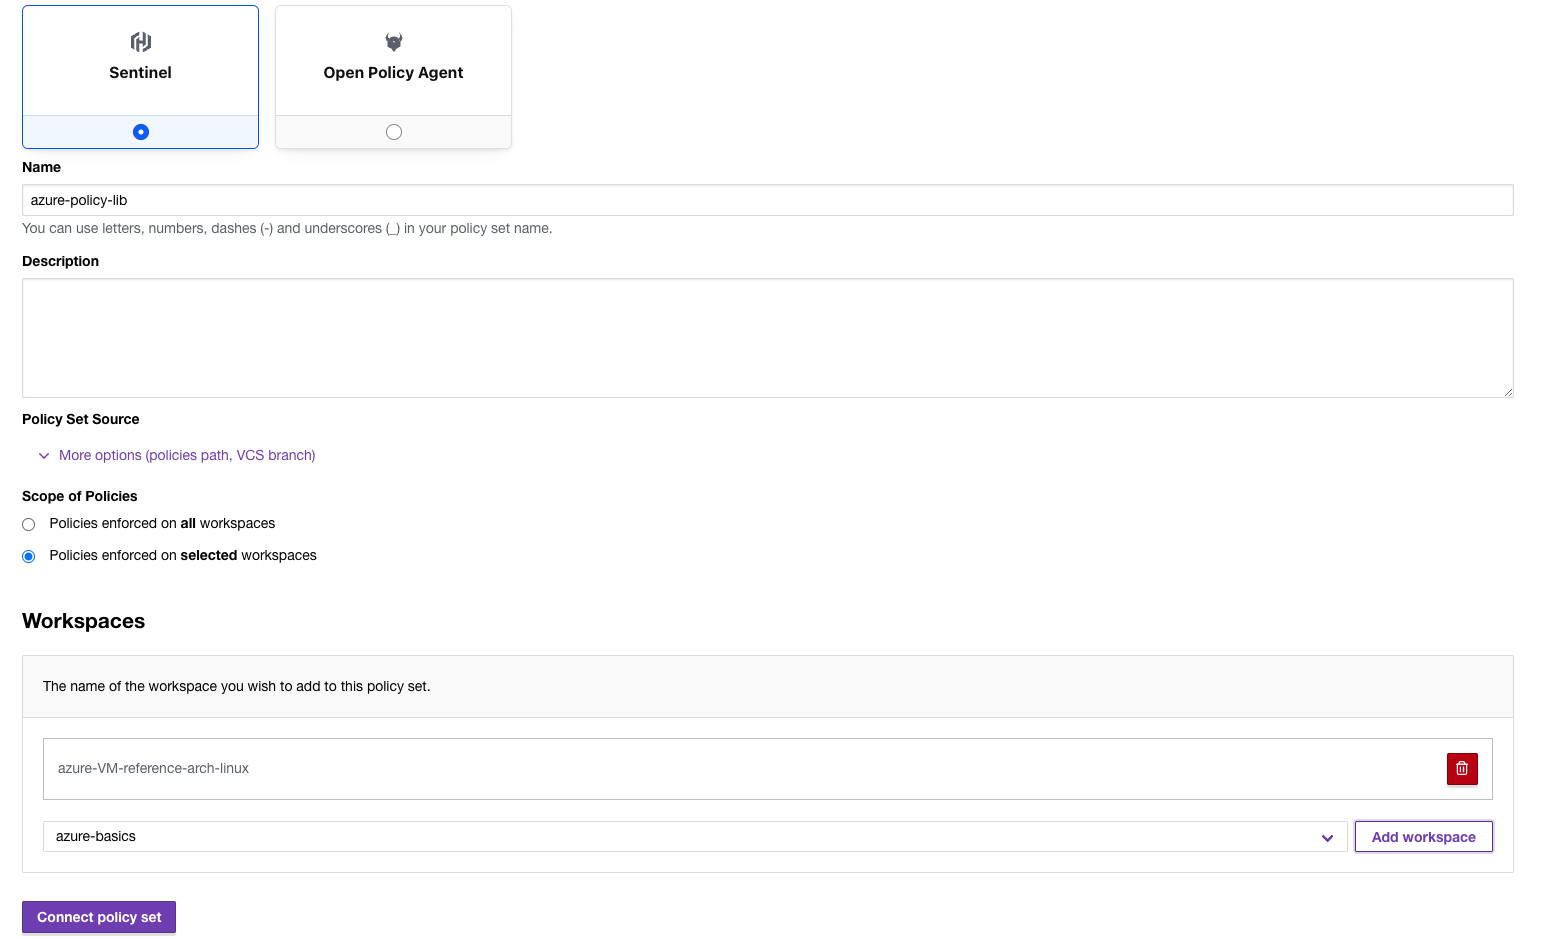
Connect the policy to the workspace by selecting the framework (Sentinel in this case), giving the policy a name, and selecting the specific workspace you want to test on. Make sure to click “Add workspace” to attach the policy and then click “Connect policy set”:
Now, when you trigger a run in Terraform Cloud, you will have the additional Sentinel policy tab below showing the outcome:
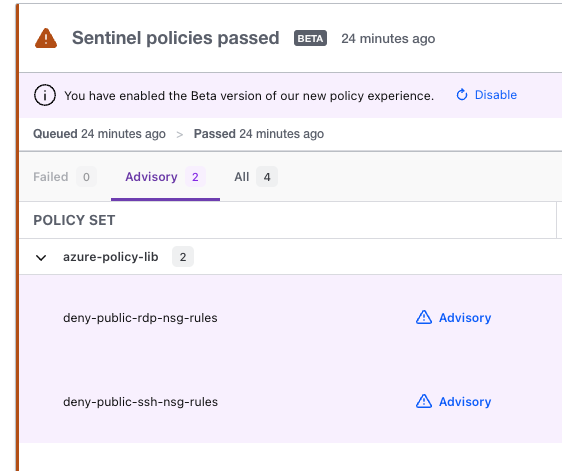
In this instance we triggered an advisory warning that we do not meet the RDP and SSH security requirements that we specified and that even though we created Network security groups in our code, they are too open to meet CIS benchmarks.
»Next steps
Incorporating security best practices into infrastructure as code is essential for maintaining secure and reliable infrastructure. By doing so, organizations help ensure that their cloud deployments are secure, compliant, and easily maintainable. Terraform Cloud helps enforce these best practices and makes sure that you can use an as code approach to build your security workflow into your deployments.
To learn more, watch the video Securing Your Cloud with Terraform Foundational Policy Library and join Microsoft and HashiCorp for our ongoing webinar series on Maximizing Microsoft Azure Security with Terraform.
To continue this series, read part two: Deploying securely into Azure architecture with Terraform Cloud and HCP Vault.