Update 2025: Read our Transparent sessions HashiCorp Validated Design guide for a more updated walkthrough of Boundary transparent sessions.
In my role as a solutions engineer, I’ve talked to many customers and practitioners about HashiCorp Boundary over the past year or so, and one of the main questions that always gets asked is: “How does Boundary secure remote access to HTTPS targets?”
Before Boundary 0.18, Boundary would use the 127.0.0.1 address and port as its proxy address to initiate a session. When Boundary opens a listening socket for connection proxying, most applications will use normal TLS verification logic, which requires using the hostname or IP address to be present on the server’s certificate, in order to establish a connection. Most certificates do not include an IP Subject Alternative Name (SAN) of 127.0.0.1 for legitimate security reasons including local trust issues, cross-application risks and certificate management. Furthermore, most customers are unwilling or unable to provision updated certificates that contain that IP SAN. Therefore, it was usually not possible to access HTTPS targets with Boundary.
Transparent sessions greatly simplify this workflow. In this blog, I’ll outline some background on Boundary vs. VPNs, Boundary aliases, and the new transparent sessions feature. To conclude, I’ll show you a working example of a transparent sessions workflow for setting up secure remote access to private HTTPS targets. This example is not intended to serve as a best practice or HashiCorp-recommended practice, but more so to provide an example of what can be achieved and to allow practitioners to take a working example to explore and build upon.
»Boundary vs. VPN
Boundary often gets compared to a traditional VPN solution, however, unlike a VPN, Boundary does not bridge the user onto the entire network. Instead, Boundary leverages your Identity Providers (IdP) to enable more granular control about what individuals, or groups of individuals, have access to, in relation to resources organizations have within their network. This helps mitigate against lateral access that often is a result of using a traditional VPN solution.
In one of my previous blogs, I discussed and demonstrated the implementation of a multi-hop deployment with Boundary. This allowed users to securely access resources sitting in an RFC1918 address space from the comfort of their own home, without relying on the need for a VPN solution. However, the multi-hop deployment specifically addressed accessing targets such as SSH, RDP, databases, Kubernetes, and others. Boundary didn't have an adequate solution for HTTPS targets.
»Boundary aliases
In the Boundary 0.16 release, the concept of aliases was introduced. Aliases are a hostname-style string that you can attribute to a target, which makes it easier to remember and therefore more user-friendly when accessing targets.
Before aliases, if you were using the CLI and wanted to SSH to a specific server in your environment (for example, a web-front-end server) you would either had to have the following:
- The
target_idwritten down or stored somewhere convenient and then issue theboundary connect ssh -target-id tssh_hjuozD0EmMcommand (if using application credential injection). - The name of the target along with the associated scope ID and then issue the
boundary connect ssh -target-name webfrontend -target-scope-id p_XUW5XcYAKe.
If you were using the Boundary Desktop client, and Boundary was managing hundreds or thousands of resources, you would have to know something about that resource, such as name or ID, to save you trawling through numerous pages to find the target in question.
With aliases, you can now give a DNS-like name to the target. For our example above, you could attribute the name prod.webfrontend1, which would replace the need to use the target ID tssh_hjuozD0EmM as the parameter required to connect to a specific target.
Aliases work hand-in-hand with Boundary’s transparent sessions. Transparent sessions enable Boundary to shift from an active to a passive connection process. Instead of users interacting with the Boundary CLI or Desktop client to initiate a session, Boundary will automatically initiate sessions for them anytime they connect using their existing tools (SSH client terminal, putty, RDP client, web browser, etc). Boundary operates in the background, intercepting DNS calls and routing traffic through a session if the user is authenticated and authorized.
With transparent sessions, you no longer need to issue any specific Boundary commands and instead can simply issue the command ssh prod.webfrontend1 to SSH to our target. This greatly improves user experience as users no longer have to remember vendor-specific commands to achieve a simple SSH connection, in this example. This is all possible because of transparent sessions, which allows a simplification of connectivity without relinquishing any of the capabilities of Boundary.
»Transparent sessions explained
With transparent sessions, users do not have to directly interact with Boundary itself, i.e. issuing specific Boundary commands to connect via SSH, RDP, HTTPS etc. to targets. However, the important benefit of connecting securely while imposing granular control about what individual users and/or groups can connect to, still remains.
The Boundary Client Agent gets installed onto your machine when you install the new Boundary installer. This agent acts as your system’s DNS daemon. When a user has successfully authenticated into Boundary via the CLI or Desktop Client, the Boundary Client Agent becomes the primary DNS resolver on the machine. The Client Agent will intercept all DNS requests made on the system.
If a destination DNS request matches a Boundary alias that the user is authorized to use, Boundary automatically generates a session and transparently proxies the connection on behalf of the user. In the event that there is not a matching Boundary alias to a destination DNS request, the Client Agent will forward requests to the previously set DNS resolver(s).
The diagram below depicts the example discussed above:
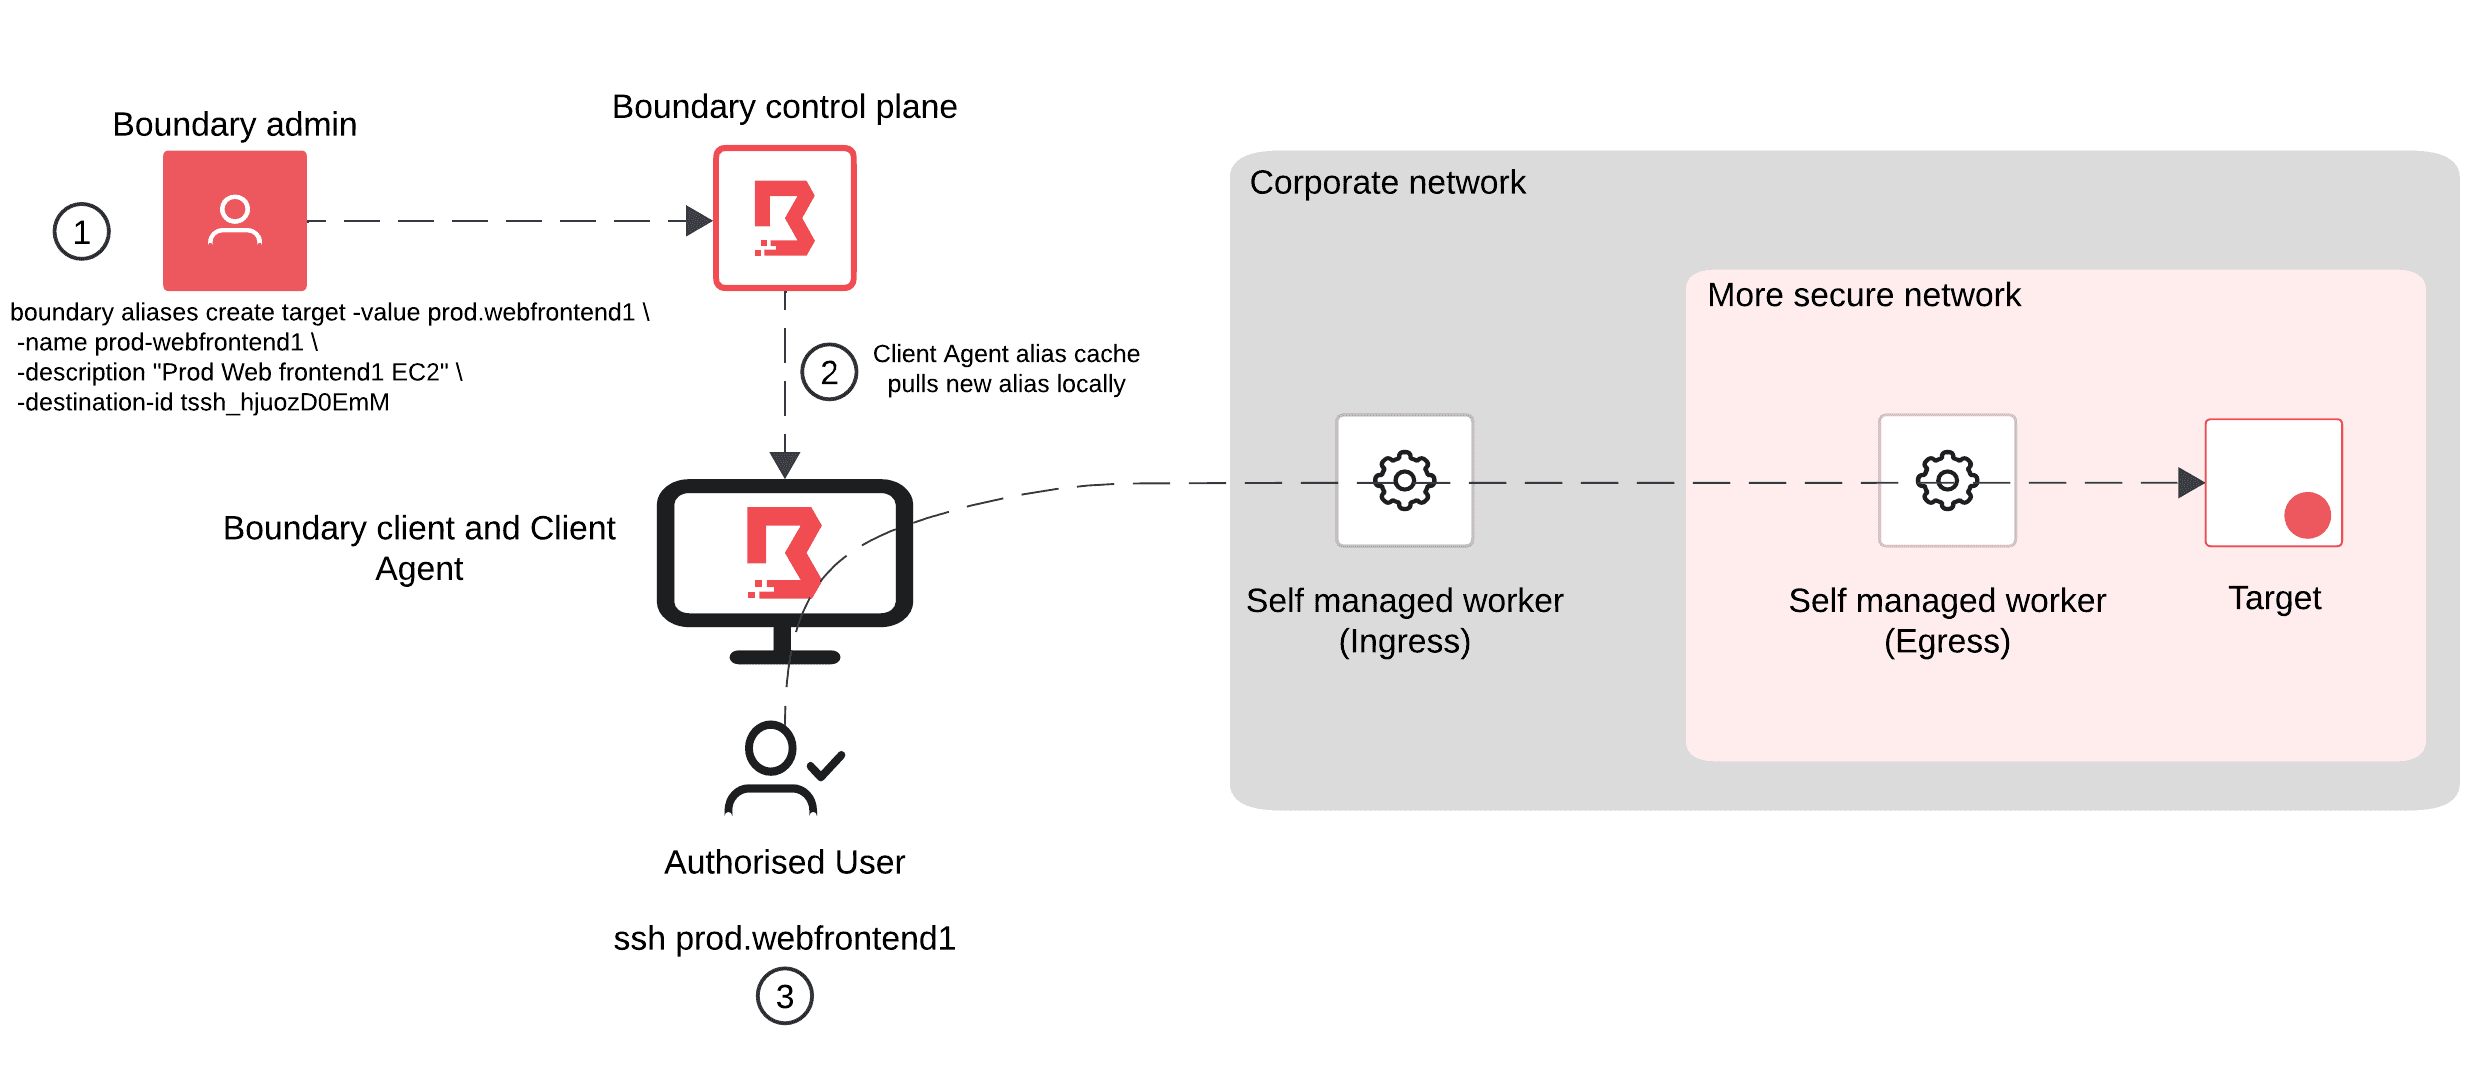
Here’s what’s happening in each step:
- Boundary admin / SRE creates the new alias
prod.webfrontend1and assigns it to the desired target. - After ~2 minutes, the Client Agent alias cache will pull the information about this assignment down to store locally.
- The end user then issues the traditional SSH command to
prod.webfrontend1. The alias is cached, which helps reduce the load on the Boundary controllers because they are not serving as many requests, and connectivity is now established.
If the Boundary admin / SRE removes the alias, after ~2 minutes if the user tries to SSH again to prod.webfrontend1, it will forward requests to the previously set DNS resolver(s).
»Boundary Client Agent
With transparent sessions, a new package is included in the new Boundary installer. This will install, and/or upgrade any existing Boundary components you already have on your system.
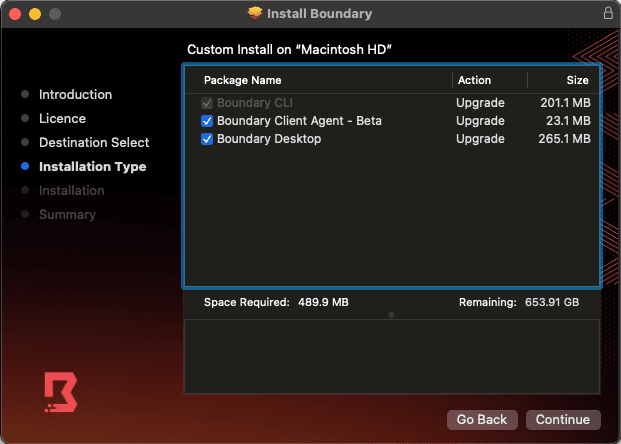
After installation, the Client Agent becomes the primary DNS resolver on the machine.
»Leveraging custom DNS responses
Before transparent sessions, the proxy address was a combination of the localhost address plus the port number. With transparent sessions, the IPv4 address used comes from the RFC6598 Carrier-grade NAT space (CGNAT) (100.64.0.0 to 100.127.255.255) by default.
As an example, if you have a target alias set to internal.hashicorp.com, when you attempt to make a connection to that address, the DNS request is intercepted by the Client Agent and directed to a local IP address, from which the connection is proxied over a normal Boundary session to the real host. The host provides its certificate, and as long as the target alias matches one of the SANs in the certificate, the secure connection will be accepted and established. This is what makes HTTPS targets possible with transparent sessions.
To verify that the Client Agent is the primary DNS server, issue the following command for Mac: % scutil --dns, or % ipconfig /all for Windows.
On a Mac, the output should look similar to the example below:
DNS configuration (for scoped queries)

resolver #1
  search domain[0] : Home
  nameserver[0] : 100.118.180.7
  nameserver[1] : fc00:557b::f451:1d6e
  if_index : 15 (en0)
  flags    : Scoped, Request A records, Request AAAA records
  reach    : 0x00030002 (Reachable,Local Address,Directly Reachable Address)
You can see that the nameserver[0] and nameserver[1] addresses are set by the Client Agent, to support both IPv4 and IPv6. There is no IPv6 range for CGNAT, so the IPv6 is a range from the unique local address (ULA) range.
If you configured an alias for www.hashicorp.com and then ran an nslookup www.hashicorp.com on Mac, or resolve-dnsname www.hashicorp.com on Windows, you would see the IPs of the DNS server used, as well as the DNS request being made and the response.
#DNS response
;; Truncated, retrying in TCP mode.
Server:         100.118.180.7
Address:        100.118.180.7#53

Name:   www.hashicorp.com
Address: 100.119.113.220
»Boundary Client Agent operations
With the introduction of the Client Agent, comes some commands to manage the operation of it.
»Status
The status command provides the user with the status of the Client Agent. As shown in the output below, you are shown the address of the Boundary cluster, the status of the Client Agent, and some information pertaining to the authorization token and version. If there are any errors in relation to the operation of the Client Agent, these will be displayed under the ‘Recent errors:’ section. The default auth token expiry is 7 days and is configurable.
% boundary client-agent status

Status:
  Address:                 https://12345678-9012-3456-a8a7-6d8c8e1bc44c.boundary.hashicorp.cloud
  Auth Token Expiration:   148h18m48s
  Auth Token Id:           at_fYfwLL7jpB
  Status:                  running
  Version:                 0.1.0
  Recent errors:
»Pause
The pause command stops the Client Agent currently running. After you initiate the command, as shown in the output below, you will receive confirmation that the Client Agent has successfully paused.
% boundary client-agent pause
The client agent has been successfully paused.
If you were to check the status of your DNS resolvers again, you will see that it has gone back to one of your previously set resolvers.
DNS configuration (for scoped queries)

resolver #1
  search domain[0] : Home
  nameserver[0] : 192.168.0.1
  nameserver[1] : fd69:2e4c:8e52:0:3e45:7aff:fe52:9620
  if_index : 15 (en0)
  flags    : Scoped, Request A records, Request AAAA records
  reach    : 0x00020002 (Reachable,Directly Reachable Address)
»Resume
The resume command restarts the Client Agent and it will once again become the primary DNS resolver.
% boundary client-agent resume
The client agent has been successfully resumed.
»Example deployment: Access to private HTTPS targets with transparent sessions
To illustrate and demonstrate how organizations can leverage Boundary with transparent sessions, I have built the topology outlined below. There are no VPN connections in this workflow, but by leveraging HCP Boundary and multi-hop workers, you can facilitate connectivity into private networks (i.e. your organization’s network) securely, while ensuring organizations do not have to create any additional inbound rules in their firewalls / security rule groups.
Everything has been automated using Terraform, and the code can be found here.
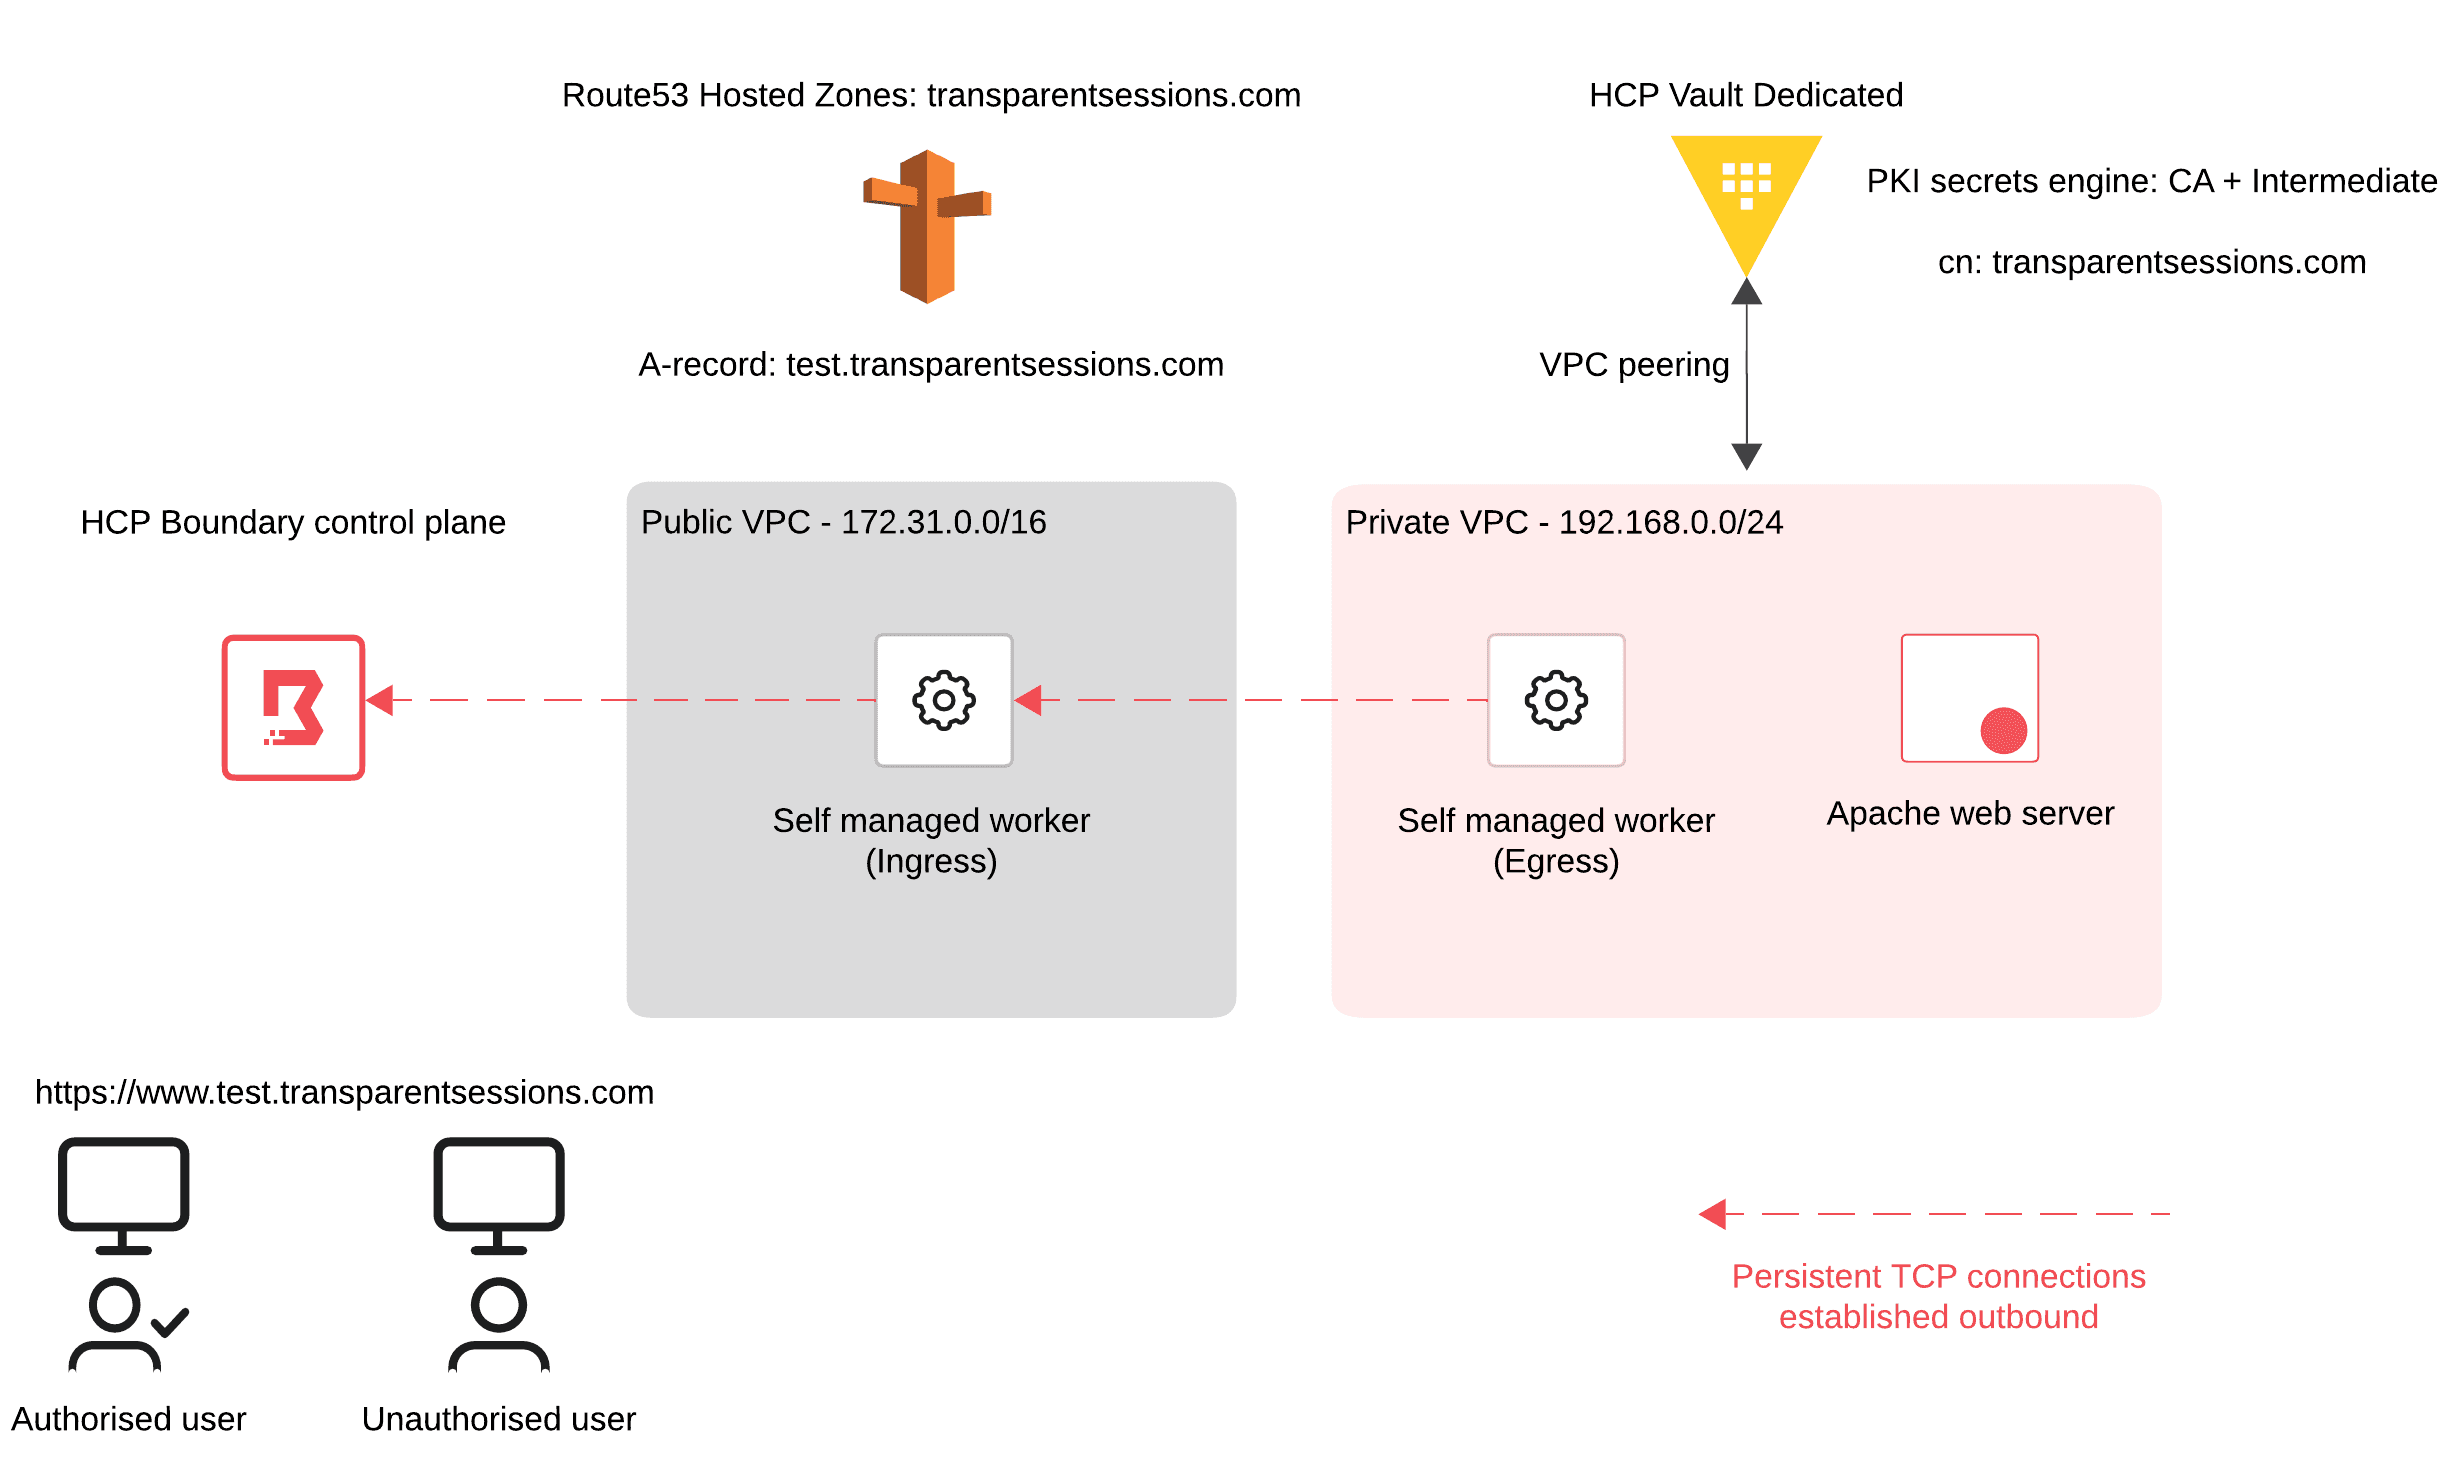
I have my domain transparentsessions.com and have created an A-record in Route 53 as test.transparentsessions.com. I have both a public and private VPC with a self-managed Boundary worker in each.
You can see in the private VPC that the address is from the RFC1918 Class C 192.168.0.0 range and cannot be accessed directly from outside of that network. The EC2 instance that gets deployed in the private VPC is configured to install an Apache web server, create a basic HTML web page, and utilize the Vault PKI secrets engine from HCP Vault Dedicated to fetch the generated, requisite certificates that will ensure you can access the site securely using HTTPS. We will configure our machine to trust this CA in a later step.
At the bottom of the diagram you have two personas: an authorized user and an unauthorized user. This is a rudimentary example, but I wanted to emphasize that you will need to control/restrict access to HTTPS endpoints/resources within your organization based on different personas.
»Assigning an alias
As previously mentioned, you have to assign the Boundary alias to the target in question. In my example, the target is an instance of Ubuntu Linux residing in the private network within AWS. In the Terraform config you have two resources that constitute the target and the alias.
The boundary_target resource is your target within Boundary. The configuration specifies the type to be tcp, allocates the ingress and egress workers to use, sets the project scope for the target to reside in, and sets the default port to be 443 (HTTPS).
resource "boundary_target" "ubuntu_linux_private" {
 type                     = "tcp"
 name                     = "ubuntu-private-linux"
 description              = "Ubuntu Linux Private Target"
 egress_worker_filter     = " \"sm-egress-downstream-worker1\" in \"/tags/type\" "
 ingress_worker_filter    = " \"sm-ingress-upstream-worker1\" in \"/tags/type\" "
 scope_id                 = boundary_scope.project.id
 session_connection_limit = -1
 default_port             = 443
 host_source_ids = [
   boundary_host_set_static.ubuntu_linux_machines.id
 ]
}
The second resource is the boundary_alias_target. Looking at the configuration below, I have specified the scope (at the time of writing, aliases are always defined at the Global scope level), the value of the alias, which is set to test.transparentsessions.com, and the destination_id, which is the target that you associate the alias with. (in this example, it’s the Ubuntu Linux resource outlined above)
resource "boundary_alias_target" "ts_alias_target" {
 name                      = "transparent_sessions_alias_target"
 description               = "Alias to target using test.transparentsessions.com"
 scope_id                  = "global"
 value                     = "test.transparentsessions.com"
 destination_id            = boundary_target.ubuntu_linux_private.id
 authorize_session_host_id = boundary_host_static.ubuntu_private_linux.id
}
»Users
To ensure clarity, I only have two personas created, as previously discussed: authorized user and unauthorized user.
For the unauthorized user, I created a user via Terraform.
resource "boundary_account_password" "unauthorized_user" {
 auth_method_id = boundary_auth_method.password.id
 login_name     = "unauthorized"
 password       = "unauthorized"
}
After that, I needed to assign minimal permissions to that user.
resource "boundary_role" "unauthorized" {
 description = "read-auth-token"
 grant_strings = [
   "type=auth-token;ids=*;actions=read:self",
   "type=user;actions=list-resolvable-aliases;ids=*",
 ]
 name          = "read-auth-token"
 principal_ids = [boundary_user.unauthorized_user.id]
 scope_id      = "global"
}
In the above resource, you can see two grant strings that have been added:
-
"type=auth-token;ids=*;actions=read:self"This ensures that the user can authenticate to the Client Agent. -
"type=user;actions=list-resolvable-aliases;ids=*"This ensures that the user can read the aliases that are part of the overall transparent sessions workflow.
No other permissions are granted to this user. Of course, within your organization, users and/or groups will have different grant strings attributed based on who they are and their role(s).
For the authorized user, I have given read access in the global scope and full access in the org and project scopes:
resource "boundary_role" "authorized_global_role" {
 name          = "authorized_global_role"
 description   = "Authorized Global Role"
 scope_id      = "global"
 principal_ids = [boundary_user.authorized_user.id]
 grant_strings = [
   "ids=*;type=*;actions=read",
   "type=auth-token;ids=*;actions=read:self",
   "type=user;actions=list-resolvable-aliases;ids=*",
 ]
}


resource "boundary_role" "authorized_org_role" {
 name          = "authorized_org_role"
 description   = "Authorized Org Role"
 scope_id      = boundary_scope.org.id
 principal_ids = [boundary_user.authorized_user.id]
 grant_strings = ["ids=*;type=*;actions=*"]
}


resource "boundary_role" "authorized_project_role" {
 name          = "authorized_project_role"
 description   = "Authorized Project Role"
 scope_id      = boundary_scope.project.id
 principal_ids = [boundary_user.authorized_user.id]
 grant_strings = ["ids=*;type=*;actions=*", ]
}
»Add trusted cert to the keychain
After the Terraform deployment has finished, the pki_root.crt will be created in the directory. For this demo, you need to add this to your keychain on the machine in order to trust the certificate authority (CA) that has generated it. In this example, the CA is Vault.
sudo security add-trusted-cert -d -r trustRoot -k /Library/Keychains/System.keychain ./pki_root.crt
»Testing out the scenarios
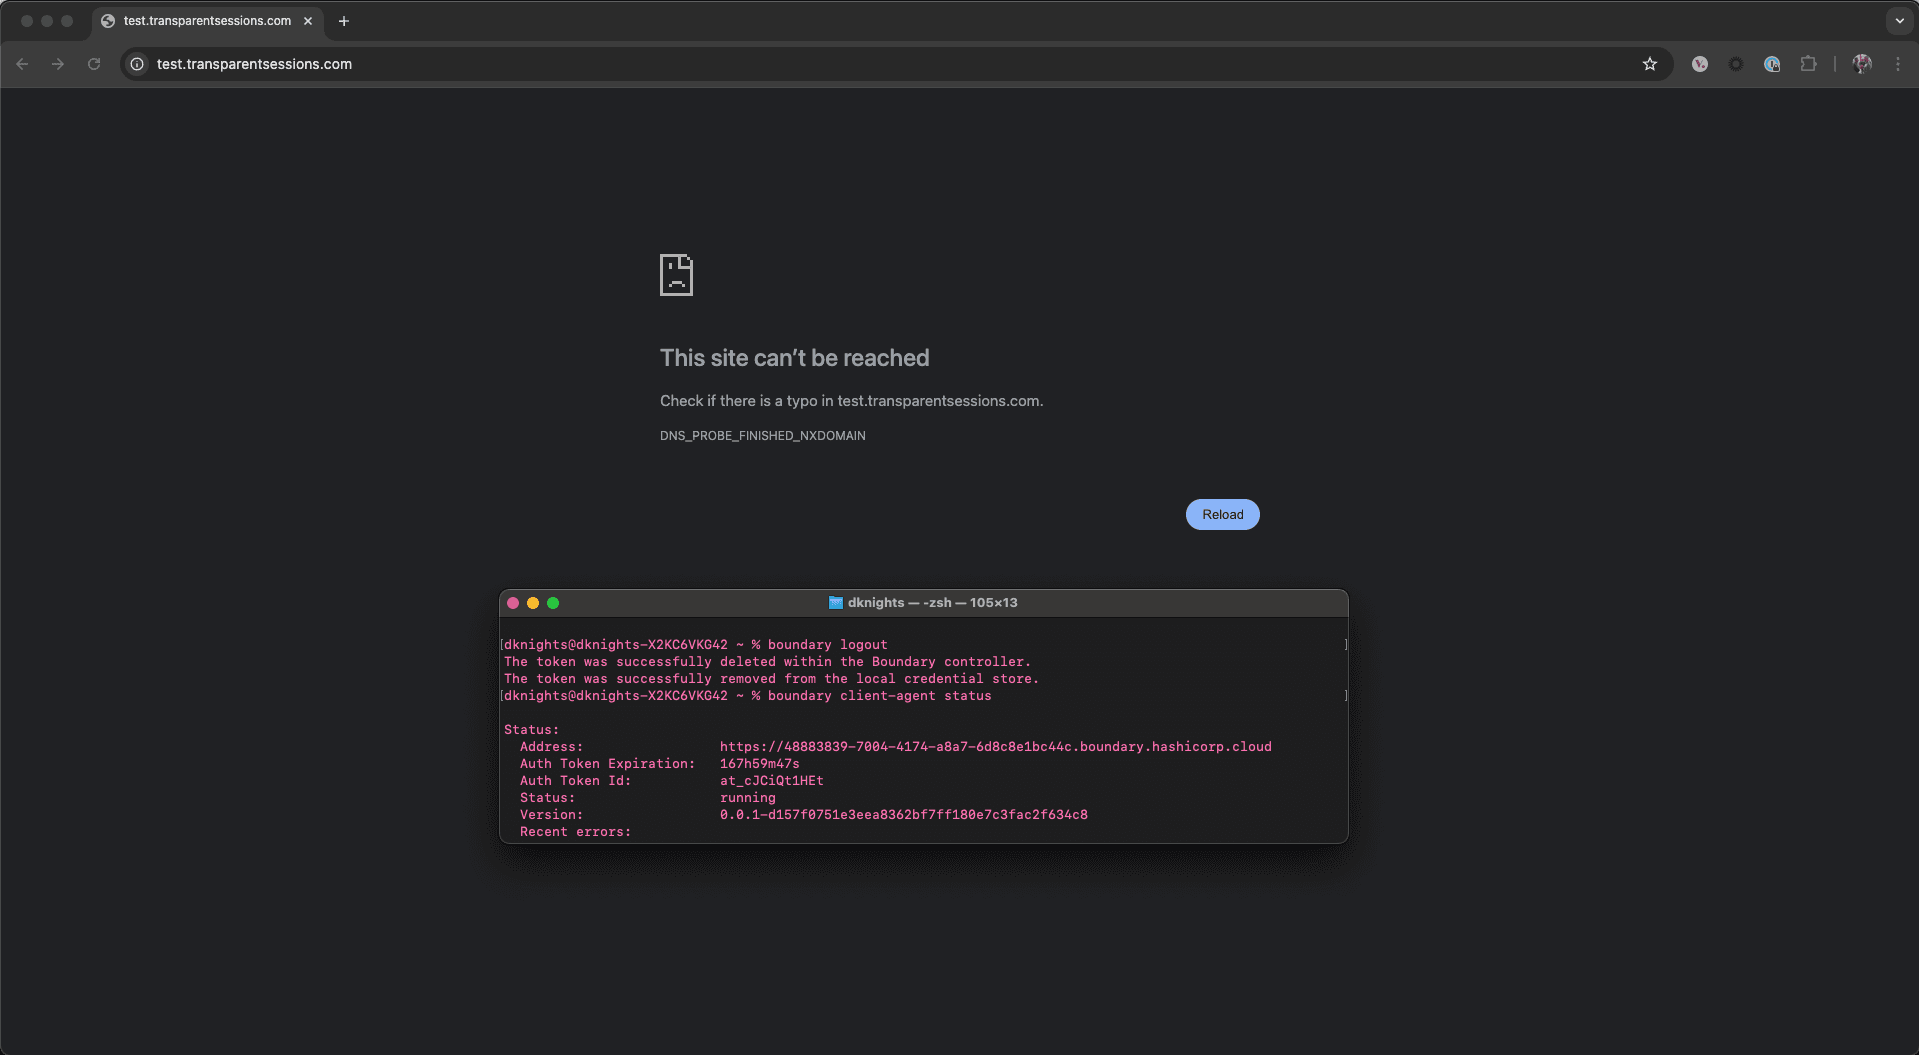
»1. Unauthenticated user
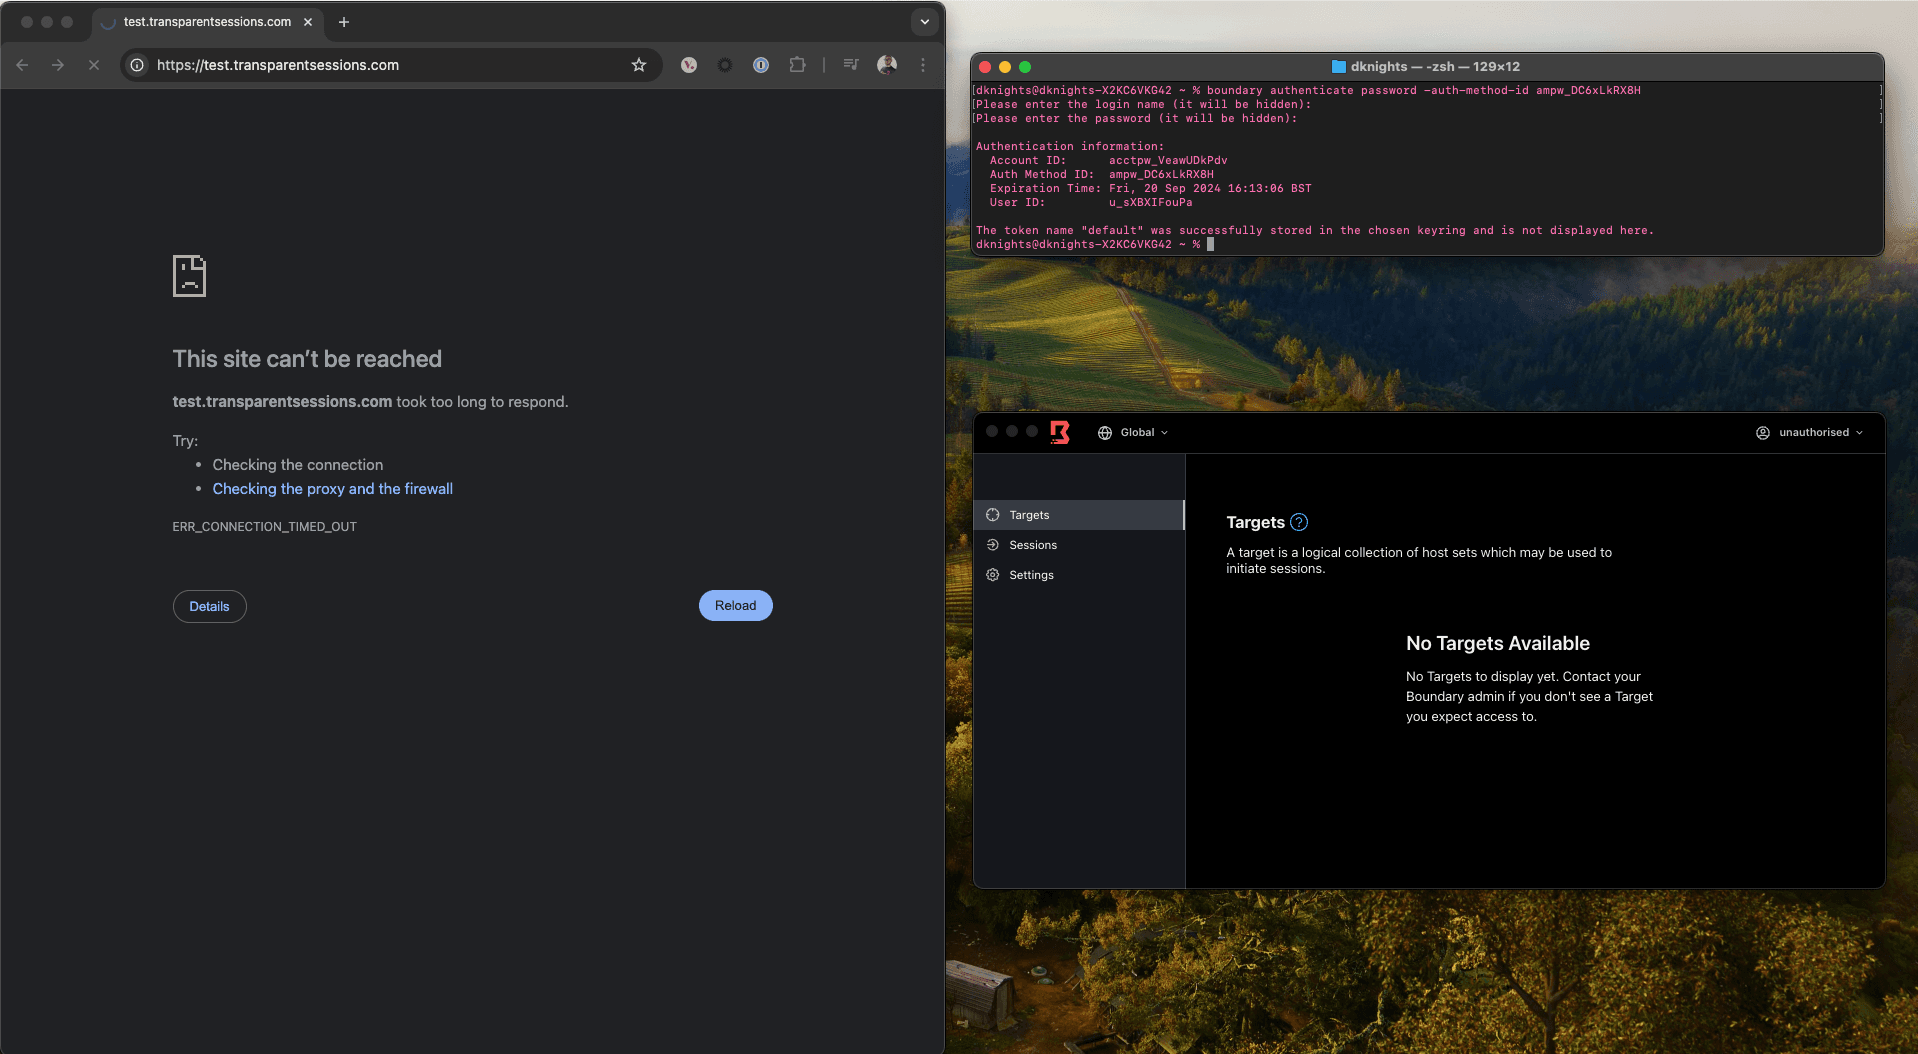
For the first scenario, I have logged out of Boundary and left the Client Agent running as displayed by the CLI output shown in the screenshot below. Trying to access https://test.transparentsessions.com fails as expected. Without Boundary and transparent sessions, I cannot access the website that sits in the 192.168.x.x address range within my AWS VPC in EU-West-2.
»2. Unauthorized user (authenticated but unauthorized)
For the second scenario I have authenticated into Boundary as the unauthorized user. you can see in the Desktop client that there are no targets available to connect to, and as expected, you cannot access the website.
»3. Authorized user (authenticated and authorized)
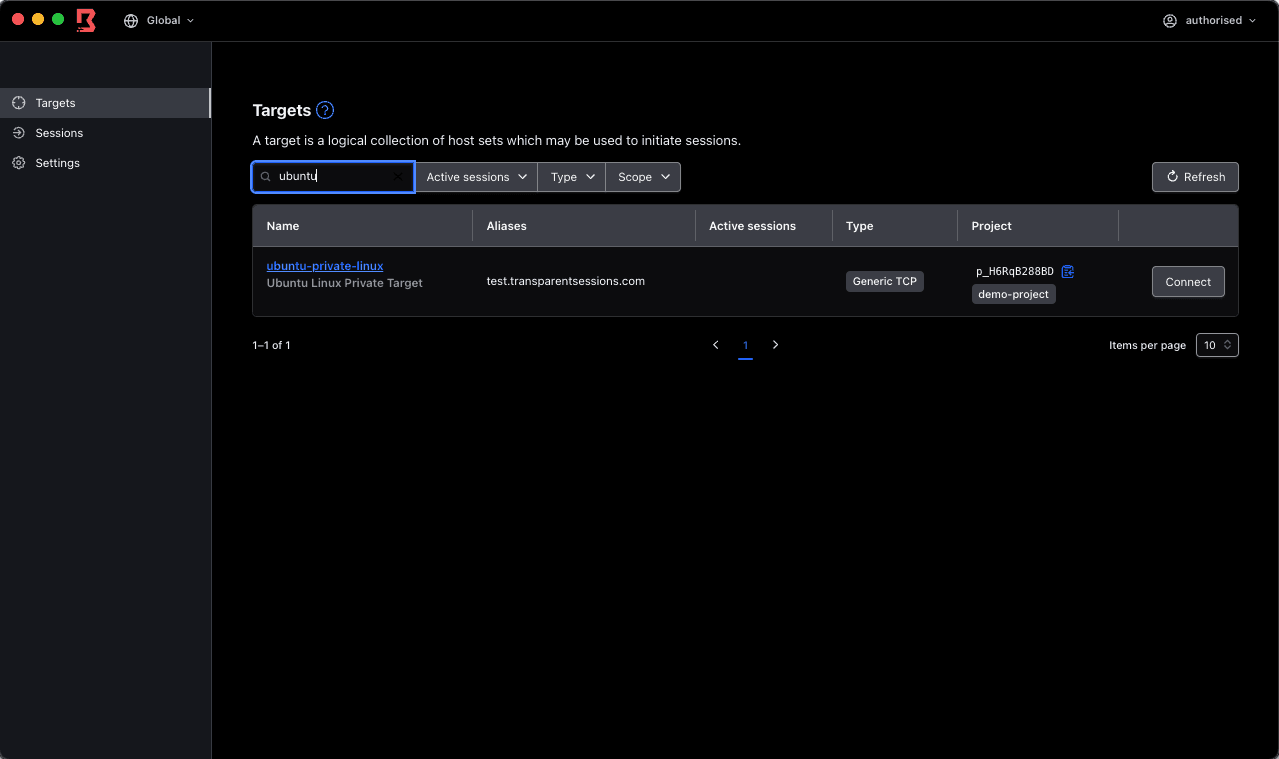
The final scenario is where an authenticated and authorized user tries to access the HTTPS target. You can see from the boundary-client-agent.log that you have successfully authenticated and a session was created on my behalf when I connected using the alias name test.transparentsessions.com. The Boundary Client Agent has found a matching alias that is attributed to a target and starts the proxy.

I have logged into the Desktop client as the authorized user, as shown in the top right corner of the screenshot, and I have the target available. This is further confirmed as you can see the alias details as our URL.
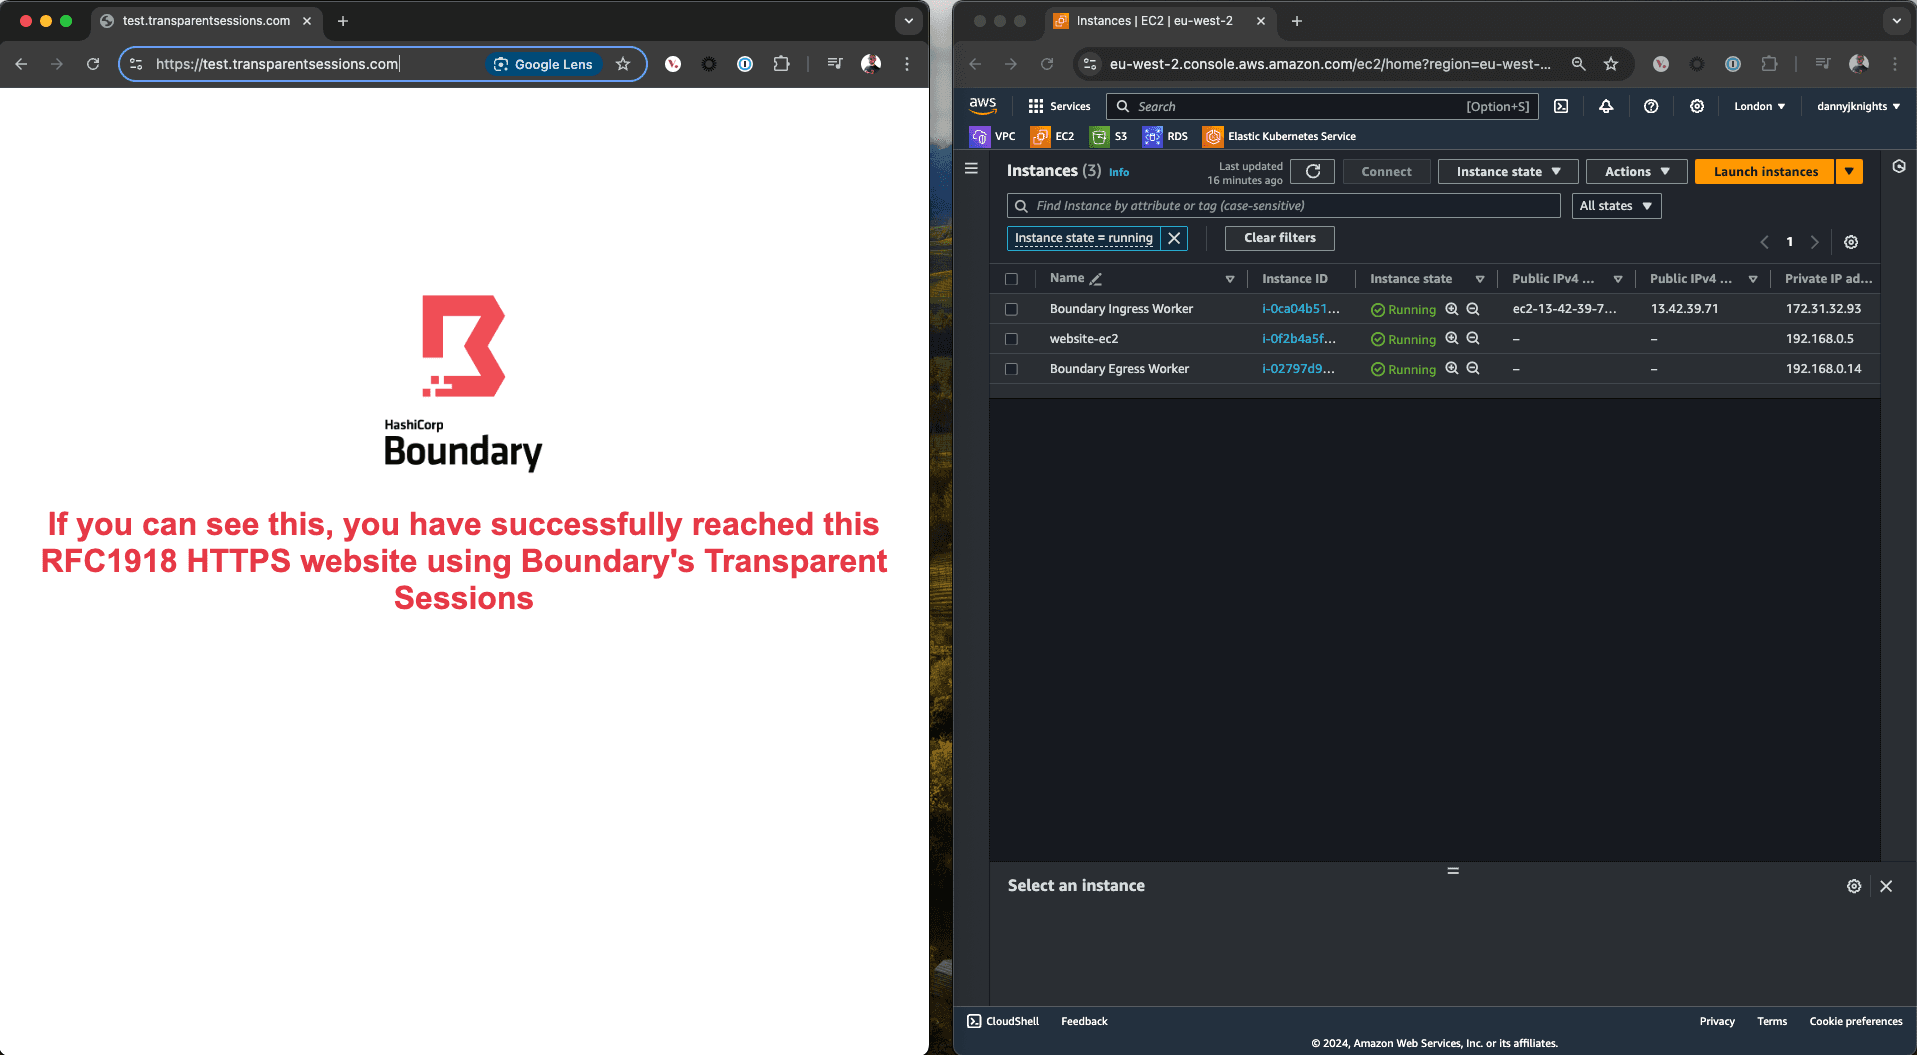
Now in a browser you can successfully reach the HTTPS target as you can see the web page. To hopefully add further credence, you can also see my AWS console that has the website-ec2 instance. If you look along that row it only has an RFC1918 192.168.0.0 address assigned and no Public IPv4 address, so I have successfully reached this HTTPS target while being on my own home network without the need for a VPN connection.
»Rethinking VPNs: How Boundary as a modern PAM takes the lead
A lot of the focus internally at HashiCorp has been around improving Boundary user experience and making connectivity simple and secure without introducing specific vendor CLI nuance to tried and tested workflows. This is obviously an important factor to the feature, but the picture is bigger.
VPNs have been a mainstay in organizations for many years and still feature heavily today. The ability to create that private, encrypted tunnel comes with some potential obstacles and issues:
- Complexity : Setting up secure VPNs is not a trivial task. Furthermore, the overhead of managing them, if not done correctly, could potentially create security vulnerabilities within your network.
- Cost: The overall cost of a VPN solution can add up. Whether this is infrastructure costs, where maintaining a VPN requires investment in hardware, software, and ongoing maintenance; or for licensing, which can be expensive, especially for large organizations with many users.
- Security : There is always the possibility that when you are bridged onto the network through a VPN, a user can move laterally around the network, potentially seeing targets and resources that they should not have the ability to see. Yes, there are third-party tools and native capabilities with some VPNs to control this, but then that becomes yet another touchpoint that you have to set up correctly and keep up to date. Furthermore, VPNs do not manage the credentials required to securely authenticate to your desired targets.
When you compare the points above to a Boundary deployment with transparent sessions, then it’s a different narrative. From a complexity perspective, if you are using HCP Boundary then it’s a push-button deployment and HashiCorp manages the infrastructure for you. Even with self-managed Boundary deployments, you have Terraform modules to stand-up the environment. But the main advantage is better security.
As Boundary can be integrated with your IdP of choice. You can also control what targets / resources each authenticated user has access to from a central point, based on their role within your organization. An example I often give is that if I am a server admin, then arguably the only resources I’d need to have access to, to do my job, are servers. The same analogy applies to databases and DBAs.
In addition, the general onboarding and offboarding process for users in your organization is also driven via your IdP and automatically reflected in Boundary using managed groups. This all aids in reducing the operational complexity and toil within your environment.
So, are you now at a point where organizations can start to rethink their VPN strategy in favor of a Boundary deployment? Well, I mentioned that in one of my previous blogs when I discussed a Boundary multi-hop worker deployment. This is where you deploy an ingress worker that is publicly addressed, as well as deploying one or more egress workers that are residing within a private network(s). Users can then reach targets within that private network, but without the use of a VPN. However you couldn’t control secure access to HTTPS targets — whether that be internally hosted web pages or internally hosted SaaS applications.
With the addition of transparent sessions, you can. Organizations can now fully control access to their privately hosted SaaS targets, websites, other HTTPS targets, SSH, remote desktop, Kubernetes, database, and anything else that supports TCP. With the addition of transparent sessions, Boundary has now taken a leap forward to be positioned to remove VPNs from your environment, along with the associated risk, complexity, and cost.
»Try HCP Boundary for free
To try this solution for yourself, the GitHub repo can be found here. To sign up for a free trial of HashiCorp’s managed Boundary service, the HashiCorp Cloud Platform Boundary product is free for the first 5 users.


