As enterprises accelerate their digital strategies, adoption of hybrid or multi-cloud architectures are becoming the new norm, requiring a fundamental shift in how infrastructure is provisioned and managed. When managing secure administration access to Unix-like servers, SSH is still the standard connectivity method. However, it does come with challenges and risks, especially in relation to key management.
The common reaction to the growing risks around key management is to simply seek out “SSH key management tools” in Google and review industry reports. But implementing products in this one category is just treating a symptom of a bigger challenge: secrets management. In this blog post, I will show you an SSH access architecture that will simplify SSH access using a scalable, secure, and consistent experience both on-premises and in public clouds. You can also view a demonstration of this architecture in this presentation: Leveraging Signed SSH for Remote Access with Vault.
»Risks with SSH Key Based Authentication
Let’s begin by reviewing the limitations of SSH key-based authentication and what problems we are trying to solve:
- Risk of private key compromise: Users will sometimes mishandle private keys, intentionally or unintentionally exposing them to other users or placing them in insecure locations.
- Key rotation: Revoking private keys is a complex operation. How do you ensure that all copies of the private key are accounted for? What happens when administrators who have made copies of private keys leave the company?
- Risk of unauthorized access: Over time, large collections of keys are created and implemented in multiple systems. Not having an inventory that tracks the usage of these keys, their relationships, what systems they access, and their usage patterns raises the risks of unauthorized access.
- Scalability and complexity: Managing the keys across multiple systems and cloud environments consistently is a complex operation. Different architectures are introduced depending on which cloud environment the hosts are deployed to. The likelihood of incidents due to SSH key mismanagement is growing, and so is the level of harm these incidents can cause. When organizations Google “SSH key management tools” looking for answers, the results are often expensive and complex solutions that weren’t built for the low-trust perimeters of the public cloud. Any service outage in one of these SSH key management tools typically results in no access to any host.
»A (Much) Better Alternative
I’ve already mentioned that organizations need a solution that addresses all of the challenges listed above — improving the SSH user experience and the security of SSH access to your hosts using a standard architecture that can be deployed in any environment. Many of the Global 2000 customers I’ve worked with are getting this result using a combination of HashiCorp Vault and SSH certificate authentication. I’m going to show you how this looks.
»Architecture Requirements
This architecture is designed to achieve the following outcomes:
- Enable and enforce identity-based security, where users and applications must authenticate first before being granted the ability to SSH into a host.
- Enable a role-based access control (RBAC) model for SSH access to hosts where policies control which hosts can be accessed by the SSH client.
- Provide short-lived SSH credentials that expire.
- Simplify the SSH workflows and key management.
- Be applicable in any environment: private, hybrid, and multi-cloud.
»SSH Certificate Authentication
SSH certificates work in a way similar to SSL certificates. SSH certs are simply a public key signed by a trusted entity called the certificate authority (CA). They introduce important features that will be used in this architecture:
- SSH certificates are signed with a valid time and will automatically expire once the certificate has reached its expiry time. It can no longer be used by a client to connect to the target host once expired.
- Valid SSH certificates can only be signed by the trusted CA’s private key.
- It is possible to pass on additional SSH instructions in the signing of the SSH certificate, such as disabling port forwarding or adding usernames the certificate will be signed for.
»SSH Configuration Features
There are many SSH host configurations. Some are not used commonly since they do not typically apply to SSH key authentication methods. There is a specific configuration that is used to complete this architecture, the sshd AuthorizedPrincipalsFile configuration.
»SSH Certificate Authority (CA) — HashiCorp Vault
HashiCorp Vault is a secrets management solution that programmatically brokers access to systems for both humans and machines. It can provide just-in-time secrets such as database credentials, PKI certificates, cloud IAM credentials, and many others.
In this use case, Vault will use its SSH Secrets Engine, allowing it to function as our SSH CA. It also provides granular access controls to SSH certificate parameters and signing, which is enforced by Vault policies.
»The Workflow Outline
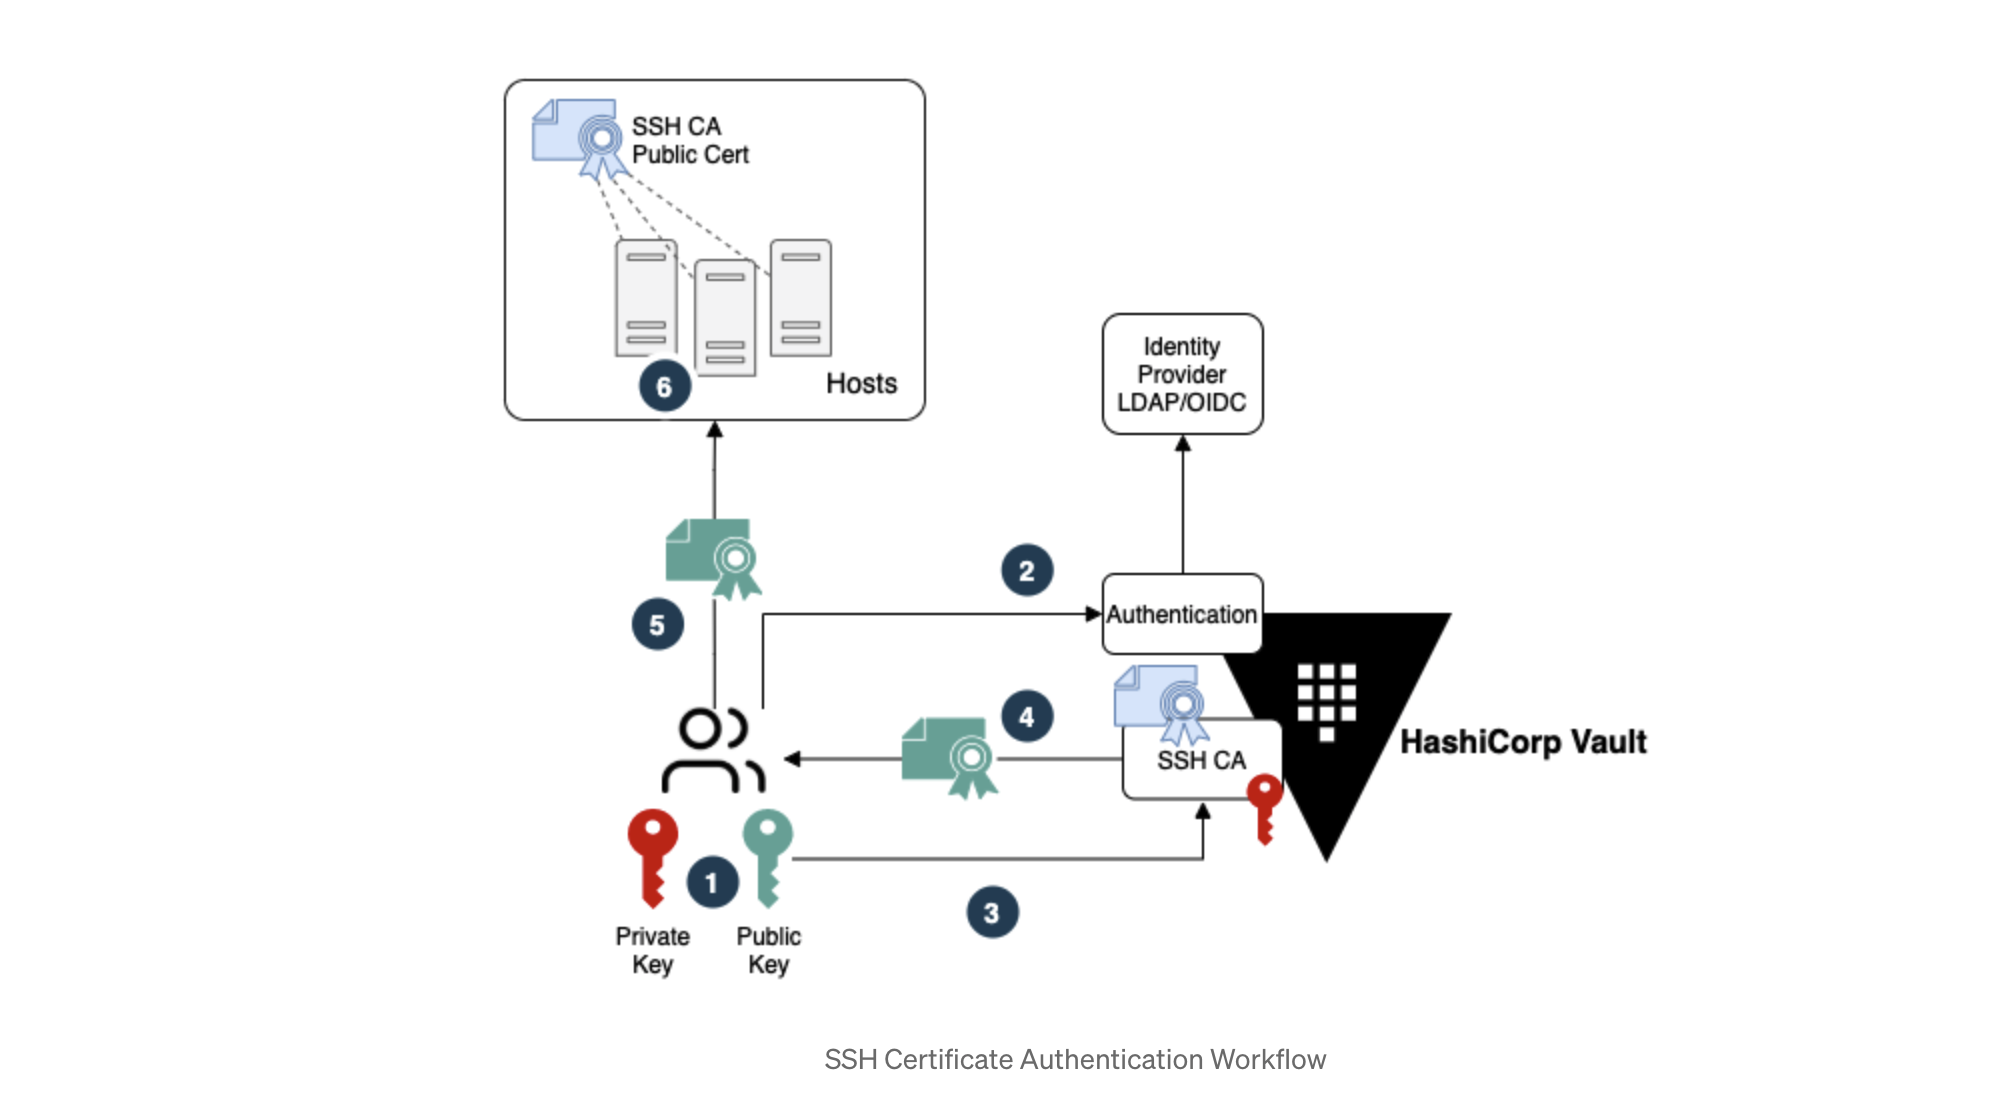
My architecture to implement SSH certificate authentication with HashiCorp Vault looks like this:

The numbers in the diagram represent the following steps:
- User creates a personal SSH key pair.
- User authenticates to Vault with their Identity Provider (IDP) credentials.
- Once authenticated, the user sends their SSH public key to Vault for signing.
- Vault signs the SSH key and return the SSH certificate to the user.
- User initiates SSH connection using the SSH certificate.
- Host verifies the client SSH certificate is signed by the trusted SSH CA and allows connection.
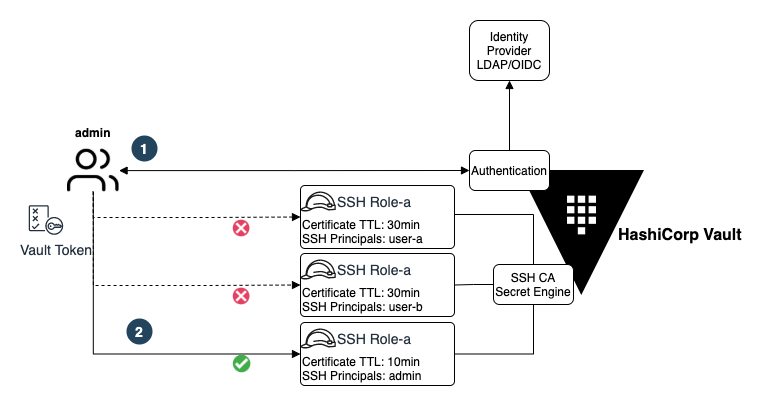
To expand on this, the Vault SSH Secret Engine can contain multiple Vault roles, where each role will contain the parameters that will be used during the SSH key signing. This allows different SSH certificates to be signed with different parameters and principals depending on the Vault role configurations. By using Vault policies, we achieve further control over who has access to these SSH CA roles.
The Vault SSH Secret Engine and roles diagram below illustrates an example:

Once a user successfully authenticates to Vault, a Vault token will be dynamically generated with an attached policy that dictates which services and secrets can be accessed by the user.
»Prerequisites
For the configurations below, you will need to have Vault running and unsealed. It is possible to test these configurations out locally by running Vault in dev mode. For Vault installation instructions, read the getting started with Vault guide.
»User Requirements
The configurations will be used to set up the following user access requirements.

I will expand on these requirements in the subsequent sections.
»Vault Configurations
The following steps will be used to configure Vault. For all the configurations I’ll use the Vault CLI.
»Mount UserPass Authentication Method, Create Users, and Attach Policies
For the sake of simplicity, we’ll use the UserPass authentication method. Vault will act as your identity broker, giving you the ability to leverage many other authentication methods that Vault supports such as LDAP or OIDC authentication. Here is an example of how to set up OIDC authentication with Azure AD.
Let’s set up three Vault accounts to represent the users that require SSH client access to hosts.

vault auth enable userpass

vault write auth/userpass/users/alice password="passw0rd" policies="administrator-policy"

vault write auth/userpass/users/bob password="passw0rd" policies="team-a-policy"

vault write auth/userpass/users/tim password="passw0rd" policies="team-b-policy"
The Vault policies will be set up at a later stage.
»Mount Vault SSH Certificate Secret Engine and Generate SSH CA Key Pair
The Vault SSH secret engine will need to be mounted and a signing key generated.
vault secrets enable -path=ssh-client-signer ssh

vault write ssh-client-signer/config/ca generate_signing_key=true
You should get the following output, showing the SSH CA public key, which will be used later on in the host configurations.
Success! Enabled the ssh secrets engine at: ssh-client-signer/

Key Value
— — — — -
public_key ssh-rsa AAAAB3NzaC1yc2EAAAADAQABAAACAQDthG9+wjEvCgqBVlBpifXK2PhjXzmjt2+3kN6J6CGsZpeevdlMtxutaAmALfREGYKGol4pqwzJrT5iGp3LAenuiC97x1skItXWrM+BYwyiaU0f8XjBIOPrviBN0v+H6XgoFlujxvdKgJ4+diORkaqtW4gz3Fhe/Gq/3s5WZ5MnB+UZsvYPhd0zuQorEoaYAqarwxq30XPSYEFaH6zqefddJaejMd8PiKGuFdhLHjnZ5jU0r+vpZfrcuQ+81RhVxD4wtiKmouO3zW8bBVrYoURKLap5UlPu8RzPwbJ3PtqtNDkV7SxeNvbXP9mmfkwyBqsU4zaenDRlFqc8UG0SyU6JMM4nL6pLpicC8EC/tHb434U/WwmuHrYhKmpXt25G6cCAHyWxu/9WXqrj4C4Cn2w495WgxGs3EqM+DotSRPw7GkfyCujnpCddcjPc1L5RdHk/tGI26UrnxMHOEBa+zXVmTlEeRyqg3HCSwBejAk3AT1lk1I+D89ANWDgipnNY7UZG+lSsRZHyiKKbfyhaoUFo8JW0KR6vujqflPrzmOHHHyW6zYmBKO+EYTlaiwWAV8nUMl5XfnARmq4Lv6WL3dbdhur6LWY1WiDNviByntYaEDViRXl6lyqrYhrXONJbi0PLB9HuKL7z4m3K9OYgYS5ofFjoCVb9HGytGgEko1wQ==
»Create Vault Roles for signing client SSH keys
To sign the client keys, we will configure Vault roles to sign and issue SSH certificates with specific configurations based on users’ functional roles.

Three Vault SSH roles will be configured for signing SSH client keys, where each role will sign for a specific SSH principal.
Before we get to the code, A few important notes regarding Vault SSH role configurations:
allowed_users: This is the list of allowed users this CA role will sign for. If the requester attempts to get a key signed by specifying a different user not in the allowed_users list for that role, it will fail.
ttl: This is where certificate expiry is set when signing an SSH key. In this example it is set for 30 minutes. Once the certificate expires, a user must authenticate to Vault and request another signed SSH certificate.
administrator-role
vault write ssh-client-signer/roles/administrator-role -<<EOH
{
 “allow_user_certificates”: true,
 “allowed_users”: “administrator”,
 “allowed_extensions”: “”,
 “default_extensions”: [
 {
 “permit-pty”: “”
 }
 ],
 “key_type”: “ca”,
 “default_user”: “administrator”,
 “ttl”: “30m0s”
}
EOH
team-a-role
vault write ssh-client-signer/roles/team-a-role -<<EOH
{
 “allow_user_certificates”: true,
 “allowed_users”: “team-a”,
 “allowed_extensions”: “”,
 “default_extensions”: [
 {
 “permit-pty”: “”
 }
 ],
 “key_type”: “ca”,
 “default_user”: “team-a”,
 “ttl”: “30m0s”
}
EOH
team-b-role
vault write ssh-client-signer/roles/team-b-role -<<EOH
{
 “allow_user_certificates”: true,
 “allowed_users”: “team-b”,
 “allowed_extensions”: “”,
 “default_extensions”: [
 {
 “permit-pty”: “”
 }
 ],
 “key_type”: “ca”,
 “default_user”: “team-b”,
 “ttl”: “30m0s”
}
EOH
»Create Vault Policies
For each user created earlier, a corresponding policy will need to be configured. Here are the policy names:

These policies will restrict each user’s access to their authorized Vault SSH role for key signing. For example, Alice is an administrator and will require the SSH certificate signed with the administrator principal. She will have permissions to get her SSH public key signed by the administrator-role. She will not be able to use any other Vault SSH role as per the policy. There is an implicit deny on everything else.
administrator-policy
vault policy write administrator-policy — << EOF
# List available SSH roles
path “ssh-client-signer/roles/*” {
 capabilities = [“list”]
}
# Allow access to SSH role
path “ssh-client-signer/sign/administrator-role” {
 capabilities = [“create”,”update”]
}
EOF
team-a-policy
vault policy write team-a-policy — << EOF
# List available SSH roles
path “ssh-client-signer/roles/*” {
 capabilities = [“list”]
}
# Allow access to SSH role
path “ssh-client-signer/sign/team-a-role” {
 capabilities = [“create”,”update”]
}
EOF
team-b-policy
vault policy write team-b-policy — << EOF
# List available SSH roles
path “ssh-client-signer/roles/*” {
 capabilities = [“list”]
}
# Allow access to SSH role
path “ssh-client-signer/sign/team-b-role” {
 capabilities = [“create”,”update”]
}
EOF
»Host Configurations
A few steps are required to complete the SSH configurations on the host, however you can automate this setup by baking in these configurations into golden image servers or using configuration management tools. These steps are:
- Create local users on the server. These are the users that clients will use to SSH into the server.
- Setup an SSH CA public key on the server.
- Setup the
AuthorizedPrincipalsFileand SSH principal names. - Update
sshd_configand restart the SSH service. Let's proceed with the configuration:

»Create Local Users
These Linux accounts will be used for administrator and application user logins.
sudo useradd -m admin
sudo useradd -m appadmin
»Update Trusted SSH CA Public Key
Navigate to the SSH directory and create a file that contains the SSH CA public key, this was previously configured in the Mount Vault SSH Certificate Secret Engine and Generate SSH CA Key Pair section.
cd /etc/ssh

sudo echo ‘ssh-rsa AAAAB3NzaC1yc2EAAAADAQABAAACAQDthG9+wjEvCgqBVlBpifXK2PhjXzmjt2+3kN6J6CGsZpeevdlMtxutaAmALfREGYKGol4pqwzJrT5iGp3LAenuiC97x1skItXWrM+BYwyiaU0f8XjBIOPrviBN0v+H6XgoFlujxvdKgJ4+diORkaqtW4gz3Fhe/Gq/3s5WZ5MnB+UZsvYPhd0zuQorEoaYAqarwxq30XPSYEFaH6zqefddJaejMd8PiKGuFdhLHjnZ5jU0r+vpZfrcuQ+81RhVxD4wtiKmouO3zW8bBVrYoURKLap5UlPu8RzPwbJ3PtqtNDkV7SxeNvbXP9mmfkwyBqsU4zaenDRlFqc8UG0SyU6JMM4nL6pLpicC8EC/tHb434U/WwmuHrYhKmpXt25G6cCAHyWxu/9WXqrj4C4Cn2w495WgxGs3EqM+DotSRPw7GkfyCujnpCddcjPc1L5RdHk/tGI26UrnxMHOEBa+zXVmTlEeRyqg3HCSwBejAk3AT1lk1I+D89ANWDgipnNY7UZG+lSsRZHyiKKbfyhaoUFo8JW0KR6vujqflPrzmOHHHyW6zYmBKO+EYTlaiwWAV8nUMl5XfnARmq4Lv6WL3dbdhur6LWY1WiDNviByntYaEDViRXl6lyqrYhrXONJbi0PLB9HuKL7z4m3K9OYgYS5ofFjoCVb9HGytGgEko1wQ==’ > trusted-CA.pem
»Create AuthorizedPrincipalsFile File Structure
The AuthorizedPrincipalsFile configurations are important to further control which SSH principals are accepted for certificate authentication. For client authentication to be successful, the principal in the signed SSH certificate must appear in the AuthorizedPrincipalsFile file. For now, let’s set up AuthorizedPrincipalsFile for the administrator and team-a principals only. We will revisit team-b principal later on.
cd /etc/ssh

mkdir auth_principals/

sudo echo ‘administrator’ > admin
sudo echo ‘team-a’ > appadmin
»Update sshd_config Configuration and Restart Service
Update the SSH configuration file to reflect the required changes and enable SSH Certificate authentication. Add the following configurations to the sshd_config file.
AuthorizedPrincipalsFile /etc/ssh/auth_principals/%u
ChallengeResponseAuthentication no
PasswordAuthentication no
TrustedUserCAKeys /etc/ssh/trusted-CA.pem
The AuthorizedPrincipalsFile is the path containing the files listing the accepted principal names. The %u signifies that the file name will be the username of the Linux user. So in our case, the admin user will contain the administrator principal, the appadmin user will contain the team-a principal.
Don’t forget to restart the sshd service.
sudo service sshd restart
»Client Configurations
The user will only need to create an SSH key pair. The user’s SSH public key will be signed by the Vault SSH CA and returned to the user. This signed SSH certificate will then be used to connect to the target host.
Let's go through what that may look like for Alice, who is a systems administrator.
»Create SSH Key Pair
ssh-keygen -b 2048 -t rsa -f ~/.ssh/alice-key
ssh-add ~/.ssh/alice-key
»Login to Vault
Let’s login to Vault as Alice (administrator role), she should have permissions to access both servers. We are going to use the Vault CLI to authenticate with the UserPass authentication method. Notice the assigned policy:
vault login -method=userpass username=alice password=passw0rd

Success! You are now authenticated. The token information displayed below is already stored in the token helper. You do NOT need to run “vault login” again. Future Vault requests will automatically use this token.
Key                  Value
 — —                 — — -
token               s.QuJwJTa14g9EvPUPsVx0Lta2
token_accessor      wzxbGGElsJsyLibwVHOyBLjM
token_duration      768h
token_renewable     true
token_policies      [“administrator-policy” “default”]
identity_policies   []
policies            [“administrator-policy” “default”]
token_meta_username alice
»Request Signing of User SSH Public Key
Once authenticated, she should have permissions to use the Vault SSH role administrator-role to sign her public SSH key.
The signed certificate that is returned can be output to alice-signed-key.pub.
vault write -field=signed_key ssh-client-signer/sign/administrator-role \
 public_key=@$HOME/.ssh/alice-key.pub valid_principals=administrator > ~/.ssh/alice-signed-key.pub
Take note of the valid_principals requested: administrator. If Alice attempts to request any other principal not in the allowed_users list of the Vault SSH CA role, it will fail. This ensures that only authorized lists of SSH principals can be signed for, preventing a user from requesting other principals used by other teams.
In the next code snippet, note the contents of the certificate, specifically the Key ID, ttl, and the configured principal. It is possible to adjust these configurations in the Vault SSH role. For example, you could extend the TTL of the certificate to one hour or another length of time.
ssh-keygen -Lf ~/.ssh/alice-signed-key.pub
alice-signed-key.pub:
 Type: ssh-rsa-cert-v01@openssh.com user certificate
 Public key: RSA-CERT SHA256:xSGrnRx5QLitljNNWonCJtAzNhGqqVkt06hvlHSCy0w
 Signing CA: RSA SHA256:ZMDd6dr1awUMgkrYEwx6KO76BlIjTkvBTbxoHXryMHc (using ssh-rsa)
 Key ID: “vault-userpass-alice-c521ab9d1c7940b8ad96334d5a89c226d0333611aaa9592dd3a86f947482cb4c”
 Serial: 1539122095861524177
 Valid: from 2021–06–10T14:52:30 to 2021–06–10T15:23:00
 Principals:
 administrator
 Critical Options: (none)
 Extensions:
 permit-pty
»Login with SSH Certificate
The client should be able to SSH into the host using the signed SSH certificate:
ssh -i ~/.ssh/alice-signed-key.pub admin@server "whoami"
admin
If Alice attempts to login with any other username, for example appadmin user, it will fail:
ssh -i ~/.ssh/alice-signed-key.pub appadmin@server “whoami”
appadmin@server: Permission denied (publickey).
If you recall, the AuthorizedPrincipalsFile configuration for appadmin only has team-a as a listed principal. The administrator principal is not listed in the AuthorizedPrincipalsFile admin file.
»What About Bob and Tim?
Bob is in team-a and requirements specify that Bob should also have SSH access to the server. Let’s test Bob’s login:
Generate an SSH key pair for Bob:
ssh-keygen -b 2048 -t rsa -f ~/.ssh/bob-key -q -N “” 0>&-
ssh-add ~/.ssh/bob-key
Login to Vault:
vault login -method=userpass username=bob password=passw0rd

Success! You are now authenticated. The token information displayed below is already stored in the token helper. You do NOT need to run “vault login” again. Future Vault requests will automatically use this token.
Key                      Value
 — —                      — — -
token                     s.9INPgEYJQqRKeZ0FxRekQpHD
token_accessor            dUYyvvFsCbGTRKQNI4O8K9WO
token_duration            768h
token_renewable           true
token_policies            [“default” “team-a-policy”]
identity_policies         []
policies                  [“default” “team-a-policy”]
token_meta_username bob
Let's get the public key signed by Vault:
vault write -field=signed_key ssh-client-signer/sign/team-a-role \
 public_key=@$HOME/.ssh/bob-key.pub valid_principals=team-a > ~/.ssh/bob-signed-key.pub
Let's confirm the principal in the certificate team-a:
ssh-keygen -Lf ~/.ssh/bob-signed-key.pub

bob-signed-key.pub:
 Type: ssh-rsa-cert-v01@openssh.com user certificate
 Public key: RSA-CERT SHA256:moR3M+yGM2sQvRSmgobZx5OH/14rpGYIbmo9dw+VePg
 Signing CA: RSA SHA256:APvCMzgQirBY6PX8ZSaXgXVO6Bpops17pjHVo1RhUHo (using ssh-rsa)
 Key ID: “vault-userpass-bob-9a847733ec86336b10bd14a68286d9c79387ff5e2ba466086e6a3d770f9578f8”
 Serial: 3154484434744577453
 Valid: from 2021–06–11T17:26:49 to 2021–06–11T17:57:19
 Principals:
 team-a
 Critical Options: (none)
 Extensions:
 permit-pty
Now Bob can use the signed certificate to sign in with the appadmin user and team-a principal:
ssh -i ~/.ssh/bob-signed-key.pub -i ~/.ssh/bob-key appadmin@server “whoami”
appadmin
However, if Bob attempts to use the admin user, it will fail since the team-a principal is not allowed in the admin user on the host:
ssh -i ~/.ssh/bob-signed-key.pub -i ~/.ssh/bob-key admin@server “whoami”
admin@server: Permission denied (publickey).
What if Bob attempts to get his SSH public key signed with the administrator principal?
vault write -field=signed_key ssh-client-signer/sign/team-a-role \
 public_key=@$HOME/.ssh/bob-key.pub valid_principals=administrator > ~/.ssh/bob-signed-key.pub
Error writing data to ssh-client-signer/sign/administrator-role: Error making API request.
URL: PUT http://localhost:8200/v1/ssh-client-signer/sign/team-a-role
Code: 400. Errors:
* administrator is not a valid value for valid_principals
As for Tim, he will have no access at all to the server since the team-b principal has not been added to any of the AuthorizedPrincipalsFile configurations. Feel free to follow the same steps shown earlier for Bob to test access.
To allow Tim access to this specific server, the AuthorizedPrincipalsFile configuration will need to include the team-b principal under the appadmin file:
cd /etc/ssh/auth_principals

sudo echo ‘team-b’ >> appadmin
»Why is This Secure?
There are many advantages to this architecture for SSH access. Here are a few:
- Short-lived SSH certificates minimize the impact of leaked credentials.
- All certificate signing requests require authentication to the IDP. This behavior allows enterprises to use a central identity provider for authorized SSH access to servers. Multi-factor authentication can also be enabled in the process for better security.
- Minimal changes are needed on the host side with no requirements for additional components such as SSH privileged access management (PAM) or 3rd party plugins.
- When using
AuthorizedPrincipalsFilein conjunction with Vault SSH roles you can provide granular SSH access to selective hosts based on the user’s role, function, or team. - There are no requirements in this setup for hosts to connect to Vault directly since the hosts only require the SSH CA public certificate.
- The SSH CA private key is protected and never leaves the Vault.
- All Vault authentication attempts and key signing requests are logged in an audit trail.
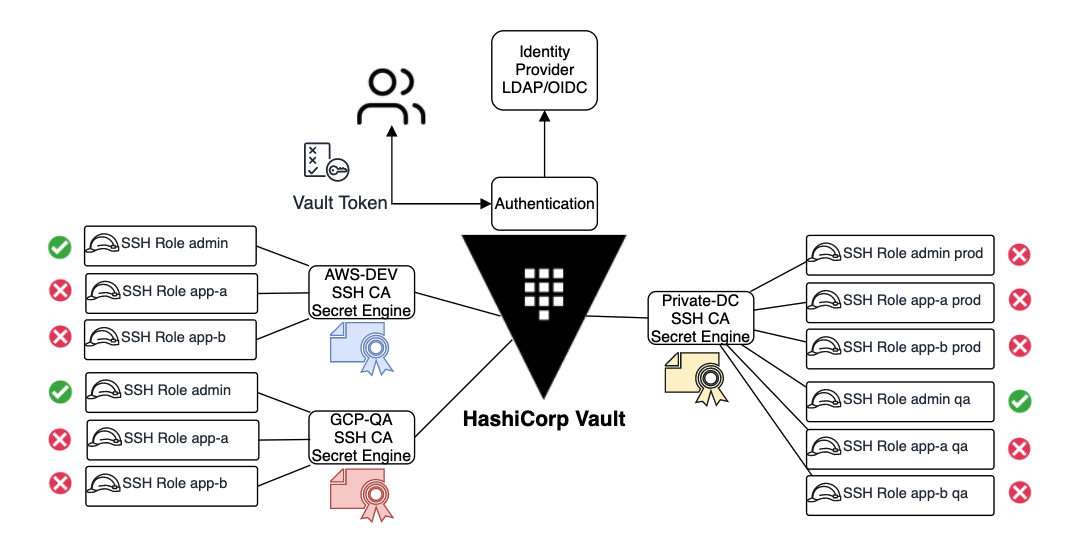
- It is possible to create multiple SSH CA instances with Vault that cater to different environments such as dev, test, and production servers.
- This architecture is very flexible and can be used across any cloud and on-premises for SSH access to Linux servers. Multiple Vault SSH CAs can be configured for different environments, each one having its own SSH roles and associated policies to further control which target hosts can be accessed.

Above is an architecture diagram of multiple Vault SSH CAs managing multiple SSH roles for different permissions.
»Review and Additional Resources
We have covered a lot in this post, with detailed insights on how to effectively manage SSH access at scale using Vault and SSH certificates. Managing SSH access across multiple environments with SSH key authentication is challenging and many enterprises struggle as they scale while trying to manage SSH access to hundreds or thousands of hosts. For more information, here are a few resources:
- SSH Secrets Engine: One-Time SSH Password
- Signed SSH Certificates - SSH - Secrets Engines
- Leveraging Signed SSH for Remote Access with Vault
- sshd_config(5) If you need more clarification on this walkthrough, feel free to message me on Twitter.


